|
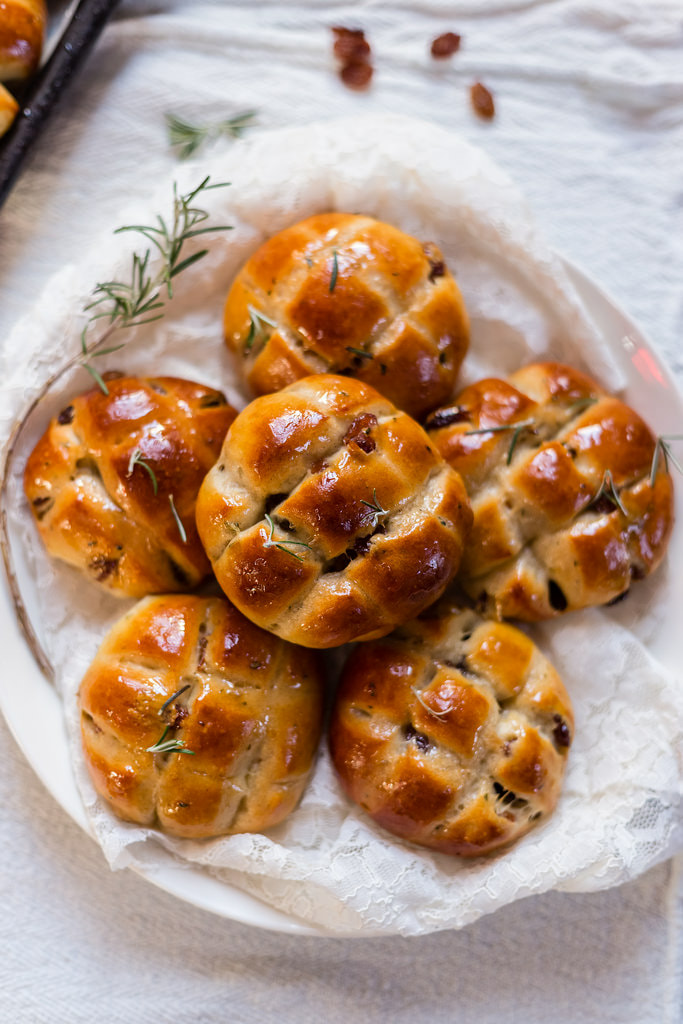
Without a doubt, one of the best ways to discover truly authentic Italian recipes is to subscribe to Pasta Grammar's YouTube channel. Follow them on social media too... @PastaGrammer. You see, aside from the nonnas on the Pasta Grannies YouTube channel, this raven haired Calabrese, Eva is one of the best cooks who uses traditional techniques for traditional Italian dishes. Her recipe for ciabatta is one you'll want to make every week. --Jerry Finzi 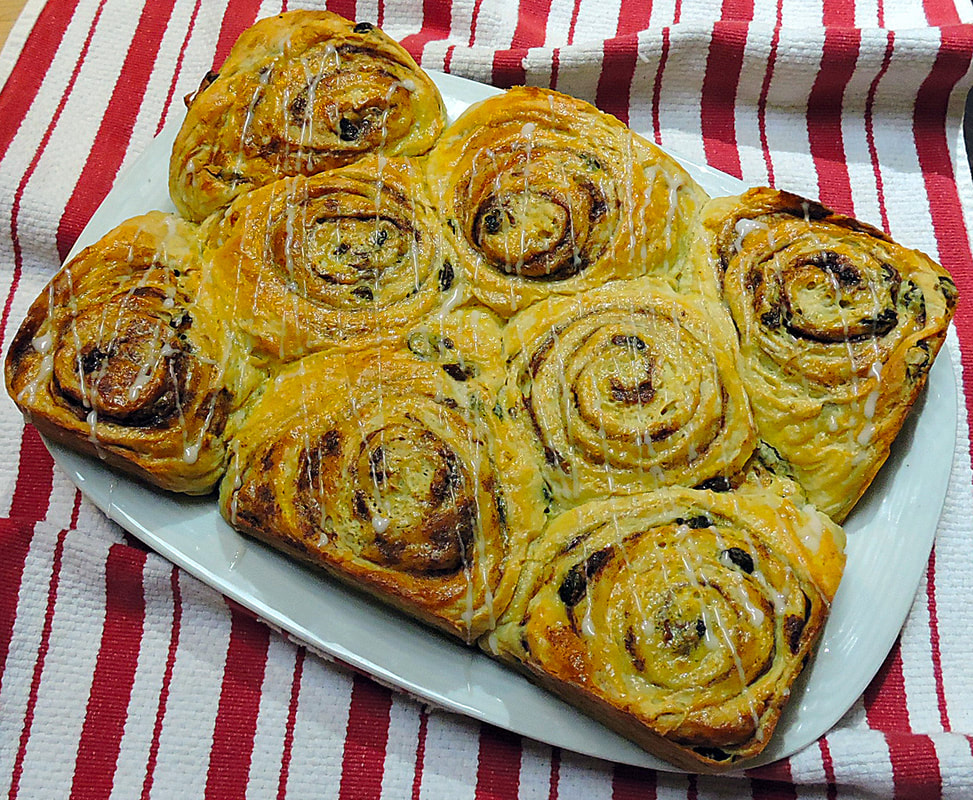 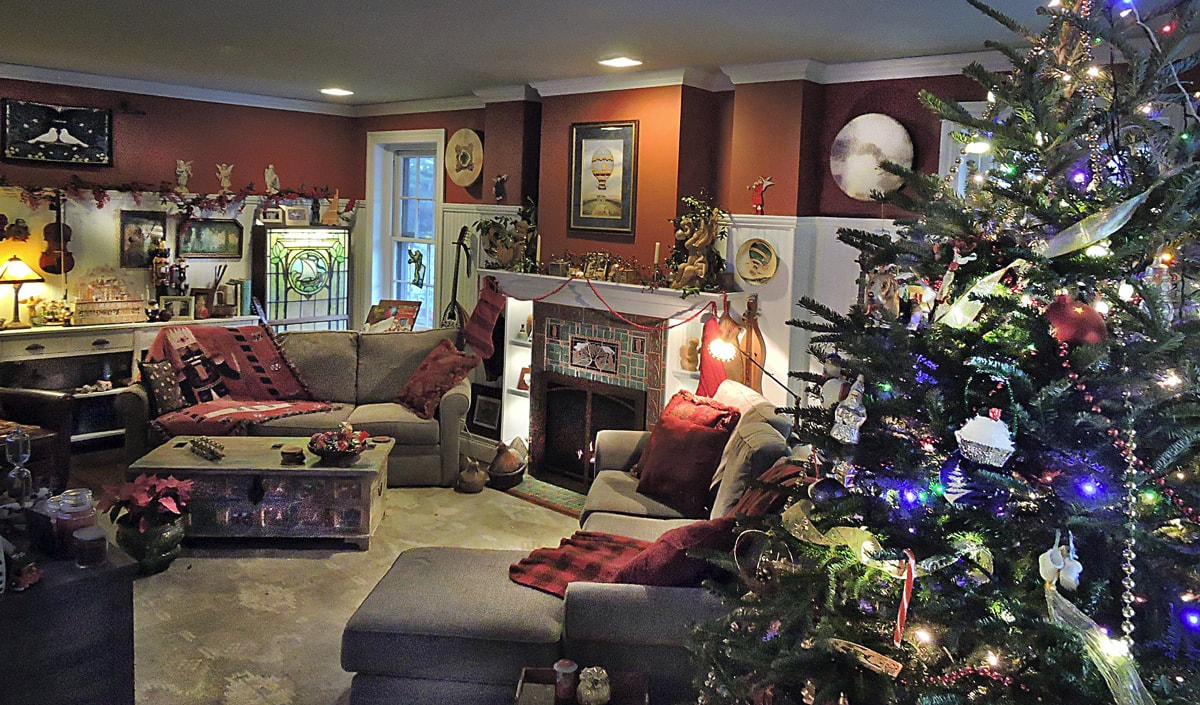 Natale a casa Finzi Natale a casa Finzi Since my son Lucas was small, we have obviously dedicated early Christmas morning to opening gifts. This early morning sharing of love for each other has often stretched past noon, depending on the number of gifts to open. Admittedly, "We Three" (as we call our little famiglia) spoil each other, with multiple gifts and overstuffed stockings hanging on the mantle--some gifts even celebrate Italian cuisine. (This year, my favorite was a 5 pound caciocavallo cheese from Puglia!). This can be a long ordeal (when Lucas was little, it might take all day), so one tradition we've tried to keep is making my recipe for cinnamon-raisin and walnut buns the day before so we can easily heat them up and ice them for our Christmas breakfast. There's nothing better than one of these buns with a hot chocolate on Christmas morning. It's also a quick, simple breakfast to make that won't delay the opening of gifts. Here is the recipe, which can make enough to enjoy throughout the entire Natale season... 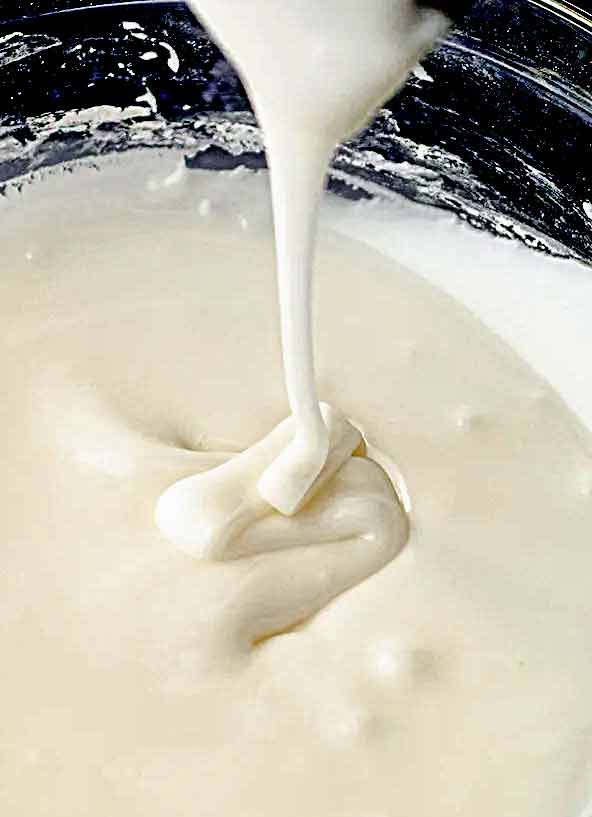 Babbo Finzi's Raisin-Cinnamon-Walnut Buns This recipe makes about 18 buns, about 5" across Ingredients Dough 4 Large Eggs 1 cup warm water (105-110 F) 1/2 cup orange juice 1/4 cup mild honey (Acacia honey is best) 2 tablespoons active dry yeast 7-1/2 - 8 cups all purpose flour 2 teaspoons fine sea salt (I use Baleine brand) 2-3 tablespoons ground cinnamon (to taste) 1-1/2 cups (3 sticks) unsalted butter, at room temperature (cut into pieces) For the Filling 1-1/2 cups light brown sugar 2 cups chopped walnuts (ground in a spice grider) 1/2 teaspoon salt 1/3 cup ground cinnamon 1/2 cup (1 stick) melted, unsalted butter 1-1/4 cups raisins (soaked in an orange liquor for 15 minutes, then drained) For the Frosting 4 cups sifted confectioner's sugar 1 teaspoon vanilla 1 teaspoon Fiori di Sicilia flavoring pinch of salt 2-3 tablespoons orange juice, or orange liquor. 1/4 cup milk (I use skim) grated zest of 1-3 oranges (depending on how many are being served) for sprinkling over the top... I forgot this Christmas) Directions for Dough 1. Place the eggs into a medium bowl and whisk until foamy. 2. Add the warm water and honey to the eggs and mix well to dissolve. Sprinkle the yeast into the egg mixture, stirring well, then let sit to "proof" until foamy (about 10-15 minutes). 3. After the yeast has proofed, add the 1/2 cup of orange juice and stir well. 4. Sift together the 7-1/2 cups of flour, 2-3 teaspoons cinnamon and 1/2 teaspoon salt into the bowl of a stand mixer. 5. Start mixing on a low speed while adding the pieces of room temperature butter until it gets to a rough crumb stage. 6. Make a well in the center and pour in the proofed egg/yeast mixture. Mix on low speed until the dough clears the sides of the bowl. 7. Place the dough onto a lightly floured work surface and knead until it becomes smooth and springs back a bit when a finger is pushed into it. This dough should become smooth and not sticky. 8. Cover with a cotton towel or plastic wrap for 10-15 minutes to relax. Make the Filling 9. In a medium bowl, combine the brown sugar, chopped walnuts, salt and cinnamon. I grind the walnuts into a crumb using a spice grinder, but if you them chunkier, leave them chopped (from a package) or use a chef's knife to chop to a size you like. Filling and Rolling the Dough 10. Prepare two half sheet pans by lining them with parchment paper. 11. Roughly shape the dough ball into a rectangular block to make rolling out into a rectangle easier. On a lightly floured surface, roll out the dough into a rectangle that is no more than 12" and no less than 1/4" thick. The rectangle should be about half as wide as it is long. Try to create 90 degree, angled corners. 12. Using a pastry brush, coat the entire surface of the dough with the melted butter, coming to within 1/4" of all sides. 13. Spread the walnut filling evenly across the dough. 14. Drain the raisins well and spread evenly across the dough. 15. Roll up the dough, starting from the side furthest from you, jellyroll fashion. As you roll toward you, lift occasionally to tighten the roll as you go. When you get to the end, pull and then pinch the last side along its length, pinching the dough so it sticks to itself. 16. Roll the pinched edge so it's underneath your roll. (This helps to hold it in place while cutting.) Using your flat hand or a bench scraper, make sure the ends are pressed in flat. 17. Using a large, serrated bread knife, start cutting 1/2 - 3/4" thick slices, placing each one on your parchment lined sheet pans. You can either allow 1-2" of space between each so they sell into nice round buns (photo below), or more tightly next to each other to create more of a pull-apart bun experience. (See the photo above). 18. Cover the pans loosely with plastic wrap and allow to rise at room temperature, away from drafts, for about 1 hour, or until doubled in bulk. This dough really puffs up! 19. About 30 minutes before baking, preheat oven to 350 F. 20. Place trays on center rack(s) and bake for 15-20 minutes, or until lightly golden brown. You can bake each pan separately, or if your oven can accommodate two pans at once, bake them at the same time, perhaps swapping racks and rotating pans once halfway through baking to ensure even baking. 21. Try not to over-bake these buns--they can dry out easily if over-baked. You want them warm and soft when served. They freeze well (on a tray in the freezer, then placed into zip-lock bags when rock-hard). They will microwave perfectly (30 seconds or so) the next day (after refrigerated), or heated in an oven from frozen for 10-15 minutes at 350 F. They can be iced right before serving. Making the Icing 22. While the buns are baking you can make the icing. Place the sifted confectioner's sugar and salt into a large bowl, and using a small whisk, combine. Whisk in the vanilla, Fiori di Sicilia and the orange juice (or orange liquor). Now, slowly start adding the milk, little by little, until the icing becomes very smooth and can make a ribbon when drizzled from the end of the whisk. You might not need all the milk, or you might need a tablespoon or two more (it depends on the humidity). This recipe can also be made swapping out the milk for water if you are lactose intolerant. You want the icing to be able to drizzle ribbons onto your buns, yet be sticky enough to cling well. Serving/Reheating 23. When finished baking, remove the pans from the oven and let cool for 5-10 minutes right in the pan. If you ice them while hot, the icing might soften and become too thin. 24. Select the buns you want to eat right away and either use your whisk or a small spoon to drizzle lines of icing across the tops. If you like lots of icing, use a small offset spatula and spread a coating of icing across the entire surface. 25. Distribute some orange zest on top. 26. For eating the next day, you can place some buns on a tray (without icing) and cover with plastic wrap. The next day you can reheat the icing for 15 seconds in your microwave, then reheat the buns in the microwave for 30 seconds (using a microwave cover) or in a 325 F oven, lightly covered with foil, for 15 minutes. 27. These buns freeze very well, without icing, by first freezing solid, uncovered, in your freezer until rock hard. Store the frozen buns individually in zip-loc bags. To defrost and reheat, place on a pan covered lightly with foil in a 350 F oven for 15 minutes, then ice afterwards. You can also defrost them using your microwave using the defrost setting, but don't forget to use a cover to prevent drying out. Our buns lasted our family of three from Christmas morning until the Epiphany on January 6th! I hope you enjoy them as much as we do... --Jerry Finzi 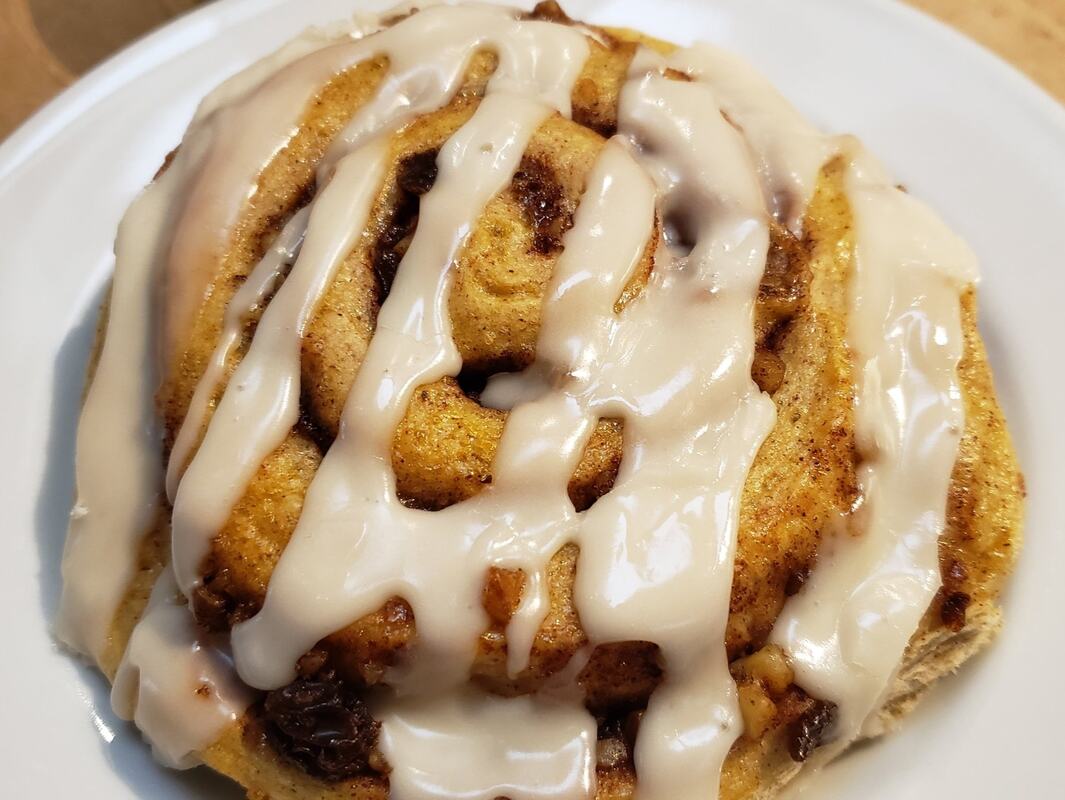 Copyright 2023 by J.Finzi/GrandVoyageItaly.com
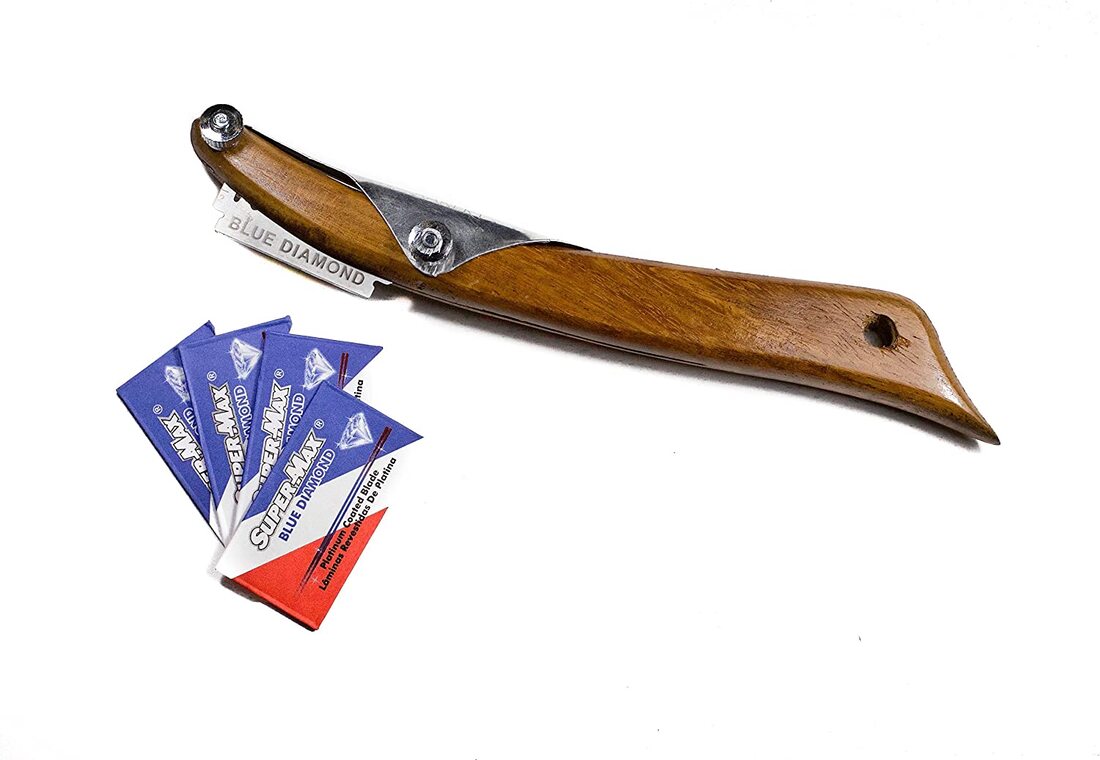
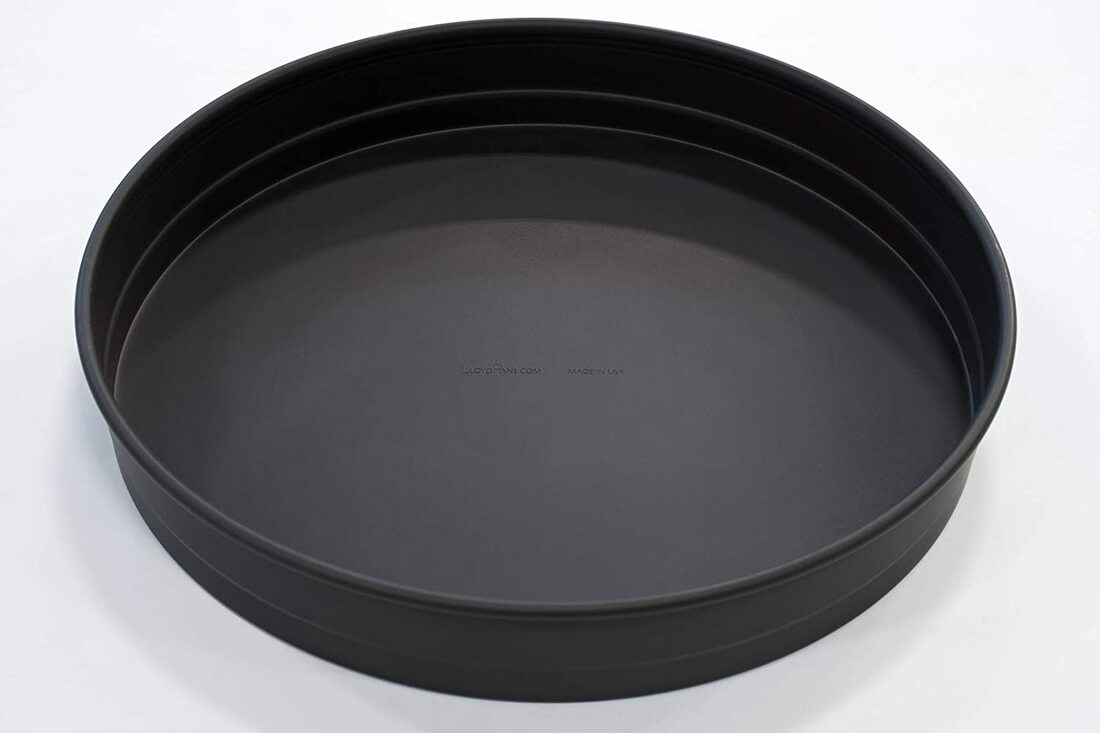
 When I was a boy, we always had bread in our home. My Dad worked as a Deli man most of his life and would bring home beautiful Italian breads that he used to make cold cut and meatball sandwiches. In typical 1950s style, my Mom would keep loaves of white bread in what she called her "All-American house". When we had pasta with "gravy", we'd tear off some bread to use at the end of the meal to clean up the plate. Even when we had meat, like a roast beef, the bread would come out and we'd soak up "the blood" (the drippings) that oozed out of the meat in the bottom of the serving platter. If we had soup or a stew, the bread would work its way to the end of a meal to clean our plates. And if my Mom was making Sunday Gravy, we'd get out the bread, even if all we had was sliced Wonder Bread (ugh), and smear a ladleful of sauce on a slice for a pre-meal snack. 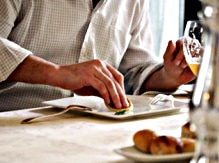 Why scarpetta (little shoe)? Wouldn't it be better to call it scopa (mop)? Little did I know what we were doing was carrying on an Italian tradition in dining--fare la scarpetta (making the slipper/shoe). Scarpetta means shoe in Italian. And to fare la scarpetta a tavola, means tearing off a piece of bread at the table to mop up the sauce or juices left on your plate, help in getting your food onto the fork or spoon. In my father's poor childhood--growing up in a Hoboken tenement with a large family--there weren't enough forks or spoons to go around, so using bread as a scarpetta was a necessity to lift bites of food out of the large communal bowl my grandmother would place in the middle of their table. Nothing goes to waste in Italy, and especially in the impoverished South where my parents came from, one would never leave anything on their plate. Food was life itself. After all, not wasting food is being furbo. And in the South, they don't shy way from having bread with pasta, like they do in the North. What is the preferred type of bread for use as a scarpetta? Curiously, it is ciabatta, which literally means slipper, but any crusty bread will do. Some say that the expression scarpetta comes from the fact that a torn piece of bread looks like a little shoe. I prefer to think that it really refers to wiping your feet... as wiping the bottom of the plate. Because of the extreme poverty suffered by many of our Southern Italian ancestors, others think scarpetta refers to being so hungry that one would eat the soles of their shoes. Sadly, there is historic evidence of desperate people doing just that, so perhaps there is some truth here.  Scarpetta can work with the right OR left hand Scarpetta can work with the right OR left hand However, the tradition of using bread to clean up plates goes back to the time of the Romans. I remember reading in my Latin study book how Romans would use bread after a meal to clean their hands--soaking up the juices and olive oil on their hands--and also cleaning the bowls and the table. They would then pop the soppy bread into their mouths. Again, furbo... nothing is wasted. Fare la scarpetta is an ancient tradition indeed. Perhaps because of its links to Southern culture and Cucina Povera, some areas of Italy consider using a scarpetta bad taste, even though its taste is actually pretty good. Most do it at home or in more casual trattoria and less in more chic ristoranti. But they all do it. And if someone tells you that they don't do it in Tuscany... nonsense. In fact, it's one of the only ways to add flavor to their saltless Tuscan bread. (That stuff is so dry on your palette without salt!) You'd be well served to consider Tuscan bread more of an eating tool, like a spoon or fork, than a bread for eating by itself. You can also do what many Italians do and consider the philosophical meaning of the phrase, fare la scarpetta: Live life fully. Never leave crumbs behind. Soak up everything that life puts in front of you. --Jerry Finzi  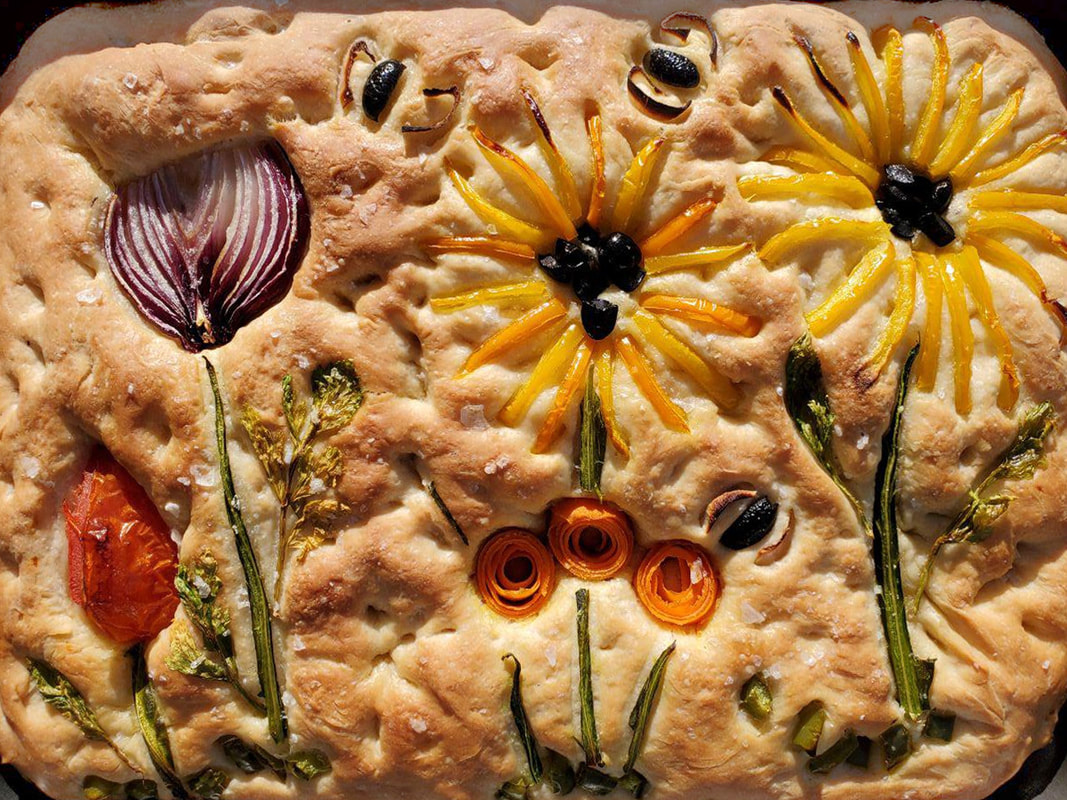 Focaccia is one of the world's oldest flatbreads with roots in ancient Greece and with the Etruscans, even before the Roman Empire reared its head. The Romans called it panis focacius (bread of the hearth) in Latin. In its basic form, it is a leavened bread, very similar to pizza but without all that cheese. There have been versions of focaccia all through the Mediterranean coastline in Europe and northern Africa. In ancient Roman days, it looked like a very simple, flat round of pull-apart bread. It was a meal to be carried by shepherds and fishermen and meant to be eaten later. In regions of neighboring France it's called fougasse. In Argentina and Brazil--both with large Italian immigrant populations--its name is fugazza and they can be either topped with stringy cheese or even double-crusted and stuffed. The common modern form of focaccia is dimpled with fingertips to make little wells that can hold savory items like olives, cherry tomatoes, peppers, red onion, sliced potatoes, garlic or even sweet things like figs, pear slices, blueberries, walnuts, dates, honey, anise seeds, bulbing fennel (finnocchio), orange zest or grapes. The top is usually brushed or drizzled with extra virgin olive oil and sprinkled with rosemary, sea salt, pepper or other spices. Of course, you can sprinkle a bit of cheese (usually grated), but go to far and you've crossed the line between focaccia and pizza. The variations are endless. In Italy, most pasticceria (pastry shops), panetteria (bread bakery) and even bars will have slices of focaccia often sliced and priced by weight. (Note: A "bar" in Italy is a family friendly place to get cappuccino and pastry in the morning and panini for lunch.) 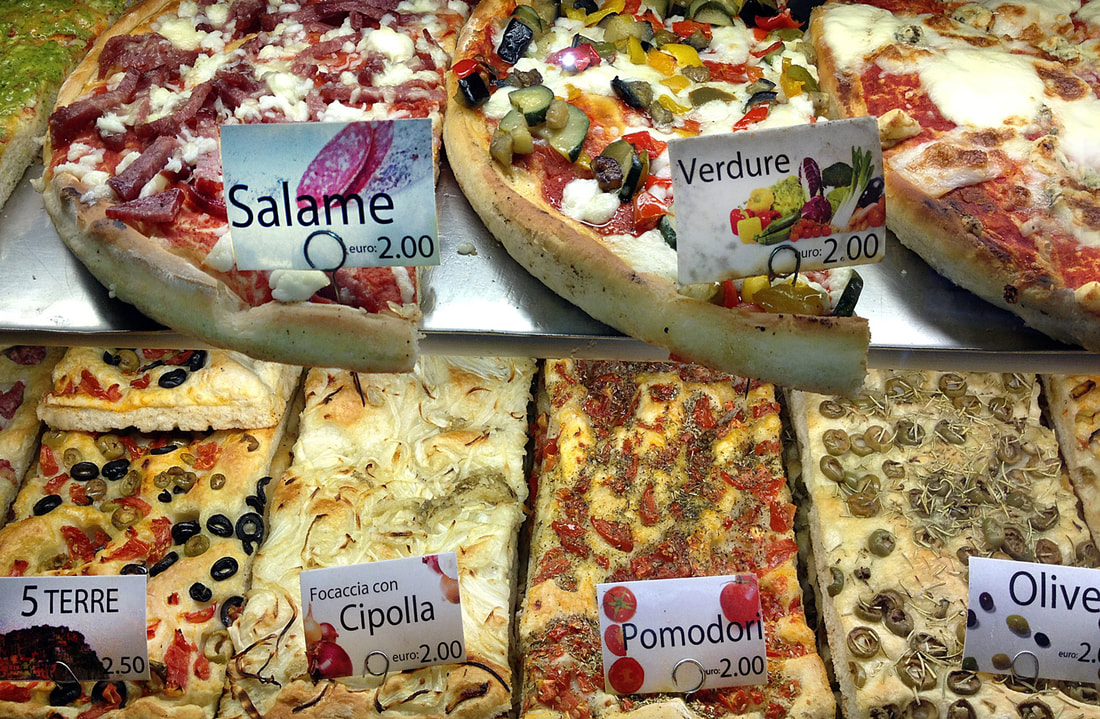 Typical Italian offerings of focaccia Focaccia is usually baked in 1" deep, dark steel pans. The texture is usually bready and for that reason a high protein "strong" flour (bread flour here in the U.S.) is used. The thickness also has the benefit of being used to make panini, slicing through the middle and stuffing with provolone, mozzarella, prosciutto or thing slices of salami. 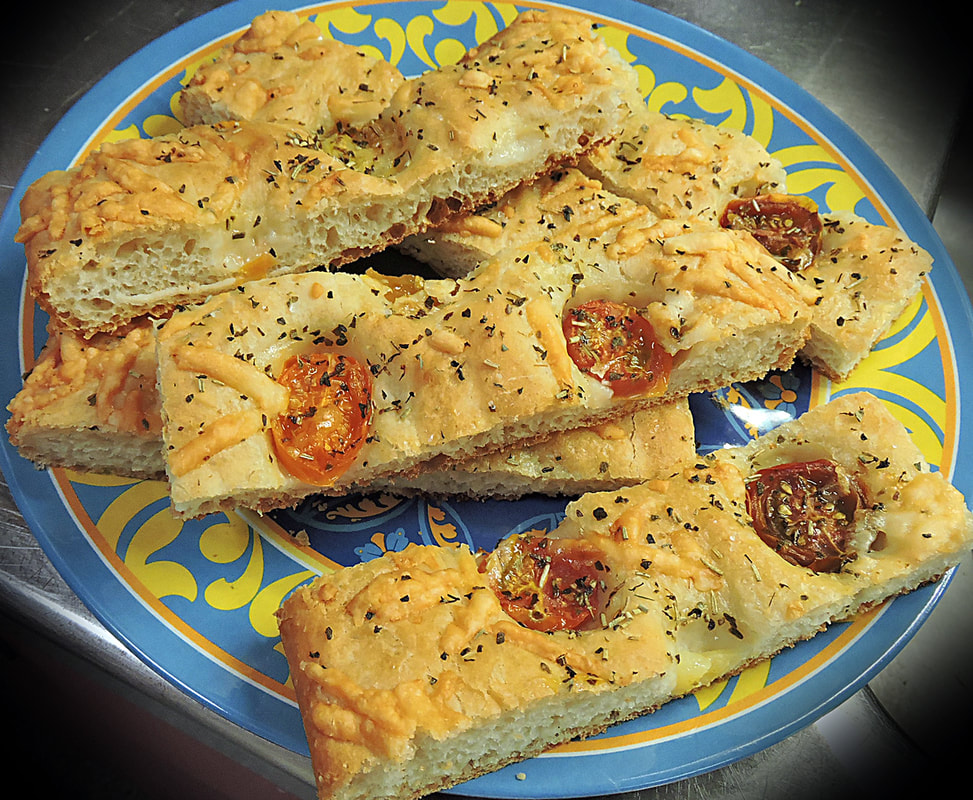 Slices of focaccia ready for snacks, lunch or along with dinner 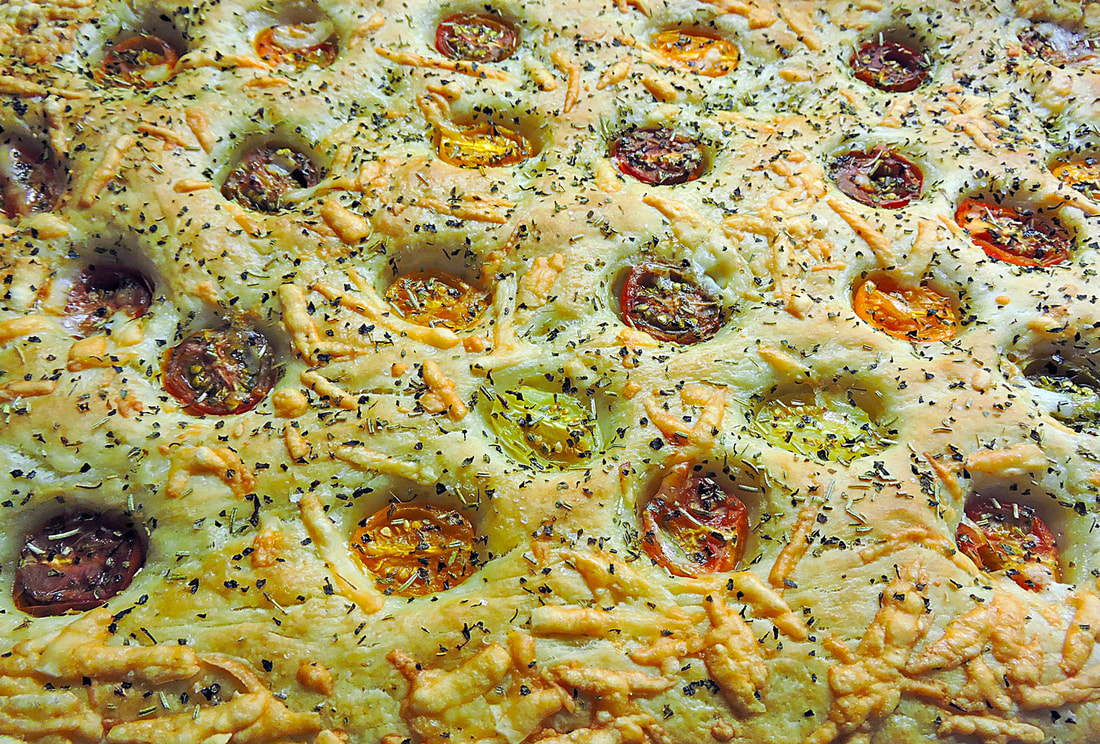 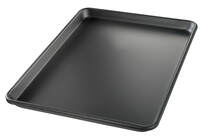 Dark, half sheet pan available on Amazon Dark, half sheet pan available on Amazon Ingredients Yeast mixture: 1-3/4 cups warm water (110-115F) 1-1/5 tablespoons fast acting yeast 1 tablespoon honey  For the dough: 1 cup King Arthur all-purpose flour 2-3 cups King Arthur bread flour (plus extra bench flour) 1 tablespoon sugar 1 tablespoon sea salt 2 tablespoons extra virgin olive oil Extra virgin olive oil for the pan Toppings: Extra virgin olive oil (for brushing) Cherry tomatoes 1/4 cup grated cheese (using 1/4 holes/box grater), provolone, asiago, or caciocavallo (cheese is optional) Dried thyme, rosemary, oregano, fresh ground pepper, sea salt Directions Preheat oven to 435F with a pizza stone or steel on the center shelf.
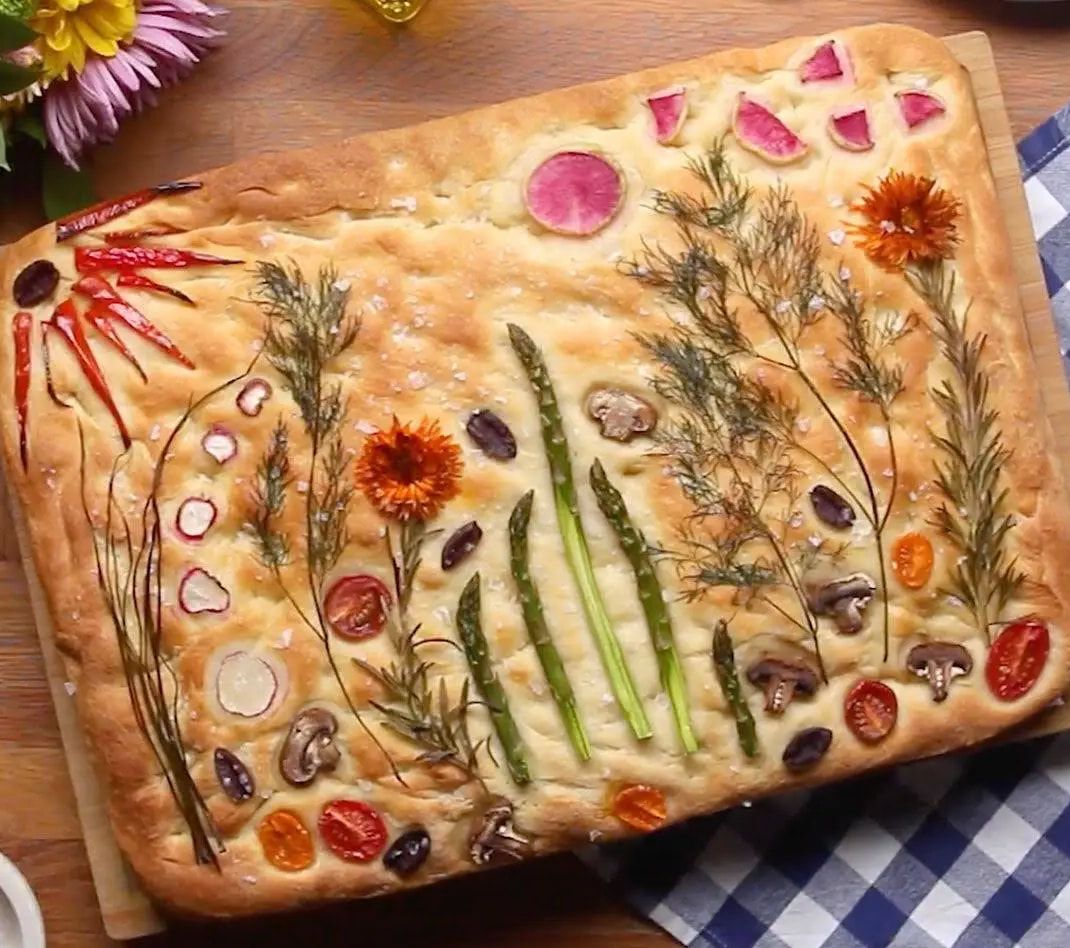
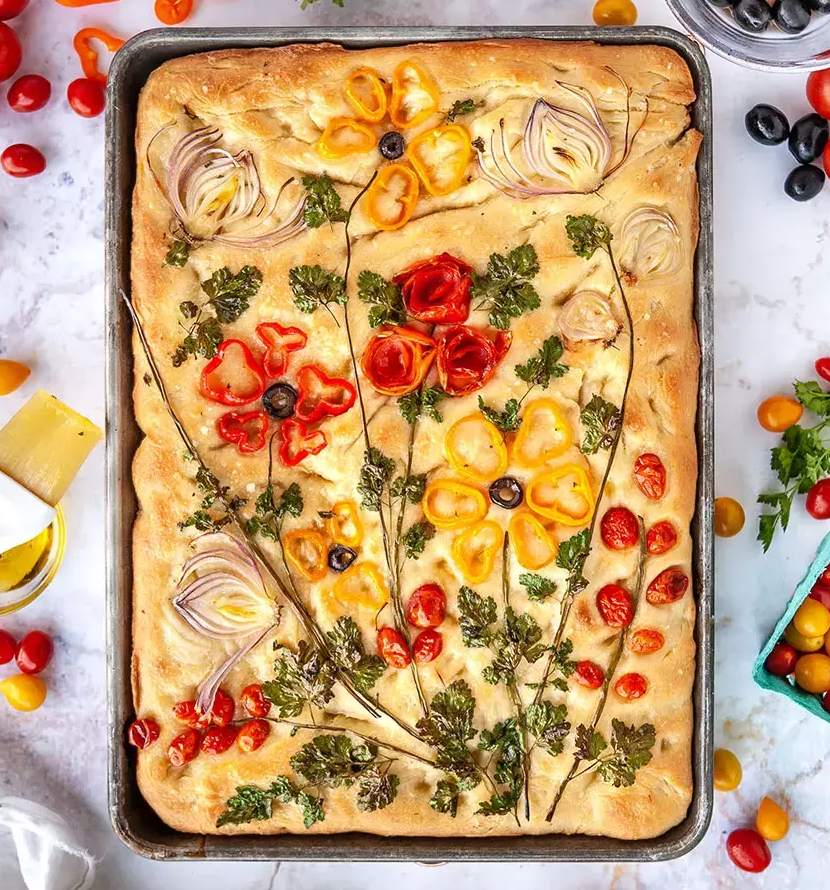
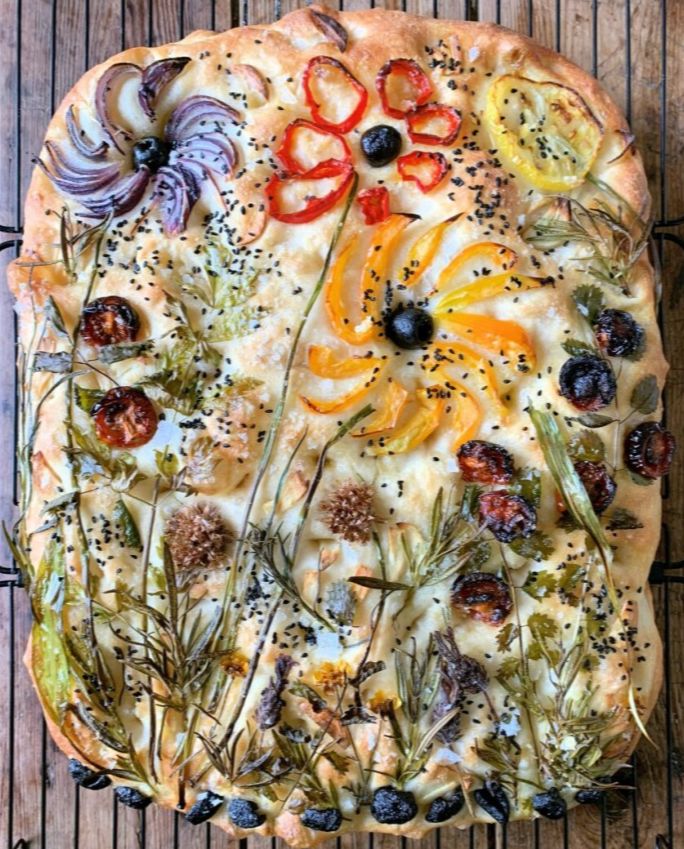
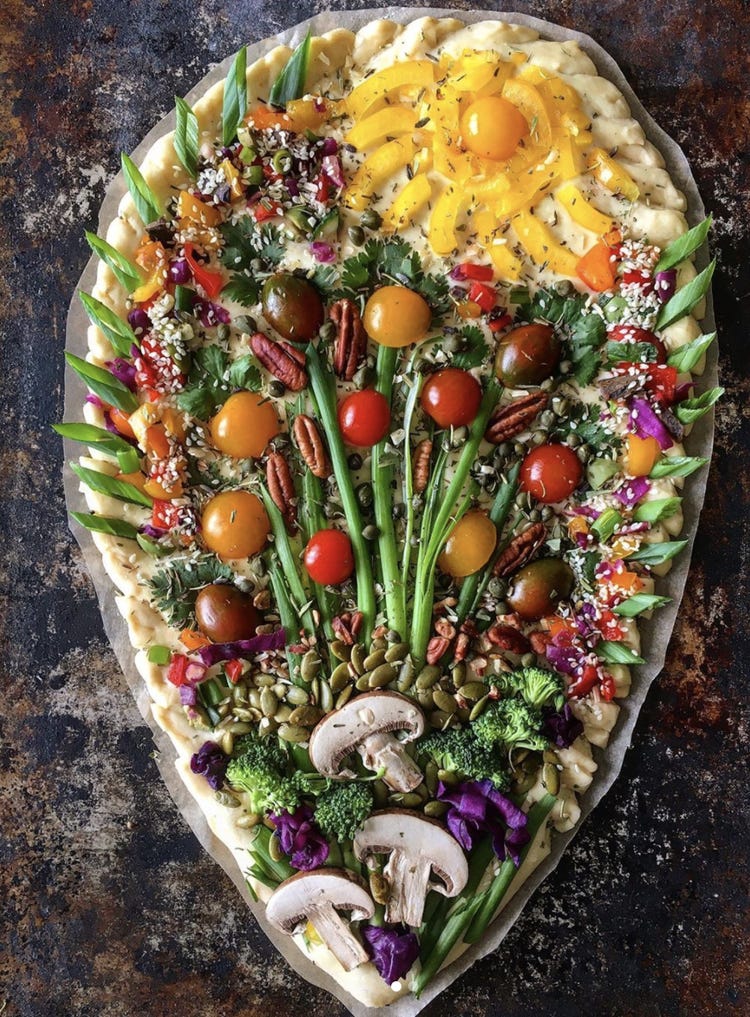
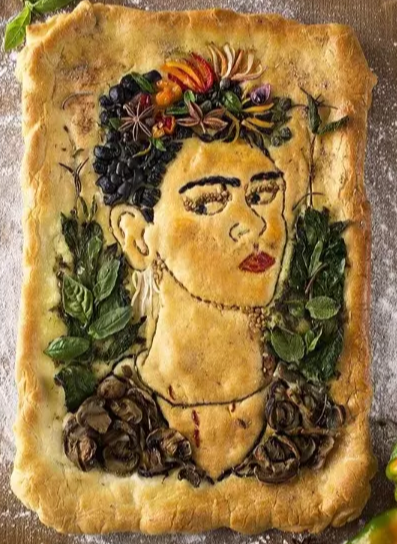
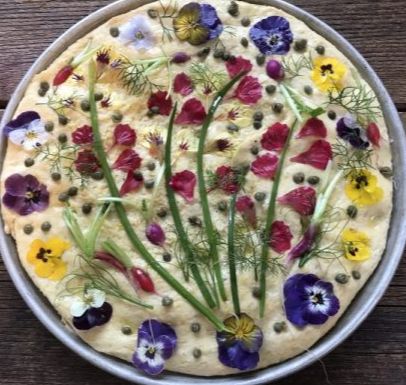
You can reheat in a microwave by wrapping with a damp paper towel, then heating for 30 seconds (time depends on the power of your unit). To kick it up a notch, try a fresh drizzle of extra virgin olive oil (we really recommend unfiltered) or an aged balsamic. For a quick lunch, top with a draping of prosciutto. You can also slice focaccia in half and use to make a panino (sandwich) filled with thin sliced colt cuts and cheese or even cooked ingredients like grilled eggplant, tomatoes and mozzarella or roasted vegetables. Getting Creative 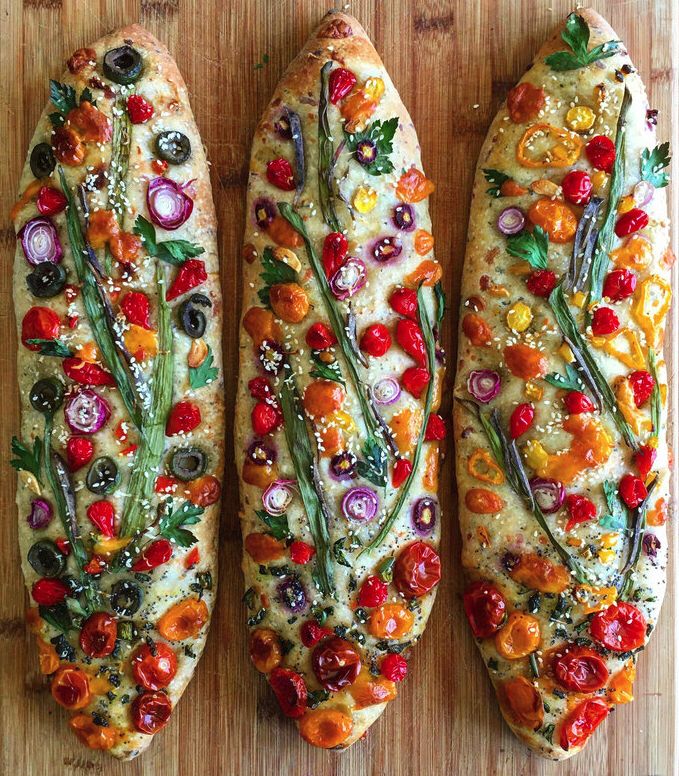 Now that you know the basics of making focaccia, consider getting creative, as these examples illustrate. Look for color contrasts, textures and interesting shapes with your choice of toppings. Consider unusual things like asparagus, cauliflower, beets, basil, cilantro, kale, mushrooms, berries, capers, chives, colored course sea salt, and various seeds. Depending on your ingredients, you might have to partially bake your focaccia first with ingredients that can cook during the entire bake time and need to be pressed into the dough. For other things that might burn, like seeds or tender leaves like basil, position on top during later stages of baking. Be creative and make a masterpiece for a special occasion, or simply make simple focaccia for every day snacks and meals... Buon appetito! --Jerry Finzi
 You might also be interested in...
Forni Italiani: 21 Regional Breads from Italy The Secret Life of Ciabatta Scarpetta: Bread Wipes the Italian Plate Clean Italian Easter Bread: Pane di Pasqua Recipe Pane Coccoi: The Amazing Sardinian Art of Decorated Breads Forno Antico Santa Chiara: More than Just a Bread Bakery 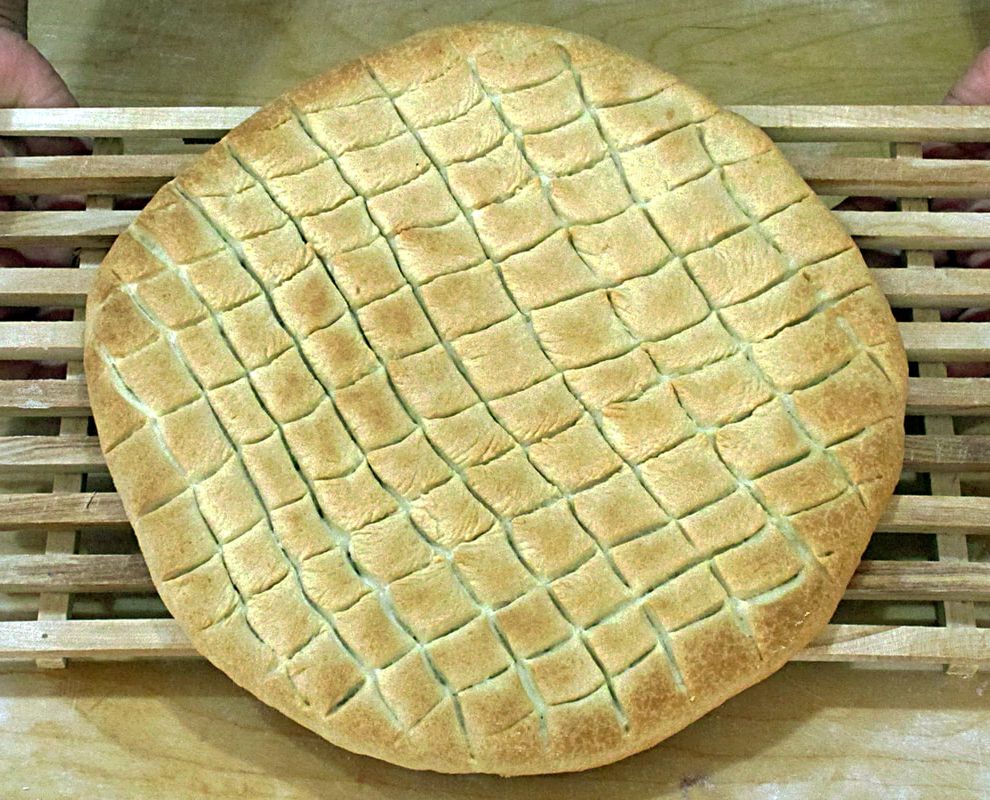 Some people called my Dad acting "silly" as a negative, but not me. Anything silly, I love. Something offbeat, oddball, out of the norm, and I'm automatically drawn to it. The time Dad wore vampire teeth at a fancy wedding's cocktail hour was wonderful. My discovery of this interesting pizza is also wonderful: pizza scima ("silly pizza") from the cucina povera traditions of Abruzzo. It's authentic and offbeat. Why is it called "silly"? To understand the name, we have to get into the evolution of the Abruzzese dialect word "scima". This is an unleavened bread, and the Italian word azzimo (masculine) or azzima (feminine) in Italian means unleavened, referring to any bread that's made without yeast. In dialect the word is ascime. Southern Italians tend to shorten words, in this case the word was simplified to scima (SHEE-ma). Scema in Italian can mean either stupid or silly, perhaps in this case referring to someone silly enough to make bread without leavening...  Il Coppo, covered in coals with the pizza baking underneath The history of this pizza evolved from the 13th century Jews who settled in Abruzzo and made unleavened bread. Traditionally it is baked directly on an open wood fired hearth, common in many country homes even today. After coming up to temperature, the wood coals are cleared to the sides and the dough round is placed directly on the brick base. Next, the dough is covered with a 5" tall dark steel coppo (like a large pot cover) and coal embers are placed on top. This baking method is similar to the Colonial American method of baking bread in a cast iron Dutch oven in an open fireplace. The baking method below tries to mimic the open hearth by baking on a pre-heated pizza stone (to cook the bottom) with a dark pan placed over the top of the pizza (to create a moist, but hot baking environment). You might even try to make this pizza using a baking cloche. Common in the southern towns of Casoli, Roccascalegna, Altino, Lanciano and San Vito Chietino, this pizza is characterized by the addition of extra virgin olive oil and wine. Each year there is even a pizza scima sagra (food festival) in Casoli.  A similar method of baking bread in a Dutch oven Ingredients
Instructions
Useful Tools on Amazon...
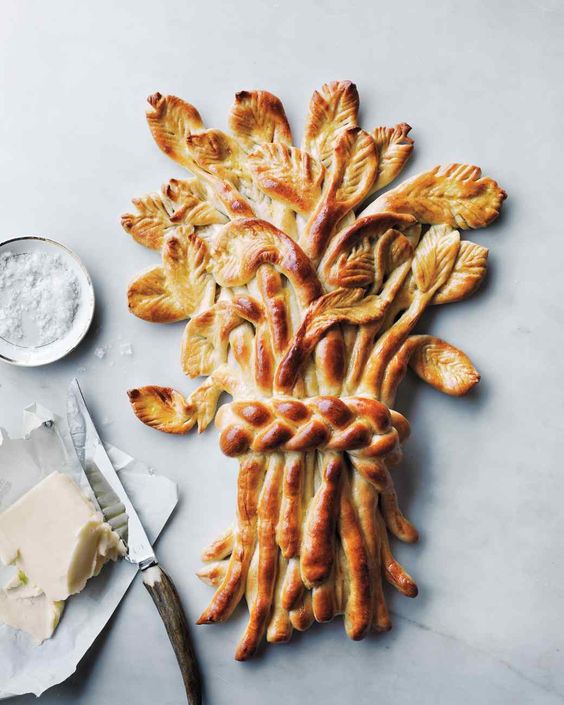
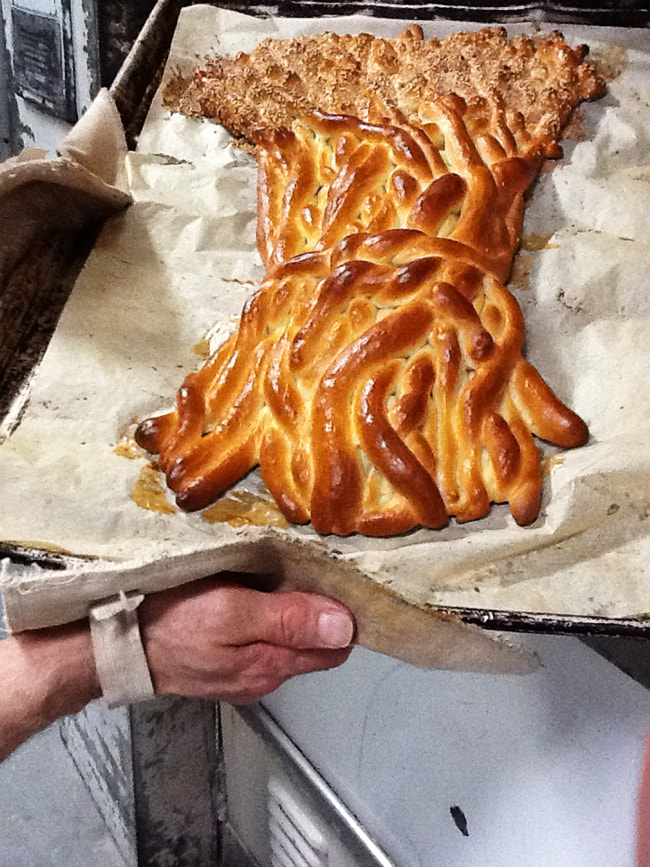
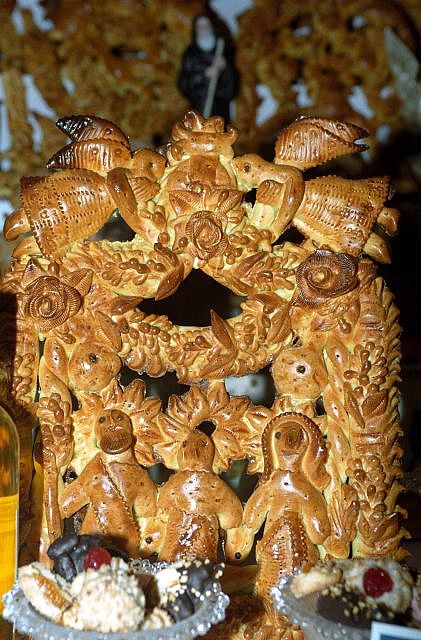
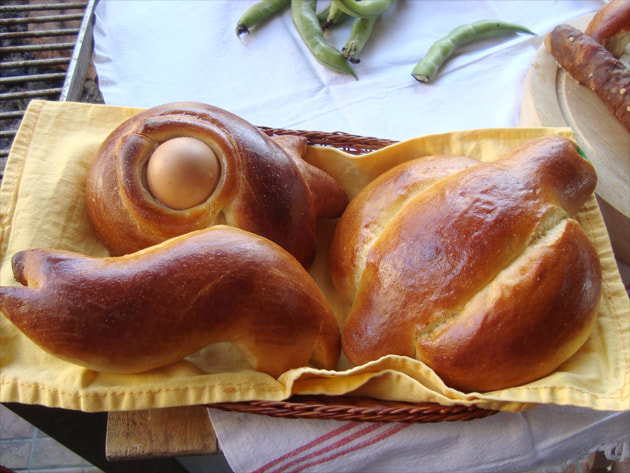
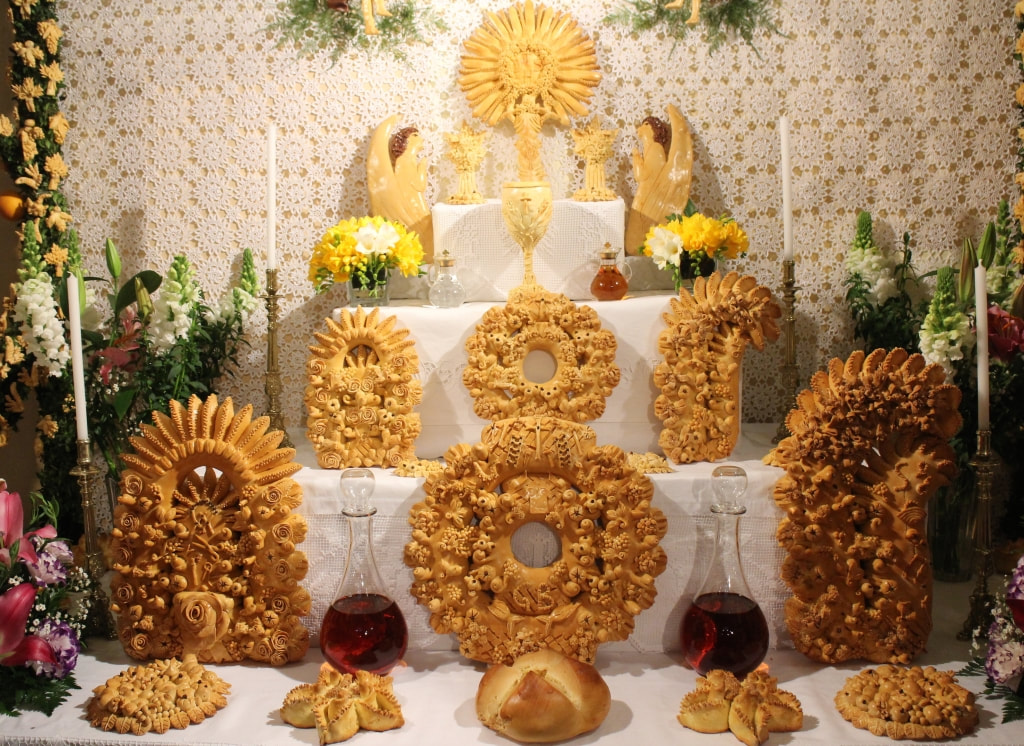
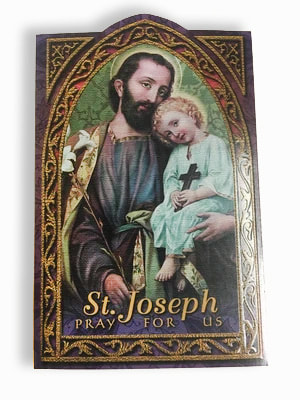
  March 19 is a very special saint day in Italy... La Festa di San Giuseppe. This is the day that Catholics celebrate not only Saint Joseph, but all fathers. Consider this day as the Italian Father's Day... A special tradition is making and serving Pane di San Giuseppe, a shaped bread formed into a variety of designs for loaves that will adorn La Tavola di San Giuseppe. You'd be surprised at the amazing and luscious spreads on Italian's tables for their Cena di San Giuseppe, both in private homes and for community and church groups. Traditional forms for breads are crowns, crosses, crabs, donkeys, staffs, wheat, images of St. Joseph, and braids representing the Blessed Mother. This bread has a rich texture and a slightly sweet taste. To pay homage to St. Joseph being a carpenter, breadcrumbs and sesame seeds signify sawdust fallen from his saw. 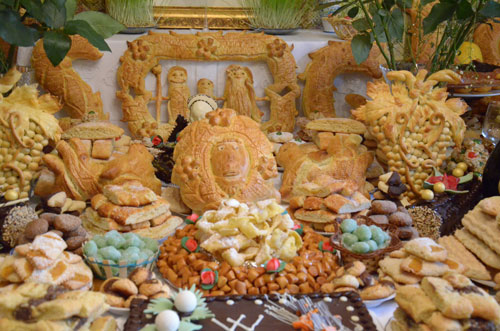 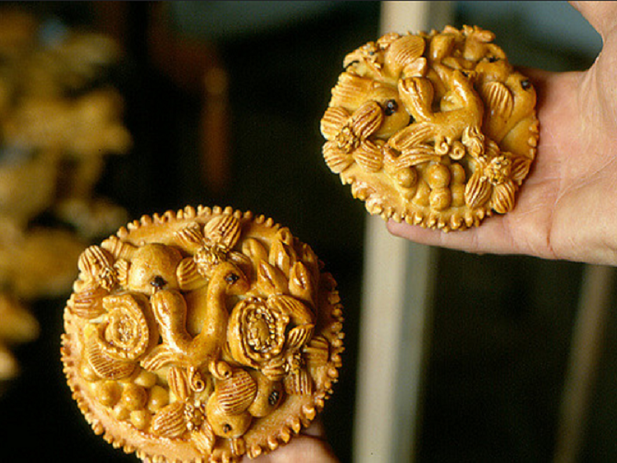 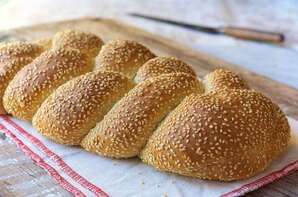 Here is a basic recipe for making Pane di San Giuseppe in a braid form... Ingredients
Directions
--GVI
    In Italy, there is a saying, "buono come il pane"... or, "It's as good as bread". This saying is used to compliment the best cooking. Think about it... that's how high Italians value a food as simple as bread, to compare other meals to it. You can't get simpler or better than the humble panino... During our Voyage throughout Italy, one of the simplest and affordable lunches was the panino. Most types of eating establishments have them: the trattoria, pizzeria, ristorante, osteria, taverna, tavola calda (a sort of Italian fast food shop) or bar (all bars are open for breakfast or lunch). In a tavola calda (literally, cold table) might include a wide range of lunch options, both sandwich style and stuffed. A new type is called a paninoteca, which is a shop dedicated to panini and typically open only in the middle of the day for lunch. They are designed as a grab-and-go place, but many will have a few tables. 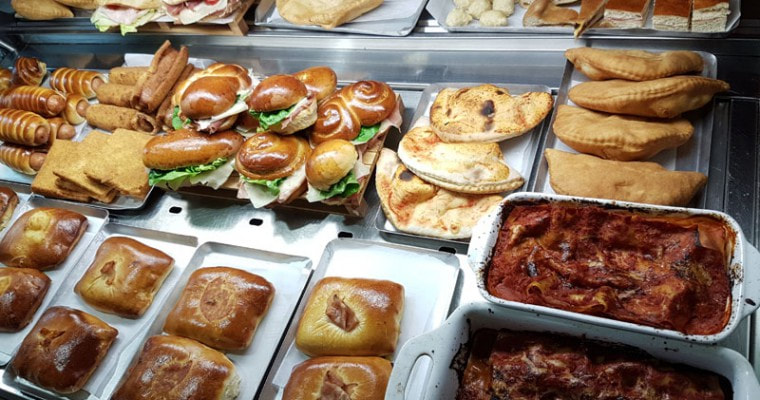 Grab-and-go selections at a tavola calda In tourist areas, the restaurants tend to overcharge, but a panino was always an affordable and very satisfying option. In mornings, we also would stop in the local alimentari (like a corner deli) and pick up some cold cuts, cheese and bread to make our own panini while on the road. 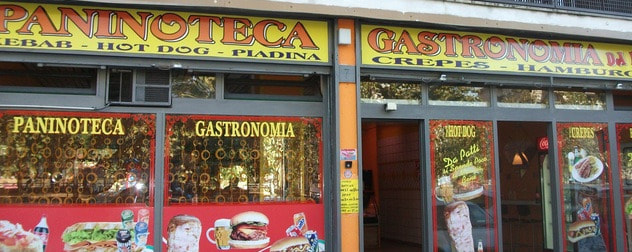 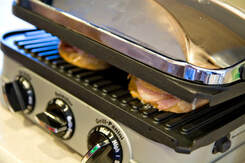 One of our favorite (and most used) kitchen appliances is our panino press, the Cuisinart GR-4N 5-in-1 Griddler. We've had ours for about 5 years and it's still in perfect condition (the plates are non-stick and clean well). You can't beat their low price, either. We use the flat platens for making pancakes and switch to the ridged grill plates to make panini. We buy ciabatta with olive oil from the supermarket and can make a couple of fantastic panini in about 5 minutes. One of our favorite ways to make a panino is to slice up some supermarket mozarella-salame rolls (some brands market these cheese rolls as "panino") along with slices of heirloom tomatoes on ciabatta. Set the panino press on high, give it a press for a few minutes and we're back in Tuscany! A Short Panino History The word "panino" literally means "little breads". In Latin, panis means bread. A panino doesn't really need to be heated, as in Italy it is often eaten as a quick snack on the run, in the field, or in the case of an Italian bachelor.... "Ehi! Mamma, make me a snack!" Stuff some peppers and ham inside a small bread roll and Mama gives her big "bambino" a satisfying, quick snack without much effort. (She thinks, "After he gets married, HE is going to look after ME.") This type more precisely is called a panino imbottito, literally "stuffed little bread". Basically it's the same as any American "hero", "hoagie" or deli sandwich. Similar to a panino is the tramezzino, a grilled/pressed sandwich made with slices of hearty white bread, sliced diagonally with the edge crusts removed. If you want a sandwich in an Italian bar, they will ask if you want it "da riscaldere" or "riscaldo" (reheated), "alla piastra" (literally, on the plates), then they will usually place the panino onto a press in between two flat platens, although many will use ridged ones. Throughout early history, bread was considered an entire meal, until it became the support (think foccacia or pizza) or container for a condiment or filling--the sandwich. Historians have found recipes for grilled sandwiches in cookbooks from the ancient Romans and it is belived that sandwiches were common across many ancient cultures. (Take that, Earl of Sandwich!)  The bread in the photo above recreates a Roman bread, baked pre-cut into wedges (to pull-apart) and with a string tied around its waist to create a division to help pull the bread apart into two halves. The reason? To put fillings between the slices, what else? In hotos of carbonized breads found in the ruins of Pompeii, while the top was pre-sliced, the bottom half was not. Perhaps they could alternately use the bottom as a support (an edible plate) for fillings? The first reference of a panino appeared in a 16th-century Italian cookbook, with the first mention of "panini" appearing in 1954 in the New York Times in an article about an Italian festival in Harlem: "The visitors ate Italian sausage, also pizze fritta, zeppole, calzone, torrone, panini, pepperoni, and taralli." Panini as we know them today, became trendy in Milanese bars, called paninoteche, in the 1970s and 1980s. In fact, in Italy during the Eighties, a cultural fad developed in Milano where teens would meet in panino bars,... the teens were called paninnare. In Sicily, Panini cresciuti ("grown rolls") are fried Sicilian potato rolls containing ham and cheese. Today in Italy, shops that specialize in panini are called panineria, although many of these have morphed into offering a smörgåsbord of many types of sandwiches, not just the classic panino. In Italy, sandwich shops traditionally wrap the bottom of a panino in a sheet of white paper, a way to keep hands clean, making this a true finger food. It couldn't be simpler... 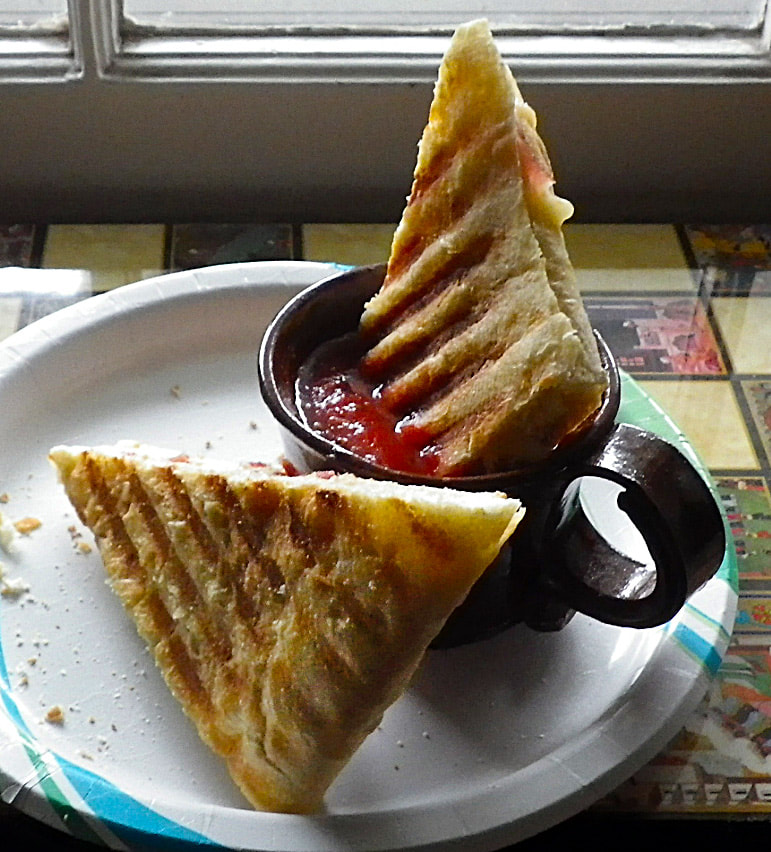 This time I made our panini with slices of salami-mozzarella roll (Boar's Head brand "Panino" roll is nice and spicy, and they also have a Prosciutto version). I find so-called "panino rolls" are becoming a commonplace item in the supermarket fresh cheese section.
I learned in Italy that some of the best things can be very simple. This lunch is a good example of this philosophy. Quick, healthy, simple. You can also get more creative too... using grated cheeses like fontina, asiago, smoked gouda or cacciacavalo and using leftover chicken, prosciutto, sausage, caramelized onions, olives, peppers... whatever. (I love making a panino using leftover chicken parmesan!) I highly recommend using a bit of smoked cheese which adds tons of flavor. Today's panino, however, was an ad hoc, simple lunch, like the ones I threw together in Italy. I cut the ciabatta in 4 inch long sections the sliced each horizontally and unfolded them to open. I then slice the salami-mozzeralla into slices a bit less than 1/4" thick and lay 4 on each ciabatta. Some say you need to butter the outside of your bread or brush it with olive oil to make grill marks or a crust, but I omit this step, preferring less fat intake. Besides, I tend to buy "olive oil ciabatta", which helps the browning. if you want more browning, feel free to lightly brush some olive oil on the outside of the panino before cooking. Butter is rarely used in Italian cooking and is never spread on bread, so I wouldn't use it. You can drizzle the contents of your panino with a little olive oil or perhaps a good balsamic, or even a decent store bought Italian dressing. I like to add slices of the best tomatoes I have around, adding moisture to my panino. Black olives or other giardinaria (pickled veggies) are also a good choice. My son, Lucas loves sweet pimentos on his. Try spreading some pesto on the bread too! Setting my panini press to "grill" and to high heat, I let it preheat for a couple of minutes and then load the panini (I can only do 2 at a time of this size). I give it a good pressing at the beginning and try to position the bread (front to back... there's a sweet spot) so the press lid sits flat. After about 2-3 minutes, I give a final press--hearing the panini sizzle. I hold this press for about 30-40 seconds, pull them out, plate them and slice diagonally into triangles. With panini, the longer you press it and hear the ingredients sizzle, the more crunch you will have in your bread. Too many people think a panini is buttered and grilled bread with cold cuts put inside unheated, and many restaurants order packaged sandwich bread with grill marks factory-burned into their crusts, then use it to make make a normal sandwich, calling it a panini. I've even seen sliced factory "panini bread" with the "grill" marks already there. Shame! A true grilled panino must be pressed and heated to meld the ingredients (that's meld, not melt) into one cohesive, gooey mess of deliciousness. And take note, if you use cold cuts and sliced cheese, the cheese must be placed both on top and on the bottom--the melted cheese helps hold the bread together. A grilled panini is not like a normal sandwich... you should not be able to lift the bread off after it's been pressed and cooked. That is, unless you're in Italy, where most basic sandwiches are known as "panini". What I make is a grilled panino. So, get yourself a panino press (no need for an expensive one) and start cooking. Buon appitito! --Jerry Finzi Acquasala (or Acquasale, Acqua Sala) is one of the cucina povera--poor dishes--of southern Italy, especially in the Lucane Dolomites of Basilicata and olive oil rich Puglia. this simple fare was enjoyed by farmers and shepherds. Its close cousin is panzanella, a sort of salad that uses torn up pieces of stale bread reconstituted with water as its base. Acquasala is a dish made from the simplest ingredients that any peasant contadina had around: eggs, onion, water, peppers or tomatoes and especially, the stale bread. Think of it as a mashup between eggs Benedict and an Italian broth, where the broth replaces the Hollandaise sauce. Perfect for breakfast, brunch or even a light dinner. 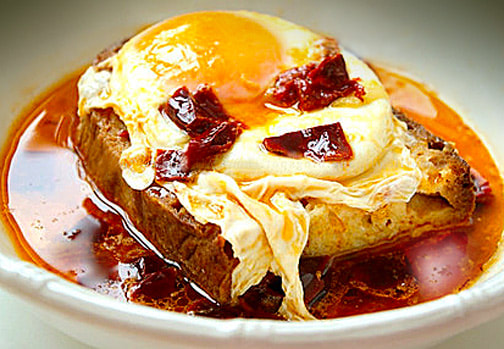 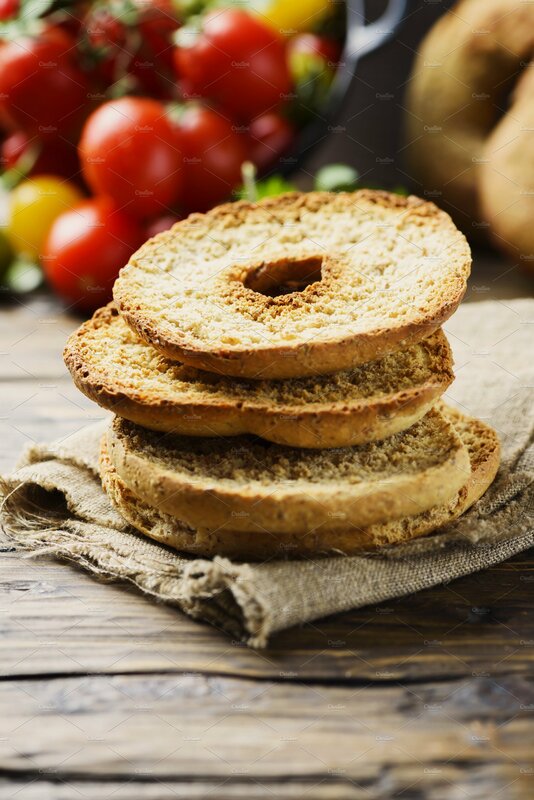 Friselli Friselli In it's simplest form, an acquasala is stale, crusty bread topped with a poached egg and a flavored broth poured over. The bread soaks up the resulting broth and its flavors. I'm certain that others in southern Italy might replace the stale bread with Friselli, a bagel-shaped, bone-dry toasted bread sold in bags in southern Italy. One easy to find bread nowadays is the ciabatta, left to go a bt stale or with the thick slices toasted before use. Don't think of this recipe as being ironclad in terms of the ingredients. Be creative. This is cucina povera, after all, which means that cooks used what they had on hand depending on the season: eggs from their chickens, stale bread, tomatoes, peppers, asparagus, eggplant, zucchini, white or red onions, a bit of garlic, mushrooms and greens. Southerners loved their greens, whether a bit of dandilion, arugla or chives. To be absolutely authentic, warm water (not boiled) is traditionally used to make the "broth", with the peppers and onions added to it for a light fusion of flavors. In Puglia it's often made without eggs and many more more ingredients, a cross between a soup and a salad.  Pepperone Crusco Pepperone Crusco Acquasala Lucan Ingredients (serves 2, with one egg each)
Directions
Boun appetito! --Jerry Finzi Pugliese Acquasala... Copyright 2019, Jerry Finzi/GrandVoyageitaly.com - All Rights Reserved
Not to be published without expressed authorization 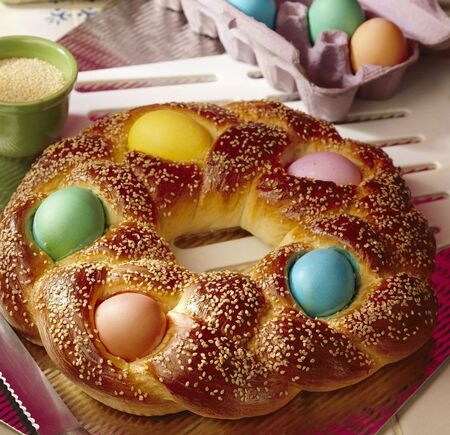 Easter is called Pasqua in Italy, and is a time for celebration and breaking the Lenten fast. In Italy, spring comes early, the weather is wonderful and the scent of flowers blossoming are everywhere. Pasqua is a time for feasting with la famiglia. The Monday after Easter Sunday is a national holiday called Pasquetta (Little Easter), when most businesses close and workers spend the day at home with their family. There are many types of celebration sweet pane (breads) and savory torte (cakes or tarts) in Italy, many of which made from family recipes handed down from generation to generation--often hundreds of years old. Some are known all over Italy while others are regional or local traditional recipes. One has to keep in mind, however, that even within each region there are variations in these recipes--often changing from town to town or family to family. Just keep in mind, it's all about the feast. Here are some of the more popular treats with links to their traditional Italian recipes. If you need translations you can always cut and paste the text of each recipe into Google Translate (or better yet, install a translation plug-in into your browser to do it automatically). Enjoy... and Buona Pasqua! 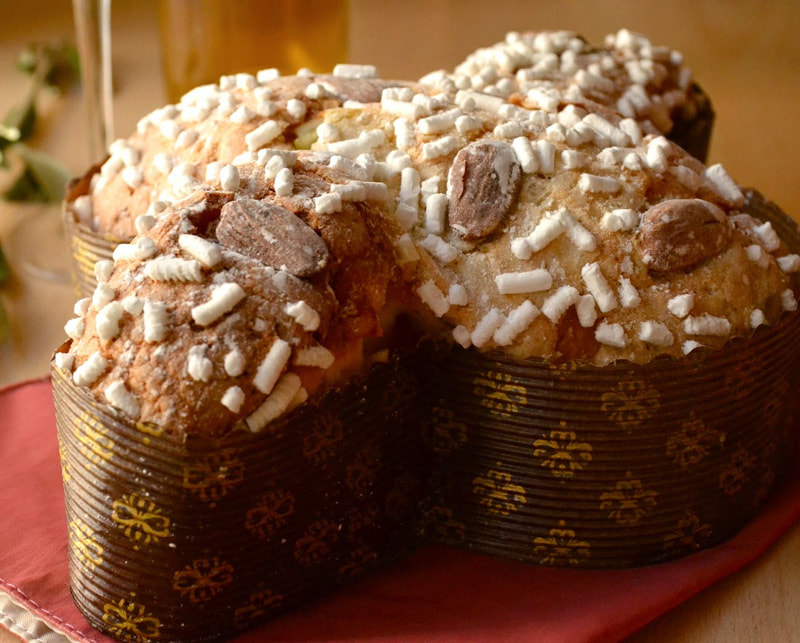 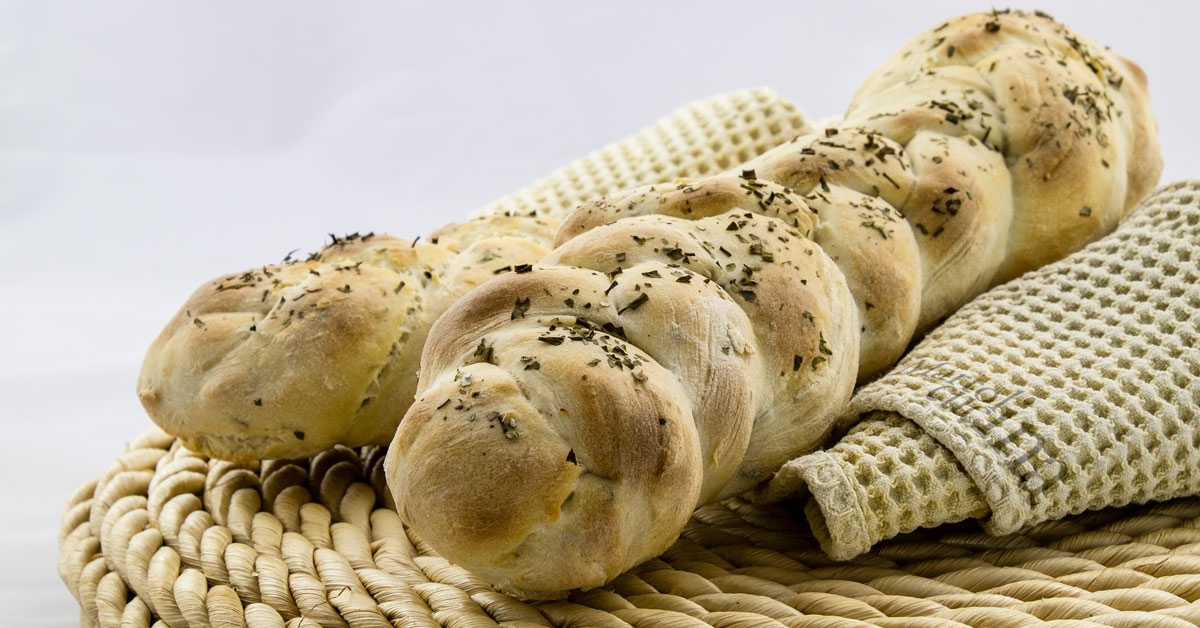  
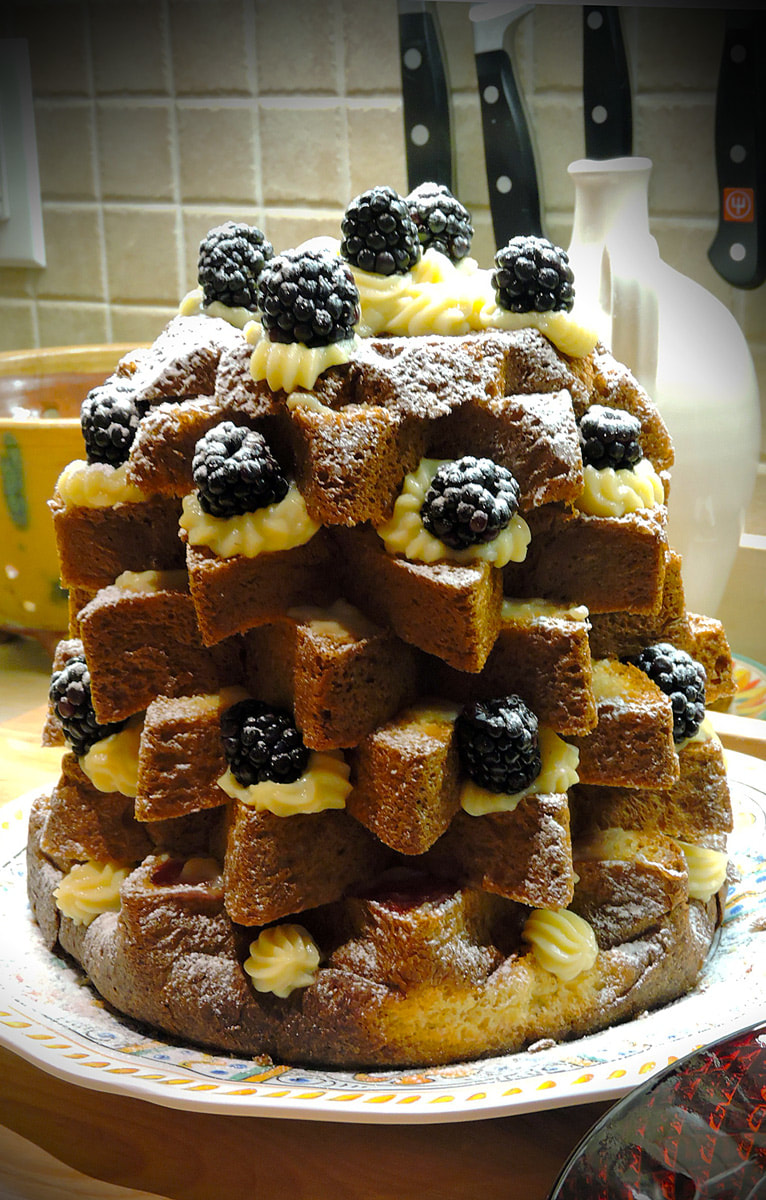
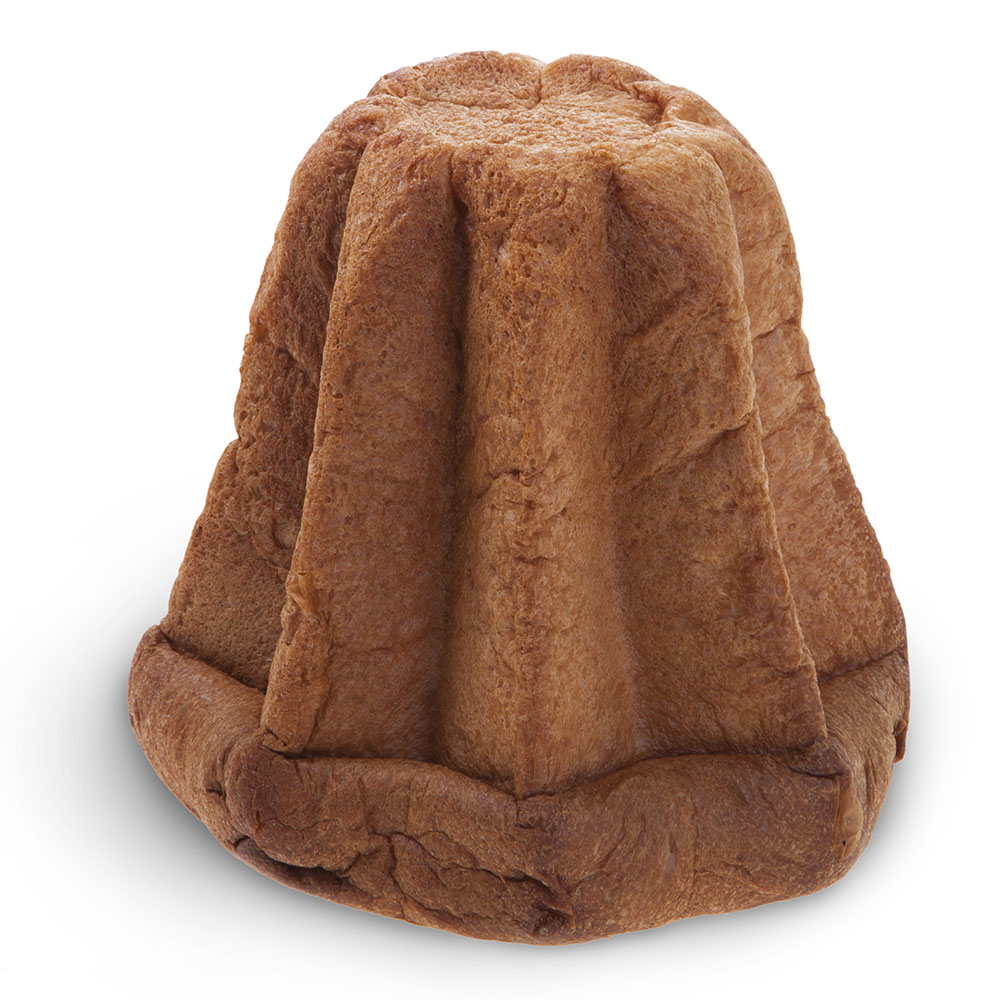 An naked Pandoro awaiting its regal clothes An naked Pandoro awaiting its regal clothes During the Christmas Holidays--even in the States--panettone and pandoro are both in plentiful supply, even in large supermarket chains. In fact, I bought several imported pandoro and panettone (they store and freeze well) two days after Christmas for under $5 each! Pandoro literally means golden bread, and lends itself to making a tree shape because of its fluted sides. To make a tree shape, simply cut 3/4 - 1" thick slices, ensuring that each slice is cut as flat as possible to prevent your "tree" from leaning when re-assembling later. A very sharp chef's knife is better than a serrated bread knife which would create too many crumbs. You will be filling each layer and re-assembling by alternating the position of each layer to position its points in between the points of the layers below them. Keep track of the orientation of the layers and re-assemble to keep your "tree" from leaning--flipping them upside and to the side after cutting each helps keep them in order. To make ours, I brushed each layer with a coating of heated and softened seedless red raspberry jam, then willed each layer with some vanilla custard, the same recipe I use when I make pasticiotti. You can also fill them with zabaglione, butter cream, or a store-bought vanilla, or other flavored pudding mix. I held back a bit of the custard and placed it into a piping bag with a fluted tip, then piped rosettes around the tiers of the assembled panettone tree, placing a blackberry on each. You can use fresh blueberries, strawberries, raspberries or pitted cherries. Top the cake with more piped custard and berries, or place a star-shaped Christmas cookie standing up. Powdered sugar adds a dusting of "snow" to make it look really festive. Traditionally, you make tall sliced wedges for each serving and lay them on their side in a dessert plate. Vanilla Custard Recipe
While French style egg custards can be difficult to master, this is a very easy custard due to the fact that the cornstarch is the thickening agent. This recipe can be used for many pastry treats that utilize a custard as a bed for berries. Ingredients 3 tablespoons cornstarch 1/2 cup sugar 1 - 1/2 cup whole milk or Half & Half 2 egg yolks 1 tablespoon butter 1 teaspoon butter Directions In a medium saucepan, whisk together the cornstarch and sugar. Whisk in the milk and egg yolks. Place the saucepan on medium heat, stirring with either whisk or spatula until the custard starts to thicken. Add the vanilla extract and butter and stir until creamy, thick and smooth. Transfer to a bowl to cool, covering the surface with plastic wrap to prevent a skin from forming. Spread melted seedless on each layer of your pandoro and then spread on a layer of custard. Do this for each payer as you re-assemble your "tree". Pipe rosettes as described above and place your berries. Dust with powdered sugar. Buon Natale! --Jerry Finzi |

Archives
May 2024
Categories
All
|