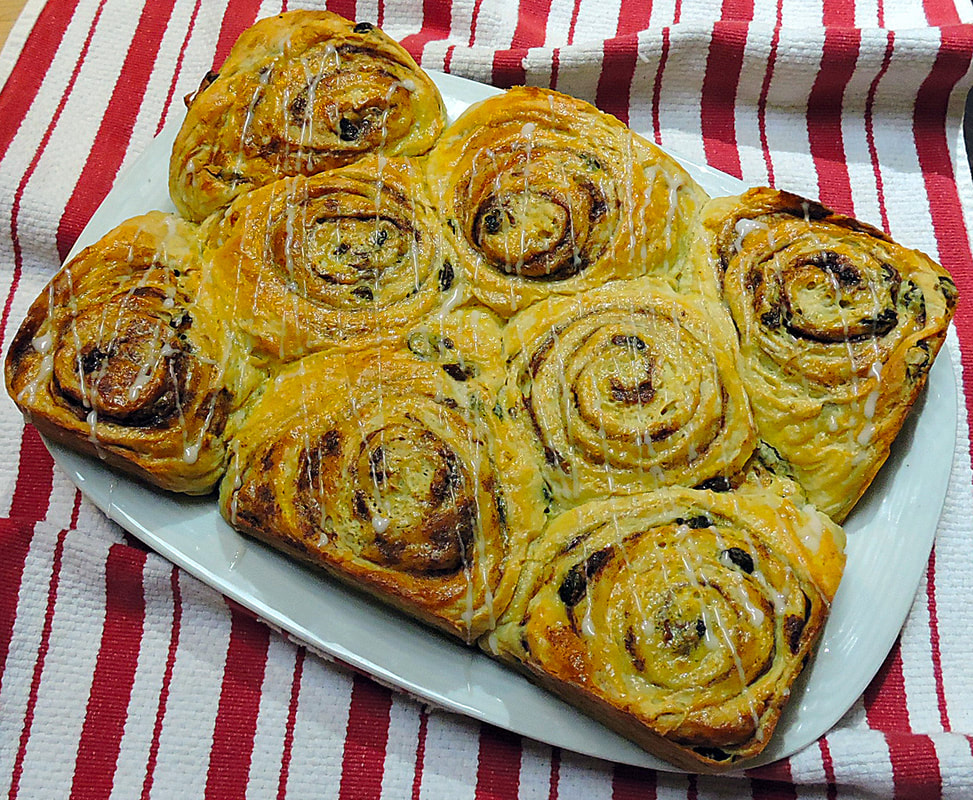
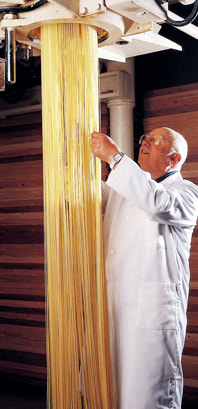
  Natale a casa Finzi Natale a casa Finzi Since my son Lucas was small, we have obviously dedicated early Christmas morning to opening gifts. This early morning sharing of love for each other has often stretched past noon, depending on the number of gifts to open. Admittedly, "We Three" (as we call our little famiglia) spoil each other, with multiple gifts and overstuffed stockings hanging on the mantle--some gifts even celebrate Italian cuisine. (This year, my favorite was a 5 pound caciocavallo cheese from Puglia!). This can be a long ordeal (when Lucas was little, it might take all day), so one tradition we've tried to keep is making my recipe for cinnamon-raisin and walnut buns the day before so we can easily heat them up and ice them for our Christmas breakfast. There's nothing better than one of these buns with a hot chocolate on Christmas morning. It's also a quick, simple breakfast to make that won't delay the opening of gifts. Here is the recipe, which can make enough to enjoy throughout the entire Natale season... 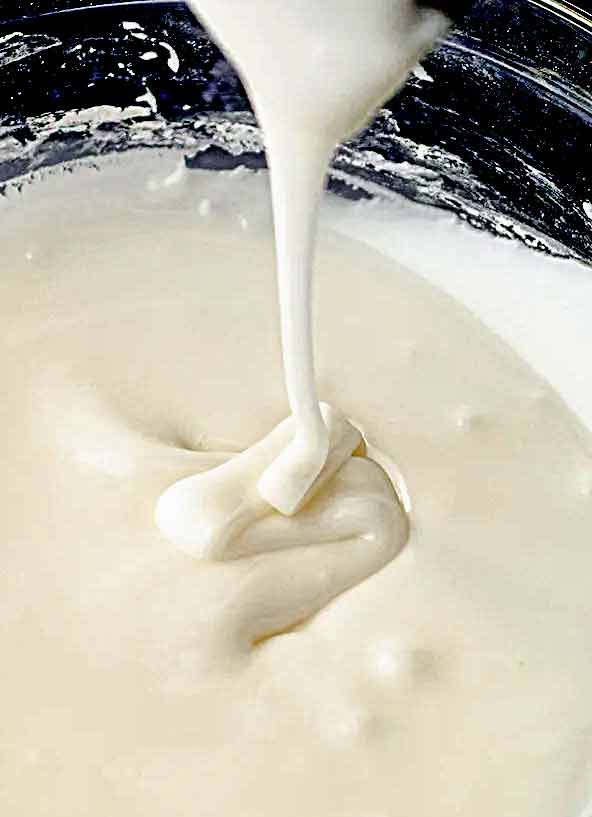 Babbo Finzi's Raisin-Cinnamon-Walnut Buns This recipe makes about 18 buns, about 5" across Ingredients Dough 4 Large Eggs 1 cup warm water (105-110 F) 1/2 cup orange juice 1/4 cup mild honey (Acacia honey is best) 2 tablespoons active dry yeast 7-1/2 - 8 cups all purpose flour 2 teaspoons fine sea salt (I use Baleine brand) 2-3 tablespoons ground cinnamon (to taste) 1-1/2 cups (3 sticks) unsalted butter, at room temperature (cut into pieces) For the Filling 1-1/2 cups light brown sugar 2 cups chopped walnuts (ground in a spice grider) 1/2 teaspoon salt 1/3 cup ground cinnamon 1/2 cup (1 stick) melted, unsalted butter 1-1/4 cups raisins (soaked in an orange liquor for 15 minutes, then drained) For the Frosting 4 cups sifted confectioner's sugar 1 teaspoon vanilla 1 teaspoon Fiori di Sicilia flavoring pinch of salt 2-3 tablespoons orange juice, or orange liquor. 1/4 cup milk (I use skim) grated zest of 1-3 oranges (depending on how many are being served) for sprinkling over the top... I forgot this Christmas) Directions for Dough 1. Place the eggs into a medium bowl and whisk until foamy. 2. Add the warm water and honey to the eggs and mix well to dissolve. Sprinkle the yeast into the egg mixture, stirring well, then let sit to "proof" until foamy (about 10-15 minutes). 3. After the yeast has proofed, add the 1/2 cup of orange juice and stir well. 4. Sift together the 7-1/2 cups of flour, 2-3 teaspoons cinnamon and 1/2 teaspoon salt into the bowl of a stand mixer. 5. Start mixing on a low speed while adding the pieces of room temperature butter until it gets to a rough crumb stage. 6. Make a well in the center and pour in the proofed egg/yeast mixture. Mix on low speed until the dough clears the sides of the bowl. 7. Place the dough onto a lightly floured work surface and knead until it becomes smooth and springs back a bit when a finger is pushed into it. This dough should become smooth and not sticky. 8. Cover with a cotton towel or plastic wrap for 10-15 minutes to relax. Make the Filling 9. In a medium bowl, combine the brown sugar, chopped walnuts, salt and cinnamon. I grind the walnuts into a crumb using a spice grinder, but if you them chunkier, leave them chopped (from a package) or use a chef's knife to chop to a size you like. Filling and Rolling the Dough 10. Prepare two half sheet pans by lining them with parchment paper. 11. Roughly shape the dough ball into a rectangular block to make rolling out into a rectangle easier. On a lightly floured surface, roll out the dough into a rectangle that is no more than 12" and no less than 1/4" thick. The rectangle should be about half as wide as it is long. Try to create 90 degree, angled corners. 12. Using a pastry brush, coat the entire surface of the dough with the melted butter, coming to within 1/4" of all sides. 13. Spread the walnut filling evenly across the dough. 14. Drain the raisins well and spread evenly across the dough. 15. Roll up the dough, starting from the side furthest from you, jellyroll fashion. As you roll toward you, lift occasionally to tighten the roll as you go. When you get to the end, pull and then pinch the last side along its length, pinching the dough so it sticks to itself. 16. Roll the pinched edge so it's underneath your roll. (This helps to hold it in place while cutting.) Using your flat hand or a bench scraper, make sure the ends are pressed in flat. 17. Using a large, serrated bread knife, start cutting 1/2 - 3/4" thick slices, placing each one on your parchment lined sheet pans. You can either allow 1-2" of space between each so they sell into nice round buns (photo below), or more tightly next to each other to create more of a pull-apart bun experience. (See the photo above). 18. Cover the pans loosely with plastic wrap and allow to rise at room temperature, away from drafts, for about 1 hour, or until doubled in bulk. This dough really puffs up! 19. About 30 minutes before baking, preheat oven to 350 F. 20. Place trays on center rack(s) and bake for 15-20 minutes, or until lightly golden brown. You can bake each pan separately, or if your oven can accommodate two pans at once, bake them at the same time, perhaps swapping racks and rotating pans once halfway through baking to ensure even baking. 21. Try not to over-bake these buns--they can dry out easily if over-baked. You want them warm and soft when served. They freeze well (on a tray in the freezer, then placed into zip-lock bags when rock-hard). They will microwave perfectly (30 seconds or so) the next day (after refrigerated), or heated in an oven from frozen for 10-15 minutes at 350 F. They can be iced right before serving. Making the Icing 22. While the buns are baking you can make the icing. Place the sifted confectioner's sugar and salt into a large bowl, and using a small whisk, combine. Whisk in the vanilla, Fiori di Sicilia and the orange juice (or orange liquor). Now, slowly start adding the milk, little by little, until the icing becomes very smooth and can make a ribbon when drizzled from the end of the whisk. You might not need all the milk, or you might need a tablespoon or two more (it depends on the humidity). This recipe can also be made swapping out the milk for water if you are lactose intolerant. You want the icing to be able to drizzle ribbons onto your buns, yet be sticky enough to cling well. Serving/Reheating 23. When finished baking, remove the pans from the oven and let cool for 5-10 minutes right in the pan. If you ice them while hot, the icing might soften and become too thin. 24. Select the buns you want to eat right away and either use your whisk or a small spoon to drizzle lines of icing across the tops. If you like lots of icing, use a small offset spatula and spread a coating of icing across the entire surface. 25. Distribute some orange zest on top. 26. For eating the next day, you can place some buns on a tray (without icing) and cover with plastic wrap. The next day you can reheat the icing for 15 seconds in your microwave, then reheat the buns in the microwave for 30 seconds (using a microwave cover) or in a 325 F oven, lightly covered with foil, for 15 minutes. 27. These buns freeze very well, without icing, by first freezing solid, uncovered, in your freezer until rock hard. Store the frozen buns individually in zip-loc bags. To defrost and reheat, place on a pan covered lightly with foil in a 350 F oven for 15 minutes, then ice afterwards. You can also defrost them using your microwave using the defrost setting, but don't forget to use a cover to prevent drying out. Our buns lasted our family of three from Christmas morning until the Epiphany on January 6th! I hope you enjoy them as much as we do... --Jerry Finzi 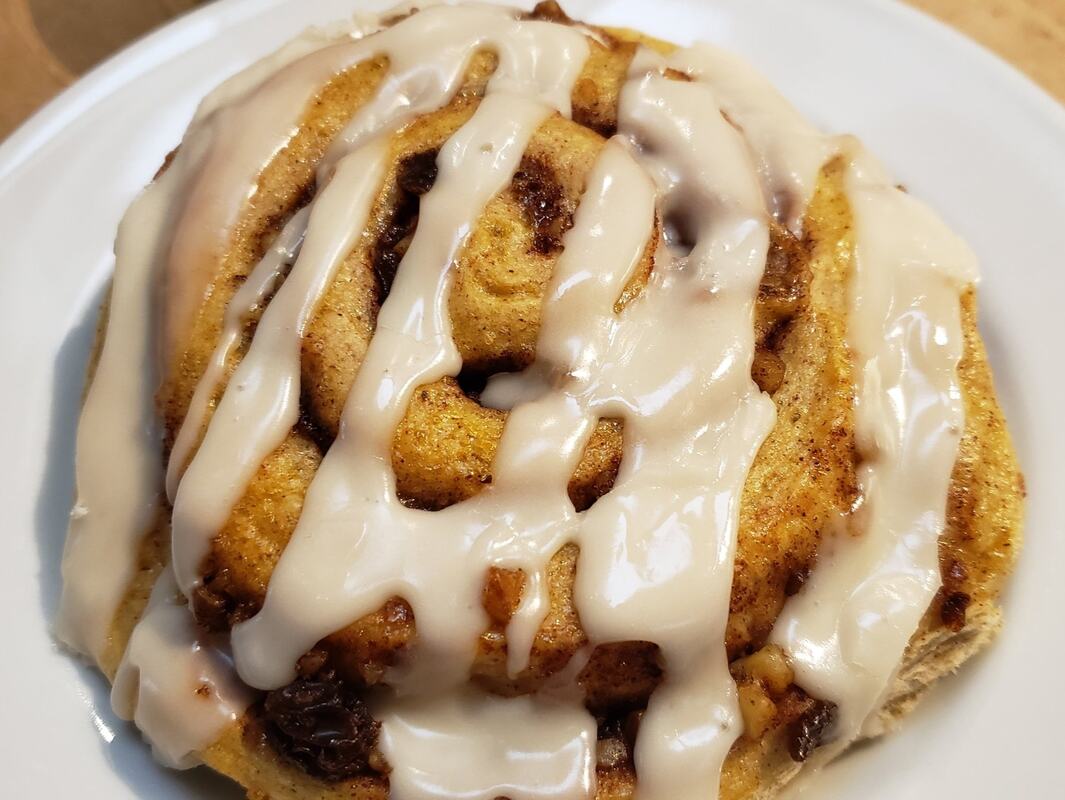 Copyright 2023 by J.Finzi/GrandVoyageItaly.com
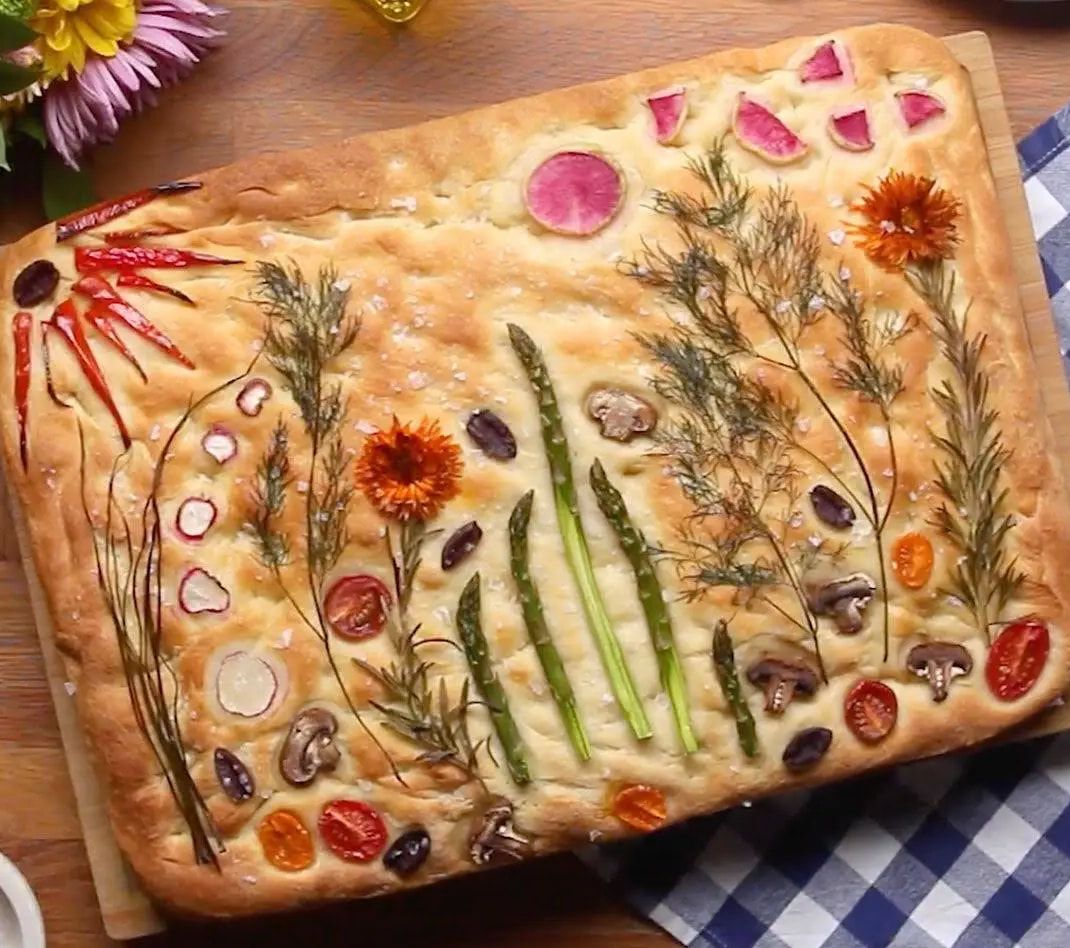
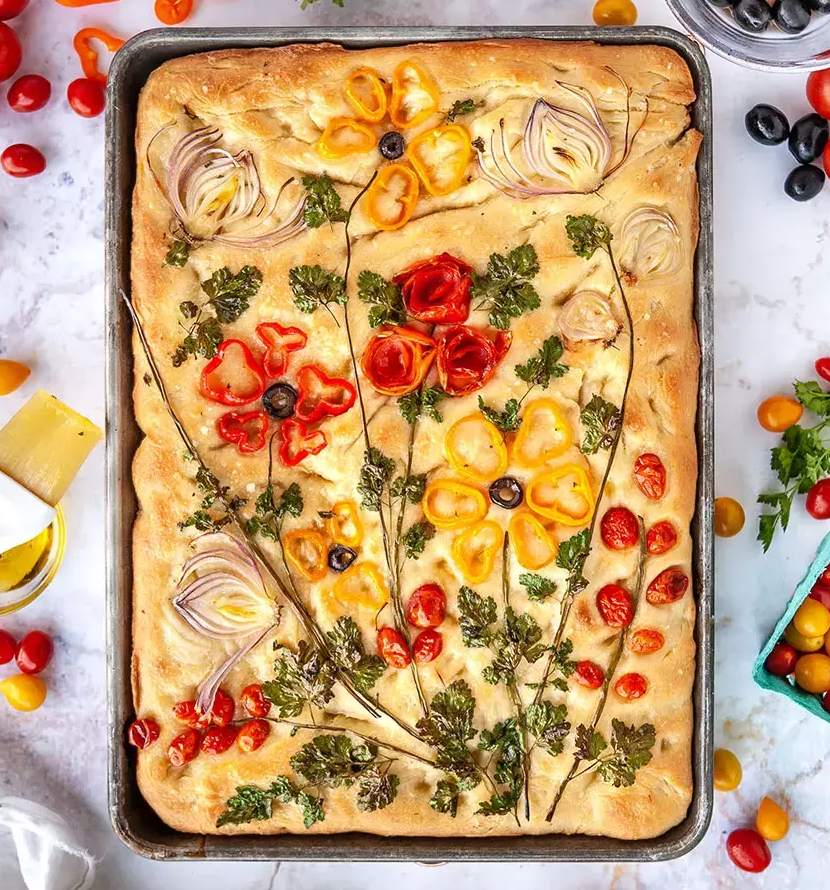
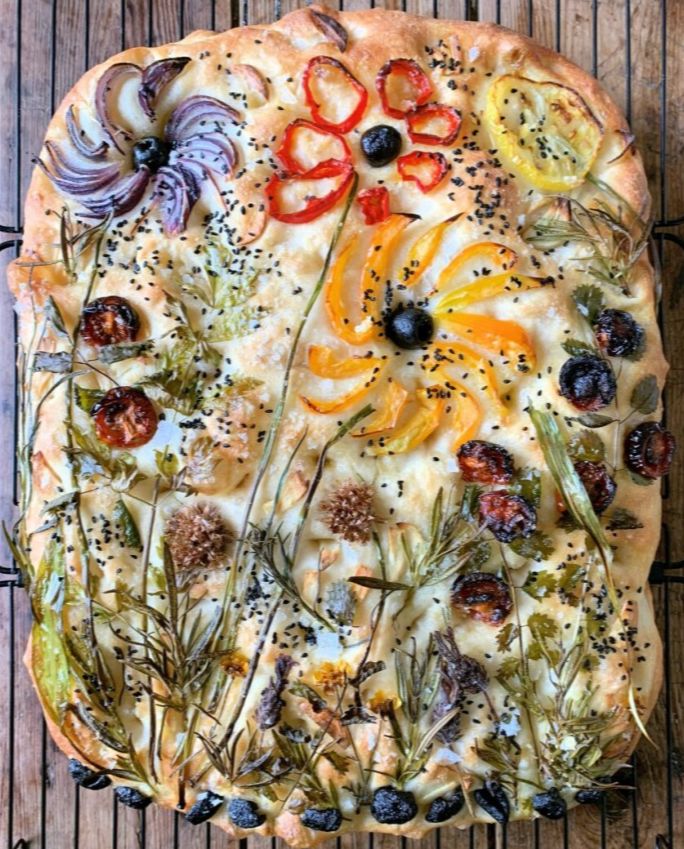
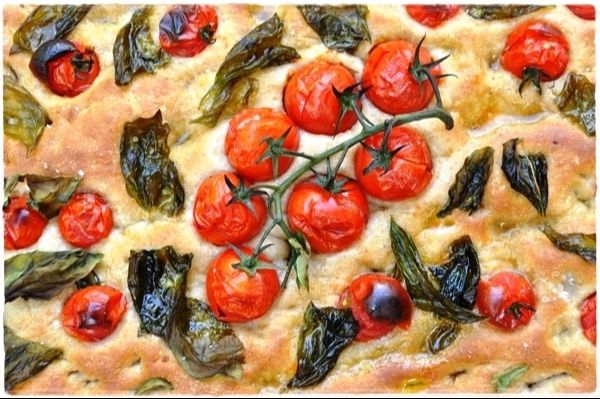
 Focaccia is one of the world's oldest flatbreads with roots in ancient Greece and with the Etruscans, even before the Roman Empire reared its head. The Romans called it panis focacius (bread of the hearth) in Latin. In its basic form, it is a leavened bread, very similar to pizza but without all that cheese. There have been versions of focaccia all through the Mediterranean coastline in Europe and northern Africa. In ancient Roman days, it looked like a very simple, flat round of pull-apart bread. It was a meal to be carried by shepherds and fishermen and meant to be eaten later. In regions of neighboring France it's called fougasse. In Argentina and Brazil--both with large Italian immigrant populations--its name is fugazza and they can be either topped with stringy cheese or even double-crusted and stuffed. The common modern form of focaccia is dimpled with fingertips to make little wells that can hold savory items like olives, cherry tomatoes, peppers, red onion, sliced potatoes, garlic or even sweet things like figs, pear slices, blueberries, walnuts, dates, honey, anise seeds, bulbing fennel (finnocchio), orange zest or grapes. The top is usually brushed or drizzled with extra virgin olive oil and sprinkled with rosemary, sea salt, pepper or other spices. Of course, you can sprinkle a bit of cheese (usually grated), but go to far and you've crossed the line between focaccia and pizza. The variations are endless. In Italy, most pasticceria (pastry shops), panetteria (bread bakery) and even bars will have slices of focaccia often sliced and priced by weight. (Note: A "bar" in Italy is a family friendly place to get cappuccino and pastry in the morning and panini for lunch.) 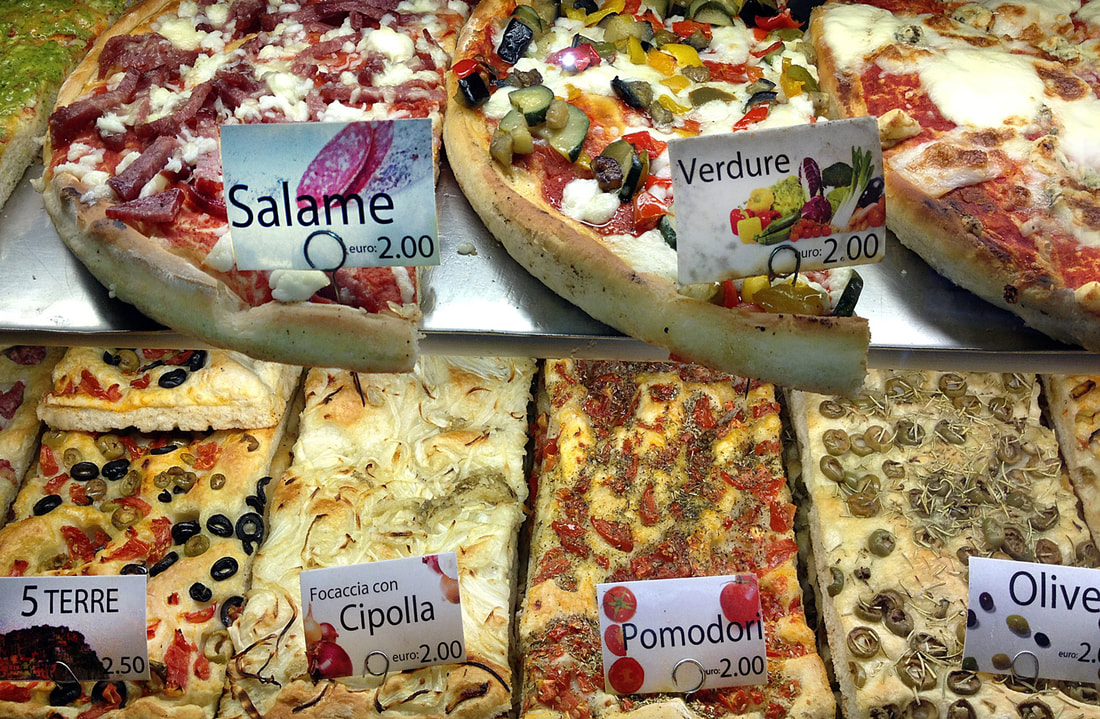 Typical Italian offerings of focaccia Focaccia is usually baked in 1" deep, dark steel pans. The texture is usually bready and for that reason a high protein "strong" flour (bread flour here in the U.S.) is used. The thickness also has the benefit of being used to make panini, slicing through the middle and stuffing with provolone, mozzarella, prosciutto or thing slices of salami. 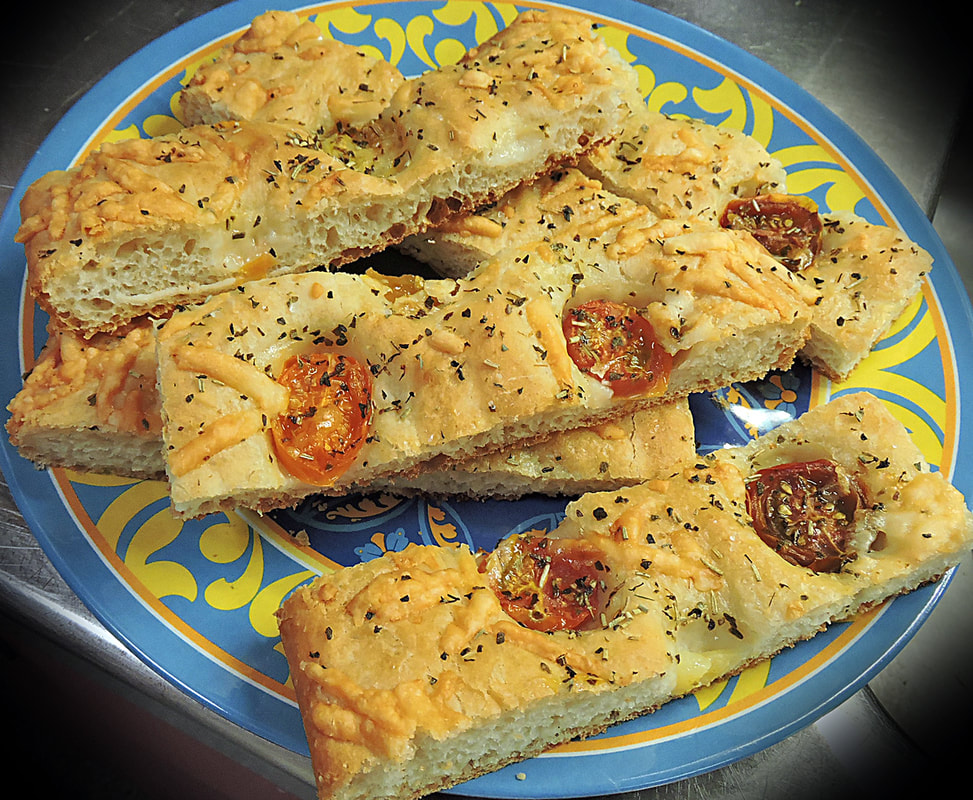 Slices of focaccia ready for snacks, lunch or along with dinner 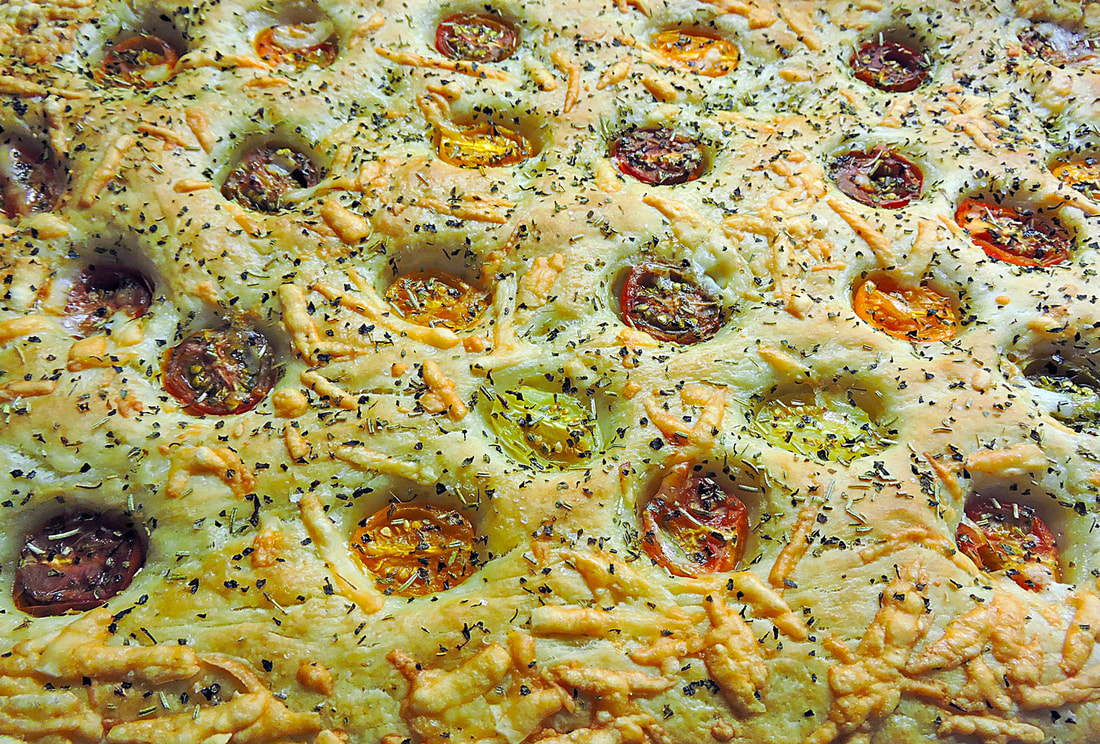  Dark, half sheet pan available on Amazon Dark, half sheet pan available on Amazon Ingredients Yeast mixture: 1-3/4 cups warm water (110-115F) 1-1/5 tablespoons fast acting yeast 1 tablespoon honey  For the dough: 1 cup King Arthur all-purpose flour 2-3 cups King Arthur bread flour (plus extra bench flour) 1 tablespoon sugar 1 tablespoon sea salt 2 tablespoons extra virgin olive oil Extra virgin olive oil for the pan Toppings: Extra virgin olive oil (for brushing) Cherry tomatoes 1/4 cup grated cheese (using 1/4 holes/box grater), provolone, asiago, or caciocavallo (cheese is optional) Dried thyme, rosemary, oregano, fresh ground pepper, sea salt Directions Preheat oven to 435F with a pizza stone or steel on the center shelf.
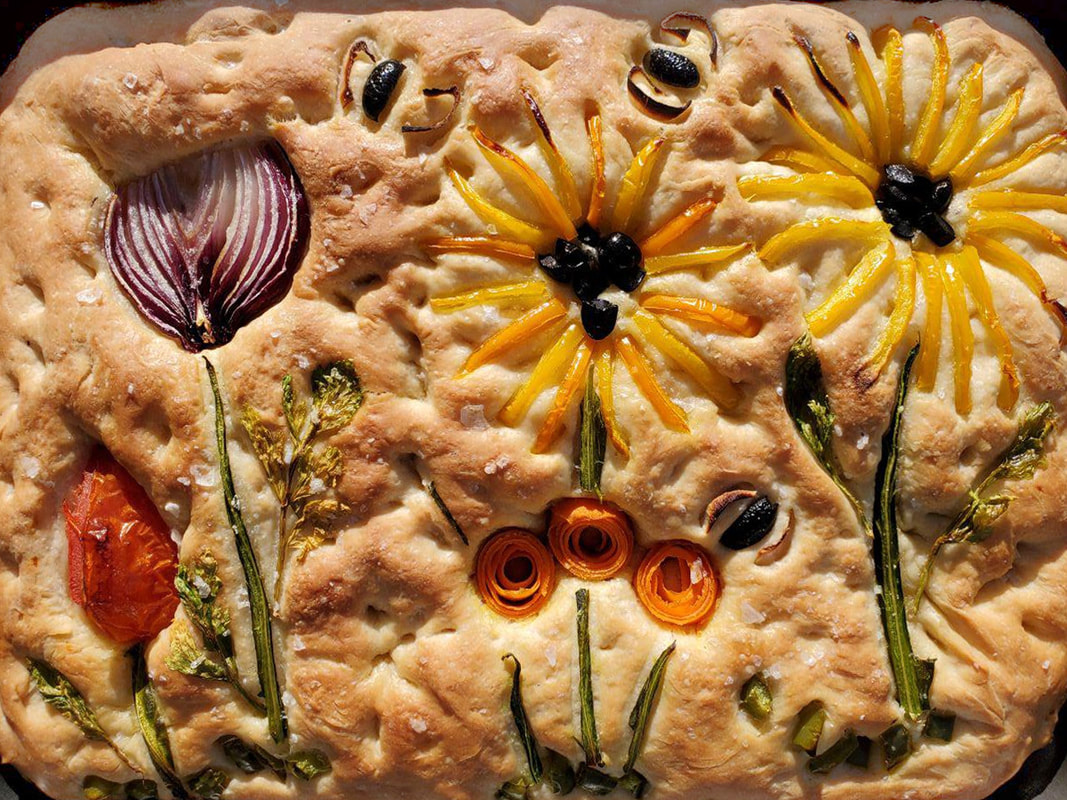
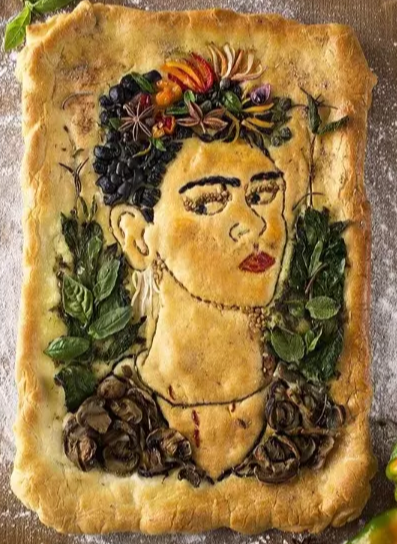
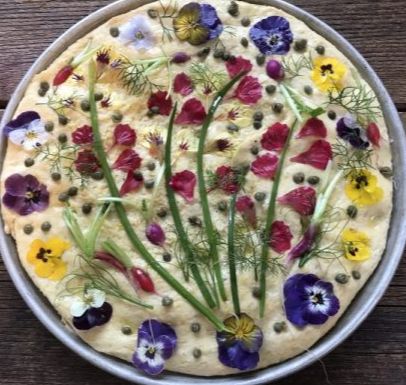
You can reheat in a microwave by wrapping with a damp paper towel, then heating for 30 seconds (time depends on the power of your unit). To kick it up a notch, try a fresh drizzle of extra virgin olive oil (we really recommend unfiltered) or an aged balsamic. For a quick lunch, top with a draping of prosciutto. You can also slice focaccia in half and use to make a panino (sandwich) filled with thin sliced colt cuts and cheese or even cooked ingredients like grilled eggplant, tomatoes and mozzarella or roasted vegetables. Getting Creative 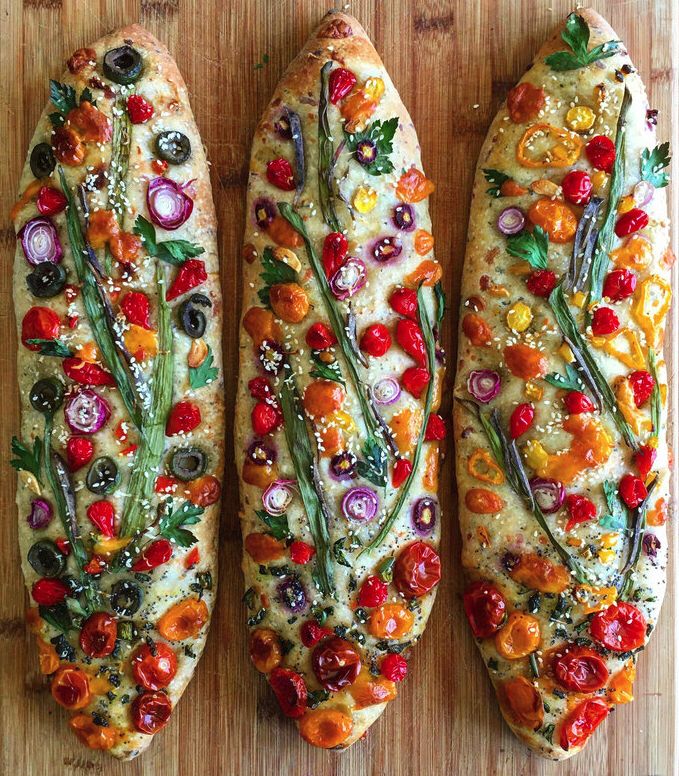 Now that you know the basics of making focaccia, consider getting creative, as these examples illustrate. Look for color contrasts, textures and interesting shapes with your choice of toppings. Consider unusual things like asparagus, cauliflower, beets, basil, cilantro, kale, mushrooms, berries, capers, chives, colored course sea salt, and various seeds. Depending on your ingredients, you might have to partially bake your focaccia first with ingredients that can cook during the entire bake time and need to be pressed into the dough. For other things that might burn, like seeds or tender leaves like basil, position on top during later stages of baking. Be creative and make a masterpiece for a special occasion, or simply make simple focaccia for every day snacks and meals... Buon appetito! --Jerry Finzi
 You might also be interested in...
Forni Italiani: 21 Regional Breads from Italy The Secret Life of Ciabatta Scarpetta: Bread Wipes the Italian Plate Clean Italian Easter Bread: Pane di Pasqua Recipe Pane Coccoi: The Amazing Sardinian Art of Decorated Breads Forno Antico Santa Chiara: More than Just a Bread Bakery 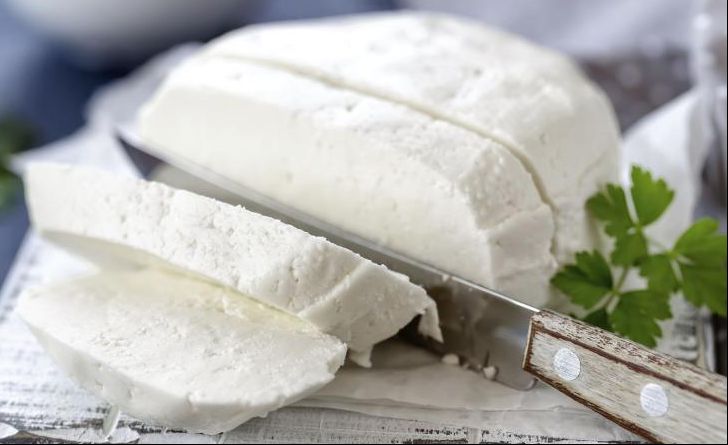 Most Italian-Americans have heard of basket cheese, that light, soft, fresh cheese (similar to ricotta) sold in Italian specialty stores every Easter which is used to make the traditional pizzagaina or pastiera di grano (wheat grain pie) recipes. In the U.S. it is rarely seen year-round and is mostly used as an ingredient. In Italy, basket cheese is is called formaggio fresca (fresh cheese) and is readily available all year long for use as both recipe ingredient and as a table cheese, just as ricotta is eaten, but with a less salty and milder flavor.   Basket Cheese Ingredients 1 gallon whole milk (or, if you can find some, use goat's milk) 1/4 teaspoon rennet 1/4 teaspoon salt (basket cheese is less salty than ricotta) You will need: Directions
You can now use your basket cheese fresh as an ingredient in recipes, such as the traditional Easter pizzagaina. If you want to eat it fresh (the same day is best) you can turn the baskets upside down onto a serving plate and remove the basket. This is a mild cheese, but if you like you can sprinkle with a little sea salt or fresh ground pepper. You can also spread it on bread or crostata and drizzle with honey or balsamic and serve with with figs or fresh berries. Although it should be eaten the day it's made, you can keep it for several days by keeping the basket in a plastic container along with with an inch of milk. 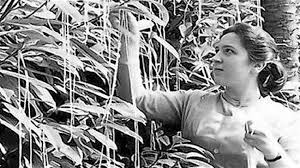 Making Ricotta from the Leftover, Fresh Whey Although my wife Lisa's ricotta recipe is great, technically, it's not a true ricotta made from whey. Making true ricotta (re-cooked, or cooked twice) is incredibly simple once you have whey leftover from cheese-making using rennet. The whey has to be fresh from the cheese-making process above.
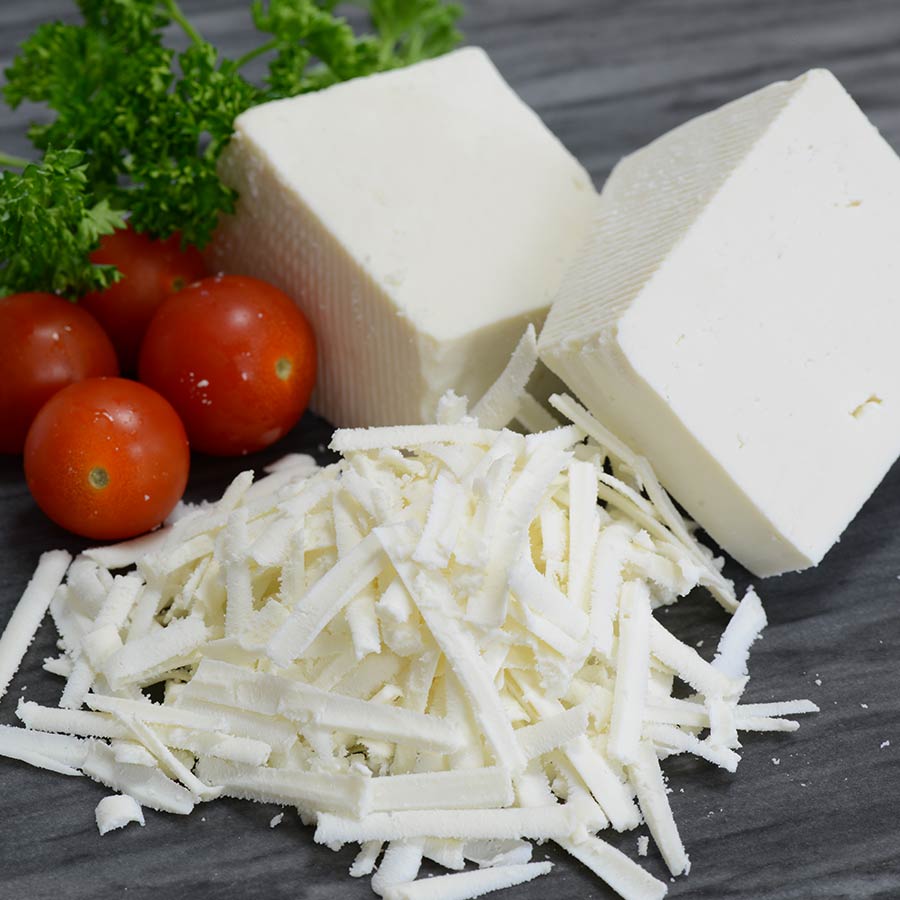 Making Ricotta Salata Ricotta salata is basically a firm, saltier version of ricotta cheese that is very similar to feta. While feta is made with rennet, ricotta salata is made from the whey leftover from cheese-making, just as normal ricotta is made. Ricotta salata needs more salt than normal ricotta and is pressed it to release any extra moisture. You need a fine mesh cheesecloth or butter muslin.
Ricotta salata is beautifully paired with sliced apples, pears, fresh figs or crumbled on pizza, pasta or salads. Buon apetitto! --Jerry Finzi You might also be interested in...
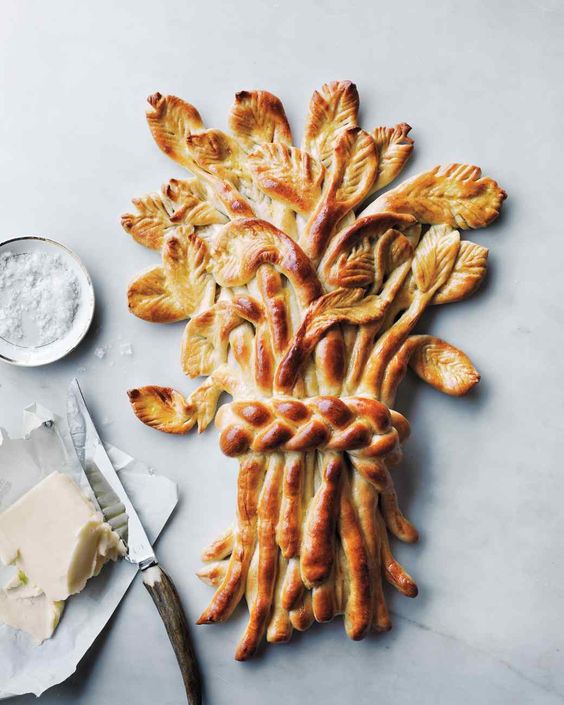
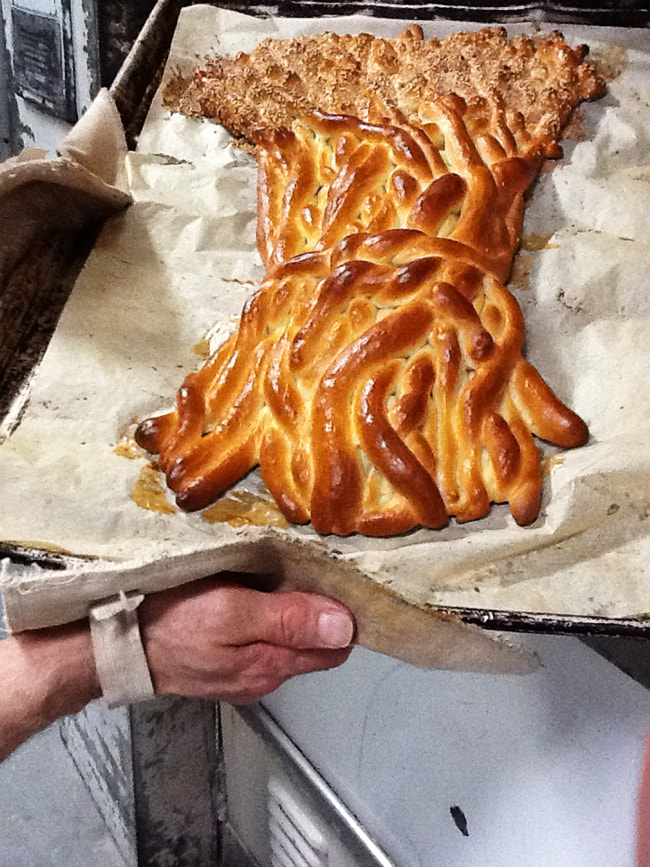
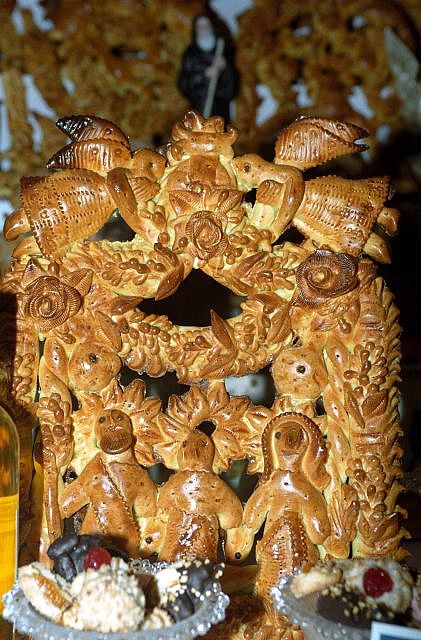
Southern Italian Pastries: Pasticiotti versus Pasta Croce Recipe: Babbo Finzi's Pizzagaina (Pizza Rustica) Recipe: Lisa's Home Made Ricotta Cheese Ricotta: Twice Cooked and Not Quite a Cheese? Recipe: Sicilian Ricotta Cheesecake Making Fresh Giuncata Cheese 31 Italian Cheeses: Goat, Cow, Buffalo and Sheep, Oh My! Supermarket Parmesan Cheese Contains Cellulose: Not All That it's Grated Up to Be? Marscarpone: More than Just Italian Cream Cheese  This year we decided to make our Pizzagaina recipe once again. We loaded up my Kindle with our recipe on GrandVoyageItaly.com and got started getting the ingredients together. As usual, my son Lucas helped with the mise en place. He is a great sous chef but nowadays is also cooking a lot of his own dishes. With the coronavirus limitations of shopping, and certain things in our fridge missing, we decided to use up some smoked gruyere in place of the mozzarella but still used ricotta and fontina (I love its creaminess). That's the way of the Italian cucina--not letting anything go to waste. Otherwise, our recipe was the same. And each time I make this treat, I'm amazed that I got the ingredients perfectly proportioned--a difficult thing to do when writing up a recipe for other people to duplicate. This crust is just wonderful to work with and fits the spring pan perfectly, with even a little left over after making the lattice strips. In the end, we made the pizzagaina a couple of days after Easter since we had a huge ham that we baked for Easter dinner, along with roasted potatoes, carrots and onions and garlic, along with home made apple and cranberry sauce. There was plenty of leftover ham for soup, sandwiches and the pizzagaina. Try this recipe if you get a chance. If you prefer a more solid filling, add two more eggs when making the filling. Buon apettito! --Jerry Finzi 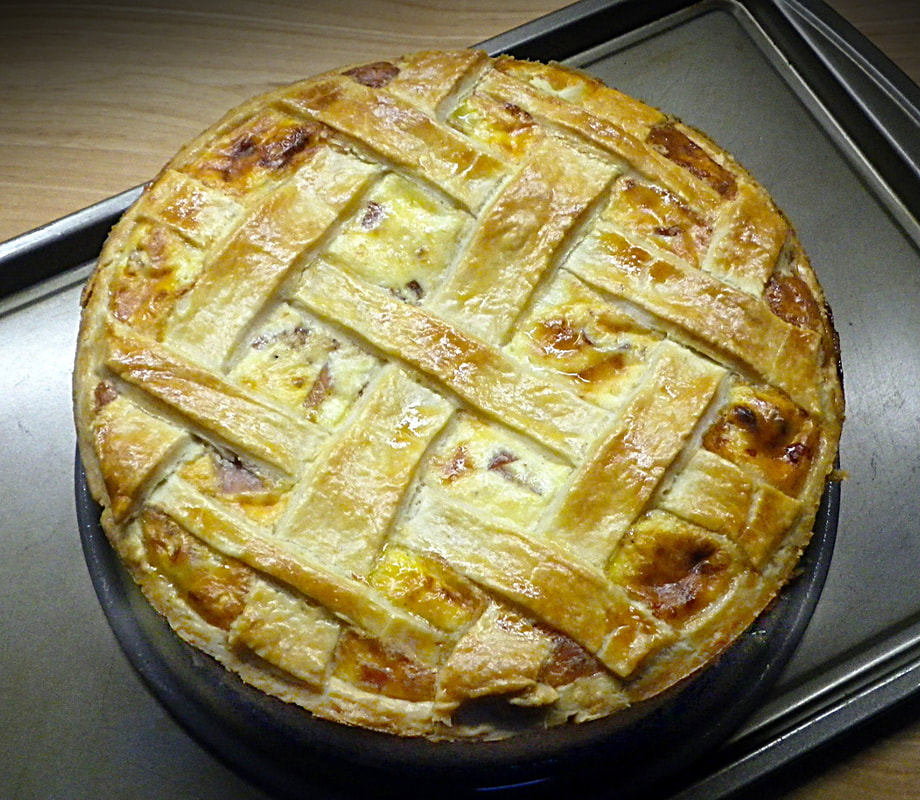  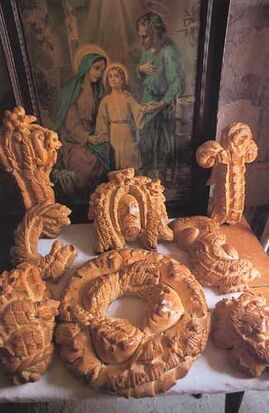 March 19 is a very special saint day in Italy... La Festa di San Giuseppe. This is the day that Catholics celebrate not only Saint Joseph, but all fathers. Consider this day as the Italian Father's Day... A special tradition is making and serving Pane di San Giuseppe, a shaped bread formed into a variety of designs for loaves that will adorn La Tavola di San Giuseppe. You'd be surprised at the amazing and luscious spreads on Italian's tables for their Cena di San Giuseppe, both in private homes and for community and church groups. Traditional forms for breads are crowns, crosses, crabs, donkeys, staffs, wheat, images of St. Joseph, and braids representing the Blessed Mother. This bread has a rich texture and a slightly sweet taste. To pay homage to St. Joseph being a carpenter, breadcrumbs and sesame seeds signify sawdust fallen from his saw. 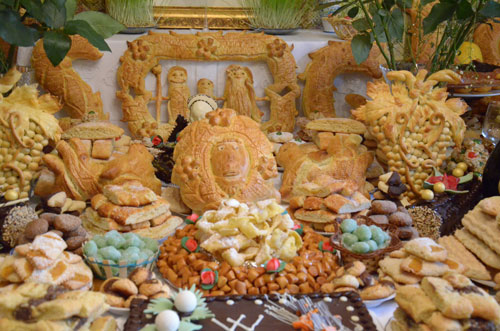 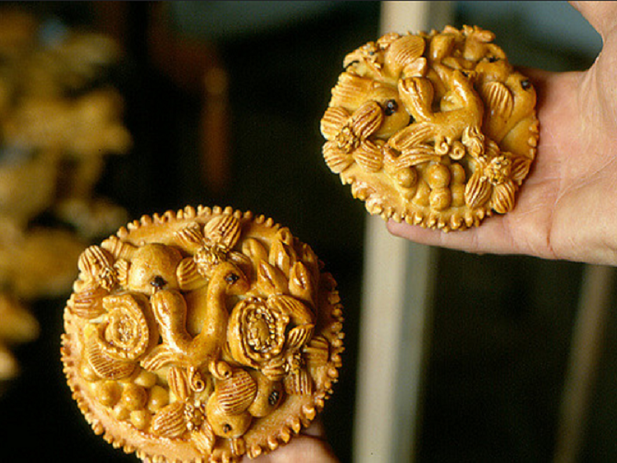  Here is a basic recipe for making Pane di San Giuseppe in a braid form... Ingredients
Directions
--GVI
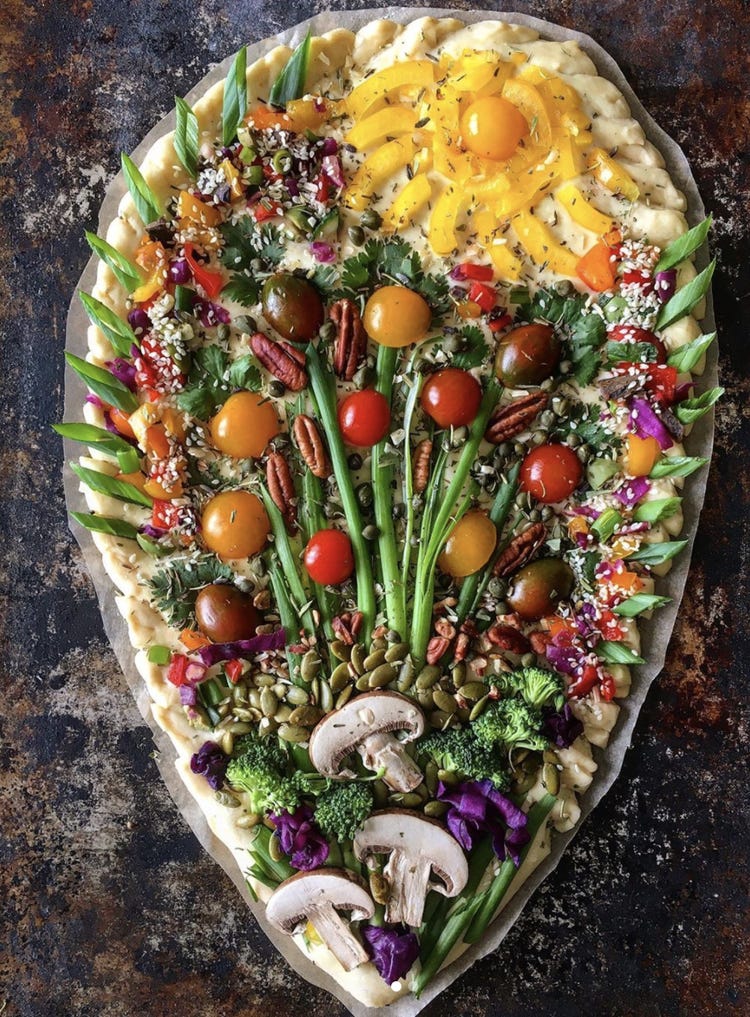
   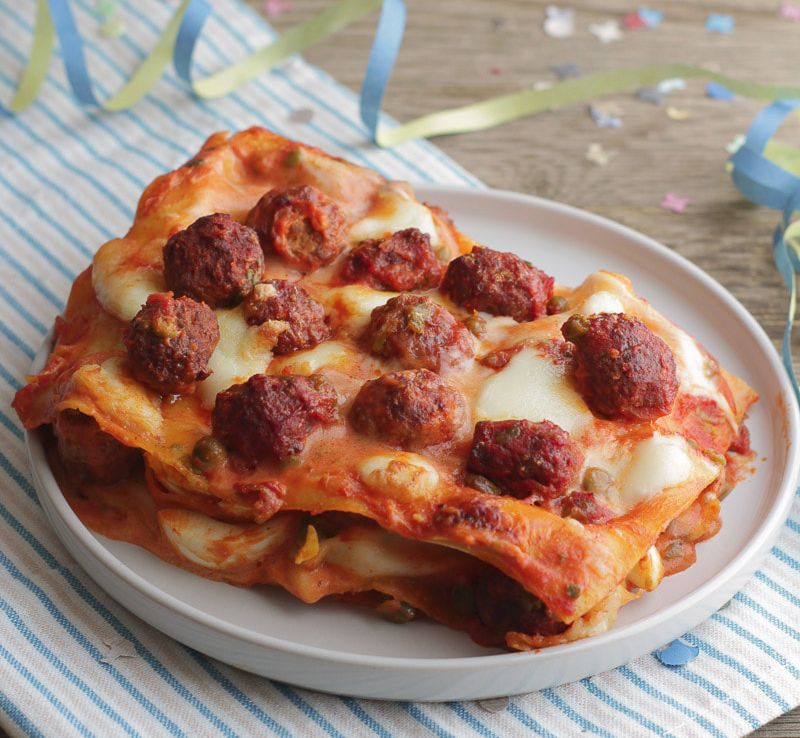 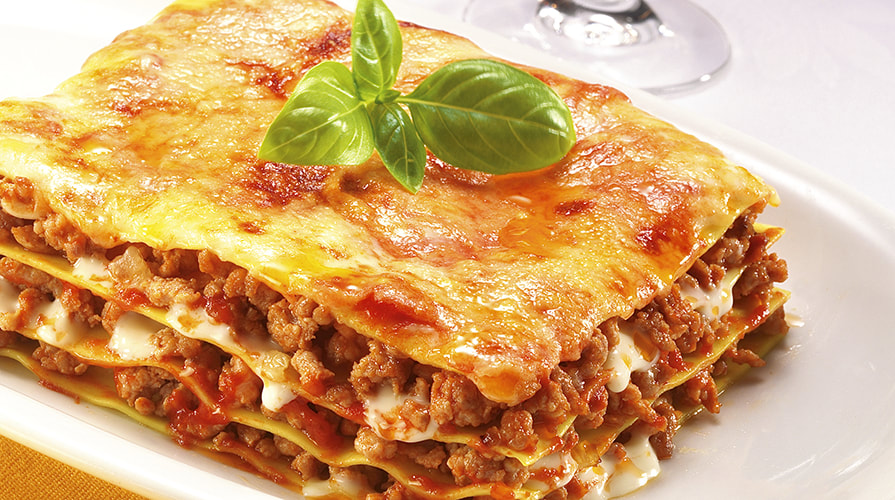 Fat Tuesday is called Mardi Gras in French but in Italy it's known as Martedì Grasso. Ash Wednesday--the beginning of Lent and fasting until Pasqua--happens the day before Martedì Grasso, which gives Italians a reason to feast and party. During Lent, Catholics are expected to give up something they love as penance. When I was a boy, the rules were very loose--giving up something you didn't like anyway was a way around the rules. But Italy is a Catholic state and many still observe full sacrifice. While some might replace meat only on Fridays with fish, others give up meat entirely during Lent. (More modern twists are giving up texting, Facebook or TV). Broken down from the Latin, Canem Levare (meat lift), the festive celebration of Carnevale can literally be thought of as a time when meat is lifted away from meals--as a sacrifice. Carnevale in Italy starts on Giovedí Grasso, the Thursday before Fat Tuesday. During this time Italy celebrates Carnevale in towns like Venice, Viareggio and the Emilia-Romagna town of Cento. But Carnevale is widespread in Italy, just as Lent is... so just before giving up meat, they feast on it... In Southern Italy, especially around Naples, the end of Carnevale is celebrated by eating Lasagne di Carnevale, a rich lasagna layered with a choice of meats, typically polpette (meatballs), sausage or a meat ragu. If you know how to make a lasagna (here's our Eggplant Lasagna recipe), then you know the basics of making a Lasagna Carnevale. Just layer in small meatballs or cut up large ones in small pieces or slices. You can also include slices of sweet or spicy sausage or a thick meat sauce (like our Bolognese recipe). Guess what we are eating tonight? --Jerry Finzi  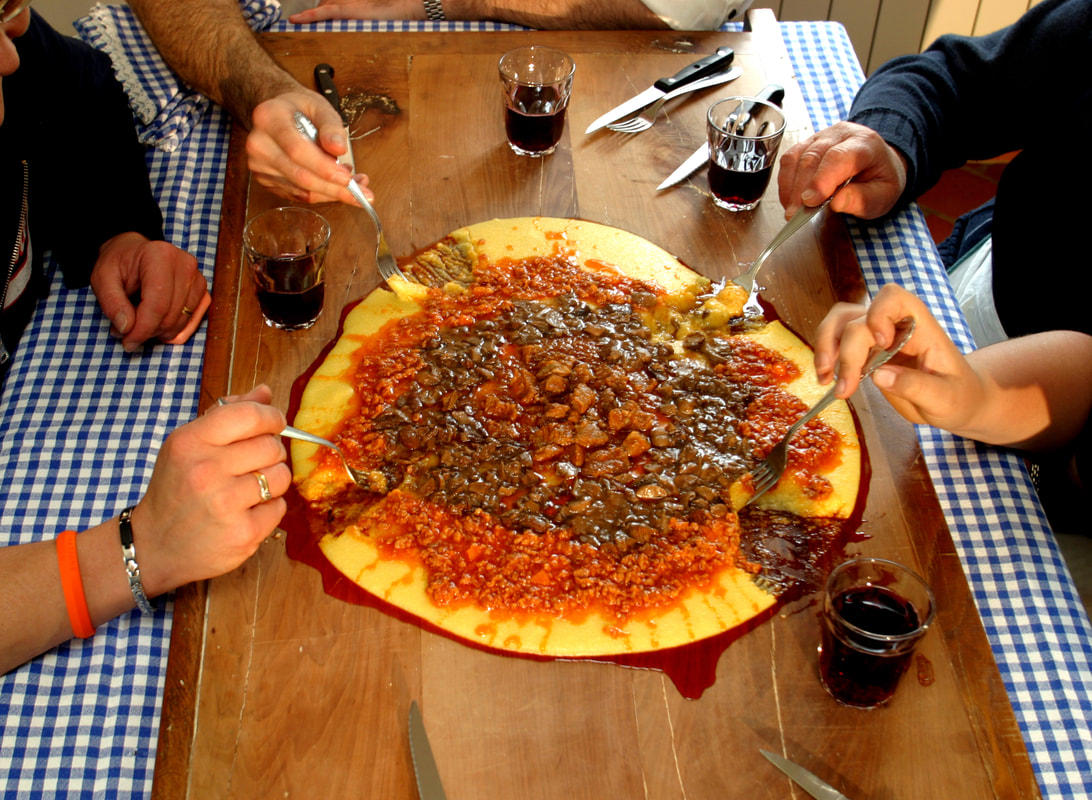 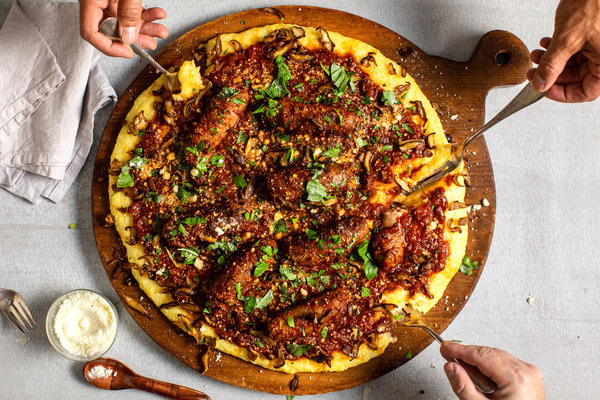 One of the cucina povera (poor kitchen) Christmas traditions in Italy is Polenta alla Spianatora (polenta on the board), a rustic meal of polenta served as a dinner during the cold nights between la Vigilia (Christmas Eve) and Capodanno (New Year's Day). What makes this meal so unusual is the manner in which it is served. In the old days, hot polenta was poured and spread out directly on the family's wooden table. A slow-cooked sugo (thick, meaty tomato sauce), peas and possibly sausages or pieces of braised pork were arranged in concentric circles. The bits of meat were a real treat for children in the poor, farming communities. Young and old alike were given forks and everyone would make their own trails in the hot mess of deliciousness, each staking out their own section. But as I've been told, in some homes there were rules: you weren't allowed to eat the meat until you ate a path to the center, with some slow eating children not having such luck! This manner of eating is a celebration of nature from the 15th century when corn was introduced to Italy from the New World. This dish is a celebration of the recent harvest... the circular shape of the polenta represented the sun, and it's corn having come from Mother Earth herself. All the ingredients topping this sun would have also been nurtured by the sun during the growing season: lentils, chickpeas, pork, chicken. This is an ancient meal that also celebrates life--and family. So everyone was at the table digging in. This is a big meal... with a large amount of polenta traditionally prepared in a copper pot resembling a modern wok. Nowadays, people tend to use a Spianatora (or spianatoia)--a modern day wooden cutting or pastry board--to pour the polenta onto. There are even some restaurants in southern/central Italy that will service this during the holiday season. 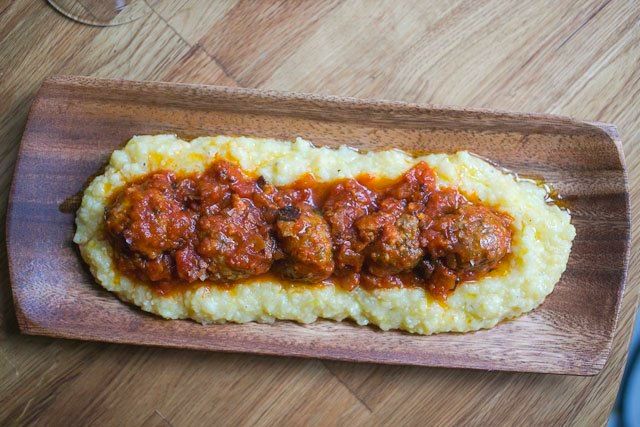 To make this warming meal for your famiglia, first you need to make a Sugo. Here's a link to my own family's Sugo Recipe.  on Amazon on Amazon For the Polenta
Top this beautiful, hot mess with Parmigiano Reggiano or Romano and invite your amici and famiglia to start scraping. Buon appetito, Buon Natale and Felice Anno Nuovo! --Jerry Finzi 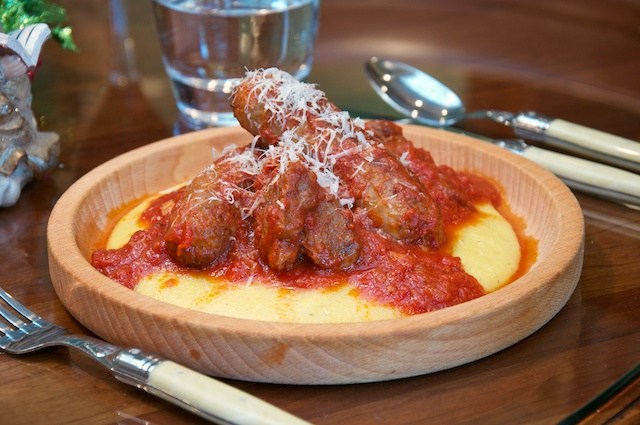 If you prefer, here's a more personalized serving 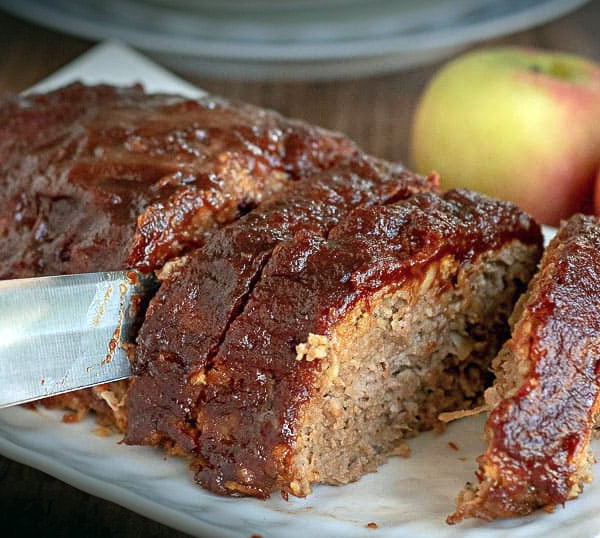 When I was a child, my mother would make meatloaf... plain, American style, ketchup covered, meatloaf. Filling, yes, but usually a bit dry and boring. After learning of the various types of polpettone (Italian meatloaves) they make in Italy, I wanted sometime more tasty with a little bit of a spicy kick. Here's my Polpettone con Salsa di Mele... For the Polpettone 1 small onion, finely chopped 2 tablespoons canola oil 1 large egg, beaten 2 cups fresh bread crumbs (honey wheat), cubed 1 cup cinnamon applesauce (of course, you can make your own) 1 teaspoon salt 1/8 teaspoon fresh ground black pepper 1 pound ground beef, extra lean 1 pound ground pork For the Glaze 1 cup cinnamon applesauce 2 tablespoons cider vinegar 1 tablespoon honey Dijon mustard 2 1/2 tablespoons brown sugar 2 tablespoons barbecue sauce (apple maple) 20 “cracks” of freshly ground black pepper Directions
Serve with some of the glaze on top of each slice, with a side of either potato croquettes or homemade spätzle (like they make in the Alto Aldige region of Northern Italy). Of course, best served with a bottle of Italian sparkling cider. Recipe copyright GrandVoyageItaly.com
 Just in time for the holidays... Autumn Beet Tart!
(Easier to say than Torta d'Autunno con Barbabietola, wouldn't you agree?) For the Crust: 1 cup of all purpose flour 3/4 cup almond flour 3 teaspoons yeast 1/4 cup water 4 tablespoons of cane sugar 2 tablespoons of extra virgin olive oil 1 teaspoon of ground fennel seeds 1 pinch of salt 1 beaten egg For the Filling: 2 large beet roots, steamed 1/2 brown sugar Directions
|

Archives
May 2024
Categories
All
|