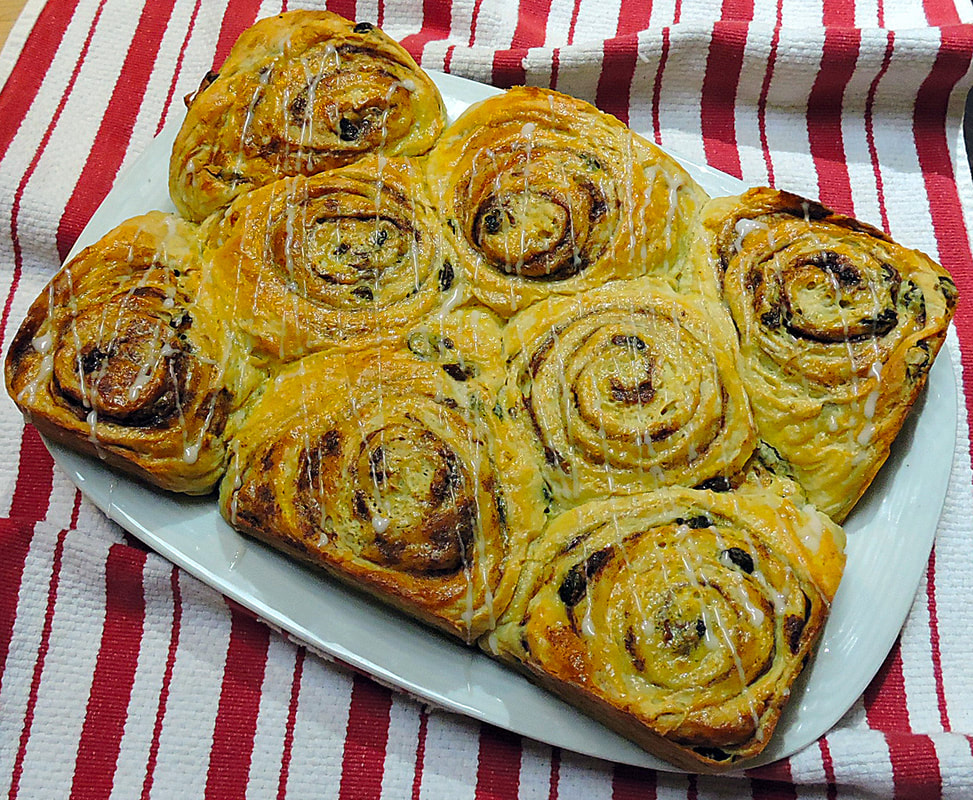
  Natale a casa Finzi Natale a casa Finzi Since my son Lucas was small, we have obviously dedicated early Christmas morning to opening gifts. This early morning sharing of love for each other has often stretched past noon, depending on the number of gifts to open. Admittedly, "We Three" (as we call our little famiglia) spoil each other, with multiple gifts and overstuffed stockings hanging on the mantle--some gifts even celebrate Italian cuisine. (This year, my favorite was a 5 pound caciocavallo cheese from Puglia!). This can be a long ordeal (when Lucas was little, it might take all day), so one tradition we've tried to keep is making my recipe for cinnamon-raisin and walnut buns the day before so we can easily heat them up and ice them for our Christmas breakfast. There's nothing better than one of these buns with a hot chocolate on Christmas morning. It's also a quick, simple breakfast to make that won't delay the opening of gifts. Here is the recipe, which can make enough to enjoy throughout the entire Natale season... 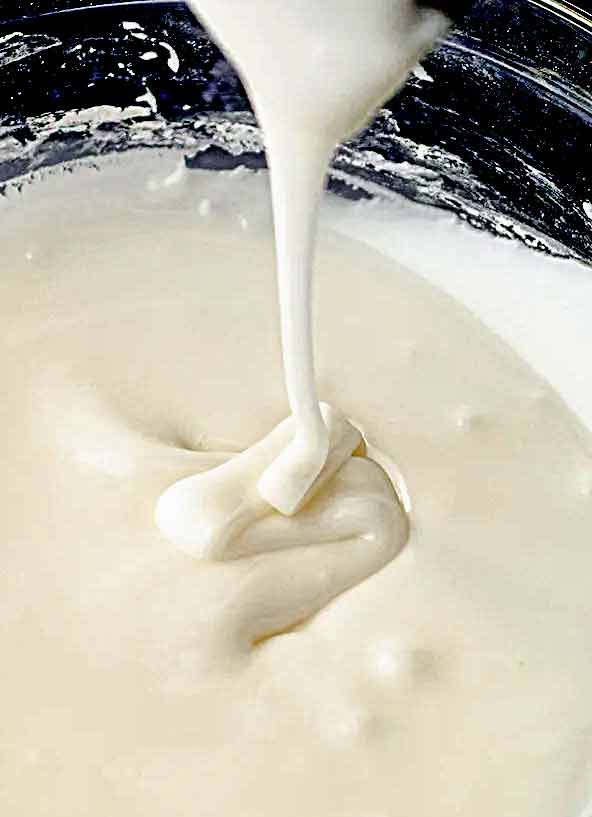 Babbo Finzi's Raisin-Cinnamon-Walnut Buns This recipe makes about 18 buns, about 5" across Ingredients Dough 4 Large Eggs 1 cup warm water (105-110 F) 1/2 cup orange juice 1/4 cup mild honey (Acacia honey is best) 2 tablespoons active dry yeast 7-1/2 - 8 cups all purpose flour 2 teaspoons fine sea salt (I use Baleine brand) 2-3 tablespoons ground cinnamon (to taste) 1-1/2 cups (3 sticks) unsalted butter, at room temperature (cut into pieces) For the Filling 1-1/2 cups light brown sugar 2 cups chopped walnuts (ground in a spice grider) 1/2 teaspoon salt 1/3 cup ground cinnamon 1/2 cup (1 stick) melted, unsalted butter 1-1/4 cups raisins (soaked in an orange liquor for 15 minutes, then drained) For the Frosting 4 cups sifted confectioner's sugar 1 teaspoon vanilla 1 teaspoon Fiori di Sicilia flavoring pinch of salt 2-3 tablespoons orange juice, or orange liquor. 1/4 cup milk (I use skim) grated zest of 1-3 oranges (depending on how many are being served) for sprinkling over the top... I forgot this Christmas) Directions for Dough 1. Place the eggs into a medium bowl and whisk until foamy. 2. Add the warm water and honey to the eggs and mix well to dissolve. Sprinkle the yeast into the egg mixture, stirring well, then let sit to "proof" until foamy (about 10-15 minutes). 3. After the yeast has proofed, add the 1/2 cup of orange juice and stir well. 4. Sift together the 7-1/2 cups of flour, 2-3 teaspoons cinnamon and 1/2 teaspoon salt into the bowl of a stand mixer. 5. Start mixing on a low speed while adding the pieces of room temperature butter until it gets to a rough crumb stage. 6. Make a well in the center and pour in the proofed egg/yeast mixture. Mix on low speed until the dough clears the sides of the bowl. 7. Place the dough onto a lightly floured work surface and knead until it becomes smooth and springs back a bit when a finger is pushed into it. This dough should become smooth and not sticky. 8. Cover with a cotton towel or plastic wrap for 10-15 minutes to relax. Make the Filling 9. In a medium bowl, combine the brown sugar, chopped walnuts, salt and cinnamon. I grind the walnuts into a crumb using a spice grinder, but if you them chunkier, leave them chopped (from a package) or use a chef's knife to chop to a size you like. Filling and Rolling the Dough 10. Prepare two half sheet pans by lining them with parchment paper. 11. Roughly shape the dough ball into a rectangular block to make rolling out into a rectangle easier. On a lightly floured surface, roll out the dough into a rectangle that is no more than 12" and no less than 1/4" thick. The rectangle should be about half as wide as it is long. Try to create 90 degree, angled corners. 12. Using a pastry brush, coat the entire surface of the dough with the melted butter, coming to within 1/4" of all sides. 13. Spread the walnut filling evenly across the dough. 14. Drain the raisins well and spread evenly across the dough. 15. Roll up the dough, starting from the side furthest from you, jellyroll fashion. As you roll toward you, lift occasionally to tighten the roll as you go. When you get to the end, pull and then pinch the last side along its length, pinching the dough so it sticks to itself. 16. Roll the pinched edge so it's underneath your roll. (This helps to hold it in place while cutting.) Using your flat hand or a bench scraper, make sure the ends are pressed in flat. 17. Using a large, serrated bread knife, start cutting 1/2 - 3/4" thick slices, placing each one on your parchment lined sheet pans. You can either allow 1-2" of space between each so they sell into nice round buns (photo below), or more tightly next to each other to create more of a pull-apart bun experience. (See the photo above). 18. Cover the pans loosely with plastic wrap and allow to rise at room temperature, away from drafts, for about 1 hour, or until doubled in bulk. This dough really puffs up! 19. About 30 minutes before baking, preheat oven to 350 F. 20. Place trays on center rack(s) and bake for 15-20 minutes, or until lightly golden brown. You can bake each pan separately, or if your oven can accommodate two pans at once, bake them at the same time, perhaps swapping racks and rotating pans once halfway through baking to ensure even baking. 21. Try not to over-bake these buns--they can dry out easily if over-baked. You want them warm and soft when served. They freeze well (on a tray in the freezer, then placed into zip-lock bags when rock-hard). They will microwave perfectly (30 seconds or so) the next day (after refrigerated), or heated in an oven from frozen for 10-15 minutes at 350 F. They can be iced right before serving. Making the Icing 22. While the buns are baking you can make the icing. Place the sifted confectioner's sugar and salt into a large bowl, and using a small whisk, combine. Whisk in the vanilla, Fiori di Sicilia and the orange juice (or orange liquor). Now, slowly start adding the milk, little by little, until the icing becomes very smooth and can make a ribbon when drizzled from the end of the whisk. You might not need all the milk, or you might need a tablespoon or two more (it depends on the humidity). This recipe can also be made swapping out the milk for water if you are lactose intolerant. You want the icing to be able to drizzle ribbons onto your buns, yet be sticky enough to cling well. Serving/Reheating 23. When finished baking, remove the pans from the oven and let cool for 5-10 minutes right in the pan. If you ice them while hot, the icing might soften and become too thin. 24. Select the buns you want to eat right away and either use your whisk or a small spoon to drizzle lines of icing across the tops. If you like lots of icing, use a small offset spatula and spread a coating of icing across the entire surface. 25. Distribute some orange zest on top. 26. For eating the next day, you can place some buns on a tray (without icing) and cover with plastic wrap. The next day you can reheat the icing for 15 seconds in your microwave, then reheat the buns in the microwave for 30 seconds (using a microwave cover) or in a 325 F oven, lightly covered with foil, for 15 minutes. 27. These buns freeze very well, without icing, by first freezing solid, uncovered, in your freezer until rock hard. Store the frozen buns individually in zip-loc bags. To defrost and reheat, place on a pan covered lightly with foil in a 350 F oven for 15 minutes, then ice afterwards. You can also defrost them using your microwave using the defrost setting, but don't forget to use a cover to prevent drying out. Our buns lasted our family of three from Christmas morning until the Epiphany on January 6th! I hope you enjoy them as much as we do... --Jerry Finzi 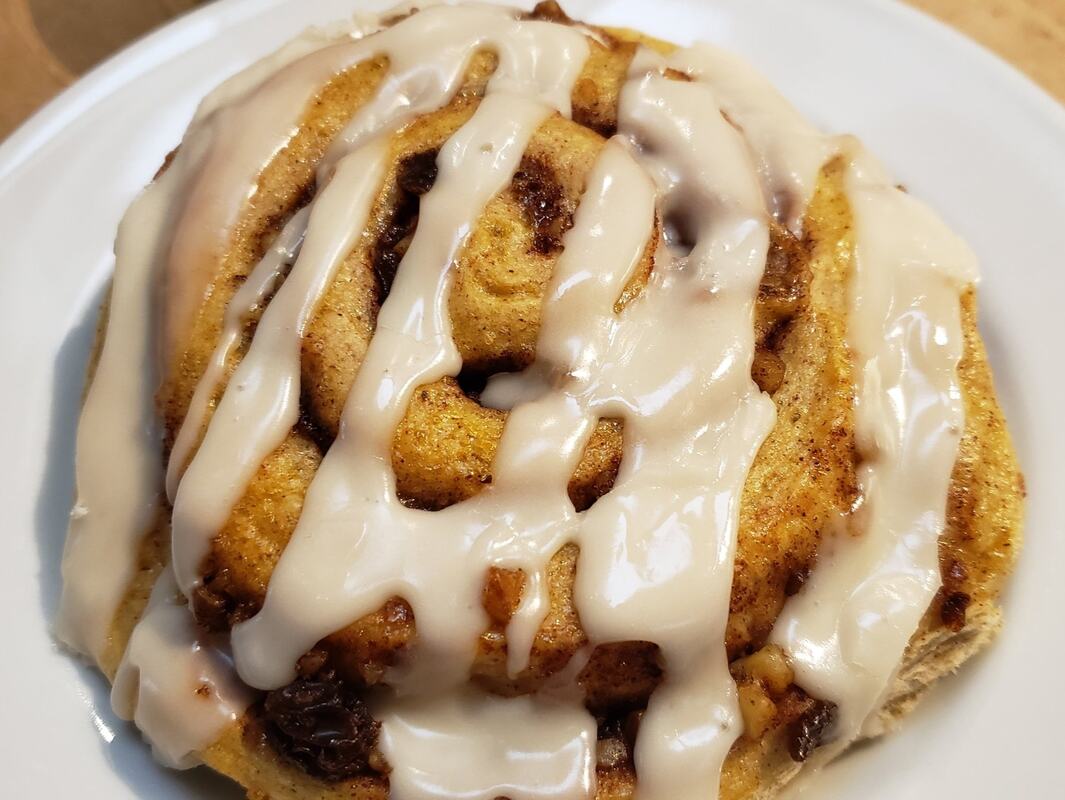 Copyright 2023 by J.Finzi/GrandVoyageItaly.com
 Making gingerbread and gingerbread houses have deep roots in history. Honey cakes can be traced to ancient Rome and culinary historians verify that ginger has been seasoning foodstuffs and drinks since antiquity. It is believed that the gingerbread as it appears today was first baked in Europe at the end of the 11th century, when returning crusaders brought back the custom of spicy bread from the Middle East. Ginger was not only tasty, but also had properties that helped preserve the bread something essential in the ancient world. According to a medieval legend, there was originally a fourth Magi who was to bring yet another gift to the infant Jesus--ginger. Sometime during his journey he fell ill and never got to Bethlehem, but a local Rabbi nursed him back to health. The Rabbi taught him that the name for Bethlehem in Hebrew actually meant House of Bread, and further told him of how he tasked his young students to make houses of bread to eat in preparation of their hopes for the coming of their Messiah. The Magus gave his chest full of ginger roots to the Rabbi and suggested adding ground-up ginger to the bread for flavor and preservation. The gingerbread house was born!  Gingerbread, as we know it today, descends from Medieval European culinary traditions. The spicy delight was also shaped into different forms by monks in Germany in the 13th century but quickly spread to other European countries. Medieval bakers used carved boards to create elaborate designs but in other places such as Calabria, Italy artisans hand shaped the spicy dough into elaborate designs, still popular today during holidays such as Easter and Christmas. Click HERE to read more about the art of Shaped Mostaccioli, the Calbrian Gingerbread.
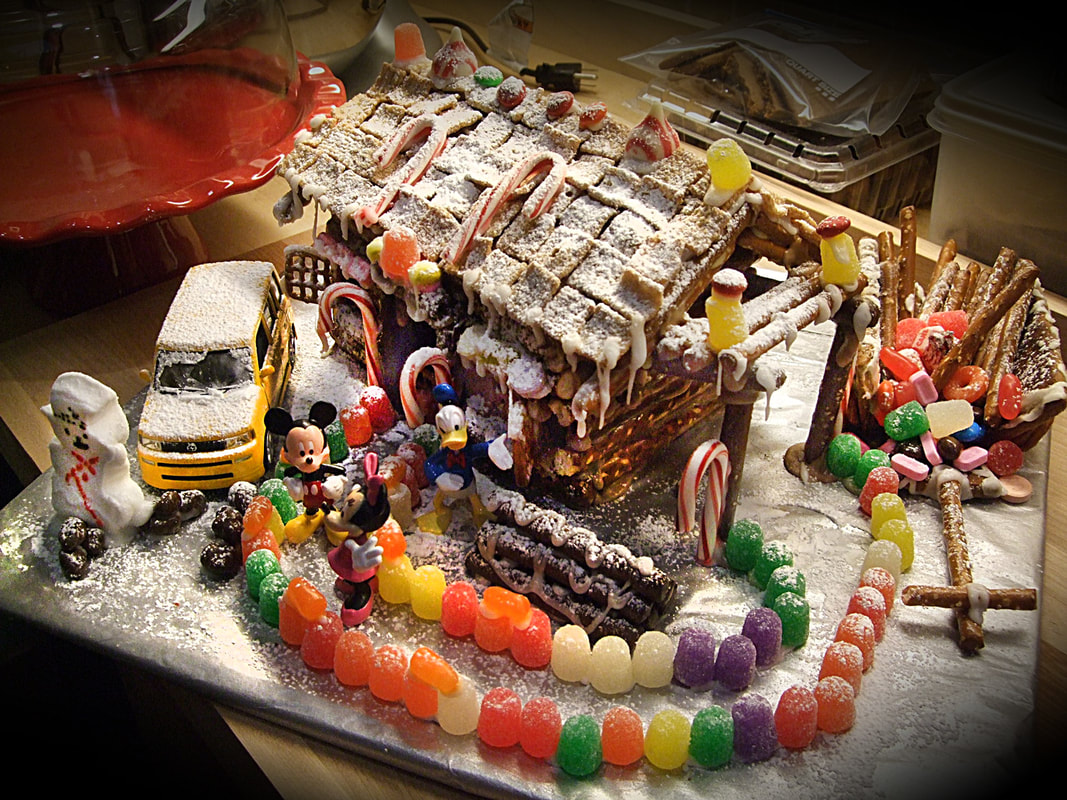
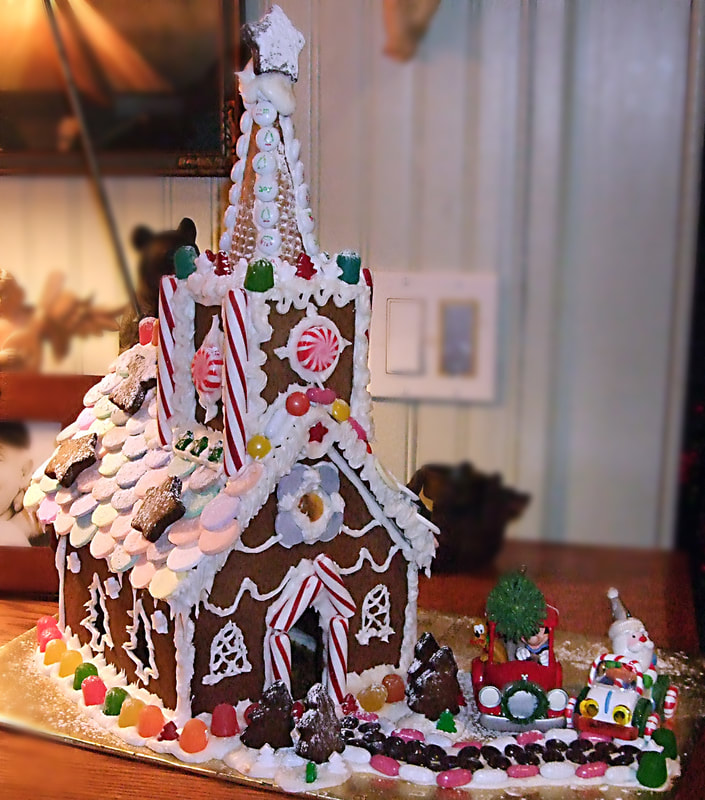
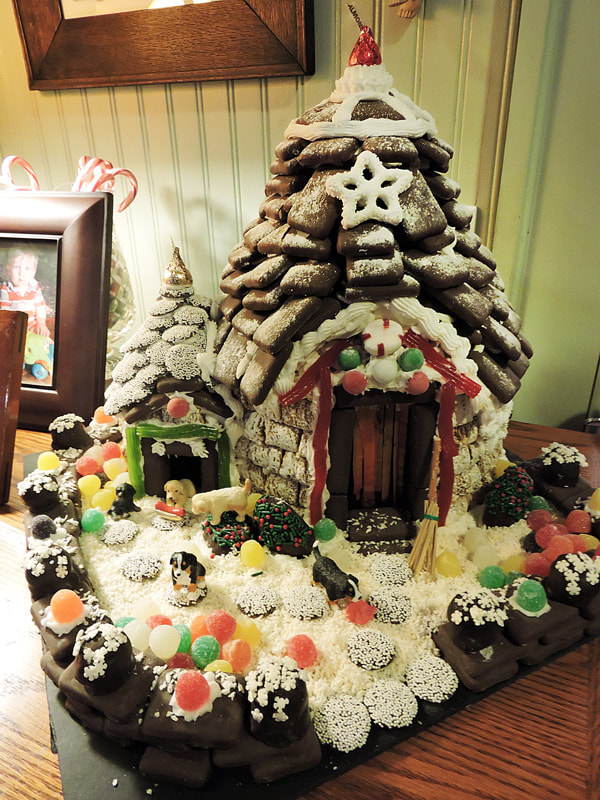
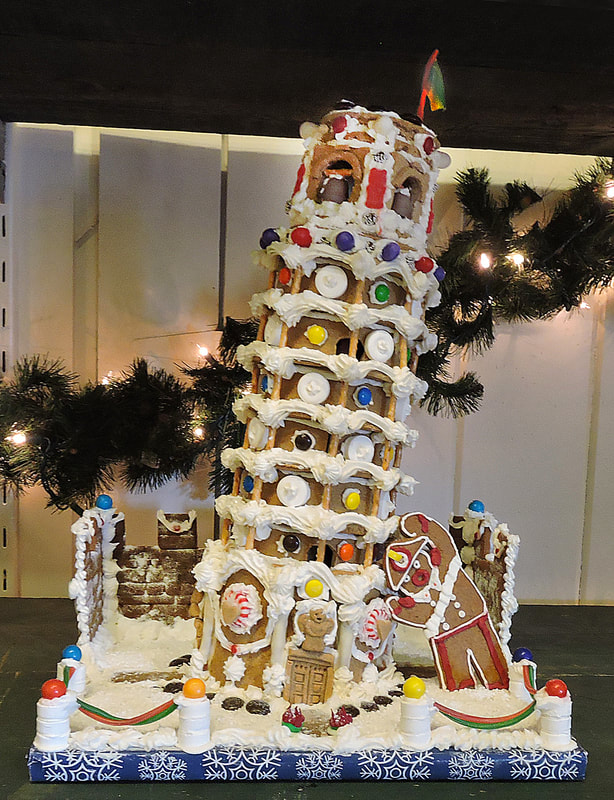
As you can see in the photos above, our gingerbread projects were modest at first, mostly a chance to begin the tradition for our son Lucas when he was a little boy. But then our passion for constructing gingerbread grew more complex and we started entering gingerbread house competions...
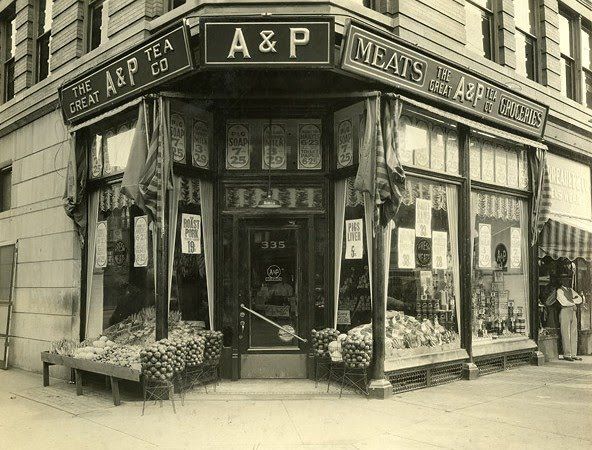
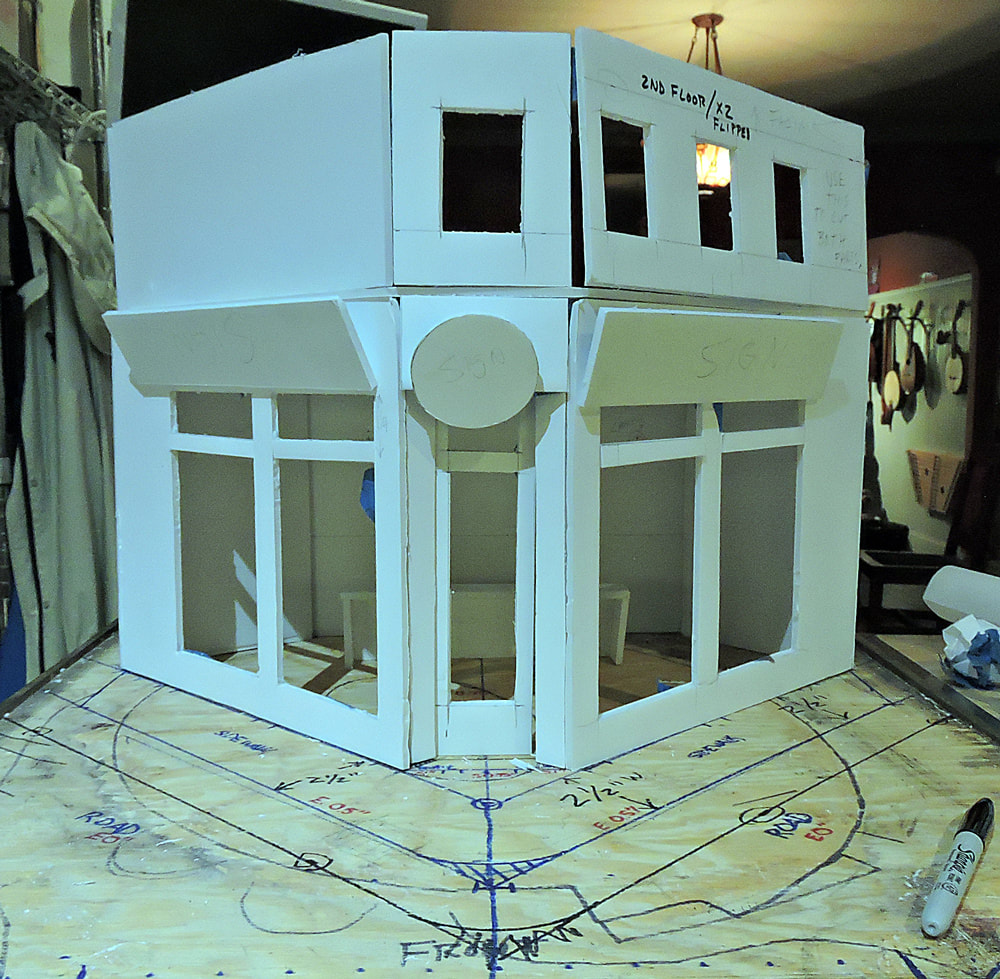
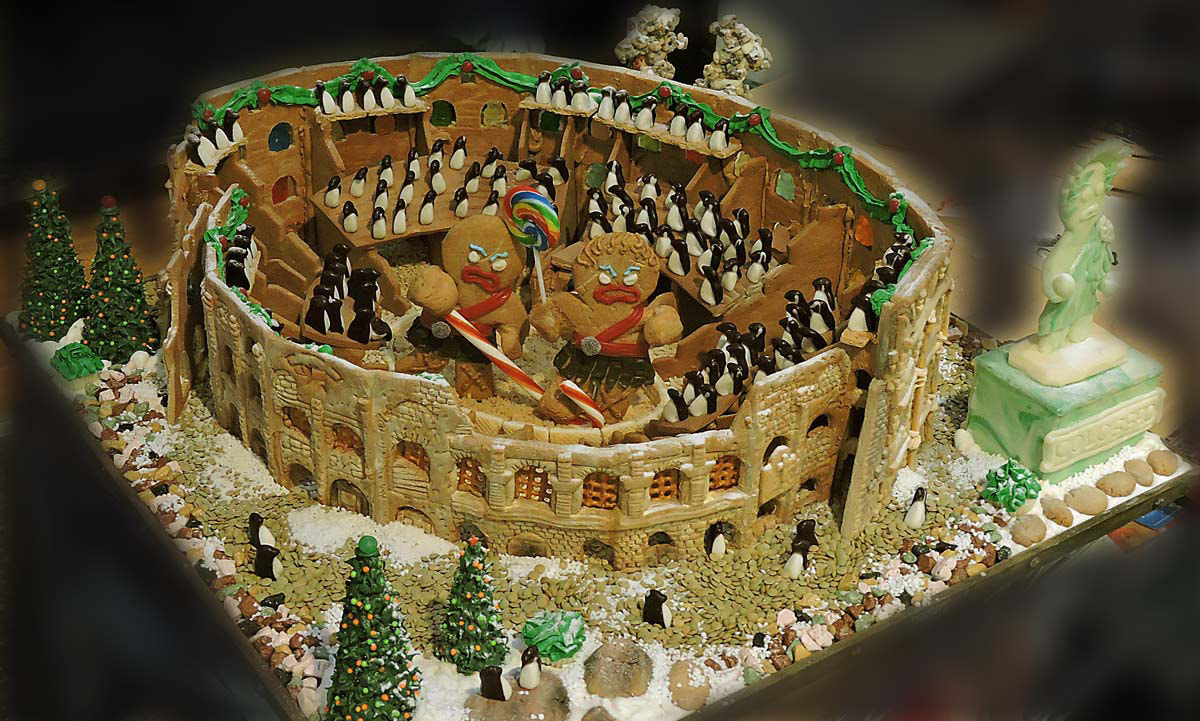 Roman Colosseum with Battling "Gingy" Gladiators - winning second place in our county competition Our 2018 Gingerbread Project: Lucas' Concept to Recreate an historic A&P Grocery Store For this year's project, I really wanted to do an Amalfi Coast hillside village complete with rugged mountain and multiple houses clinging to the cliffs, I was out-voted and we decided to build my son Lucas' concept for a 1930s vintage A&P grocery store--a timely choice since the A&P supermarket chain, the oldest in America, had recently closed all of its stores. Besides, to win, Lisa and Lucas both thought we should do a more "all-American" theme.
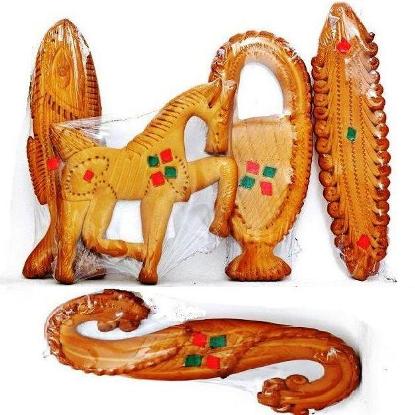
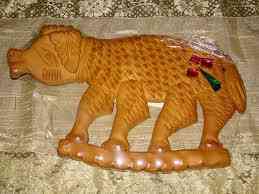
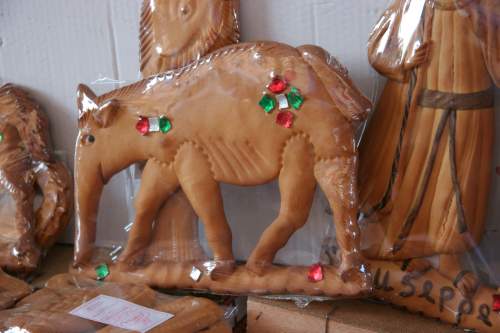
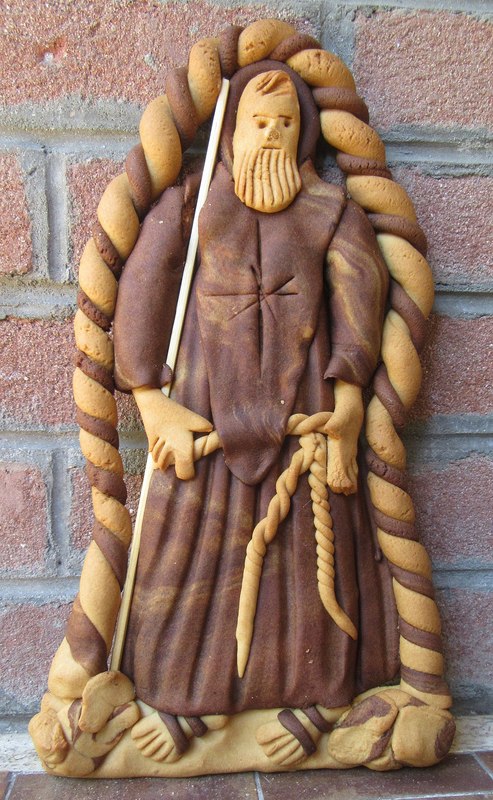
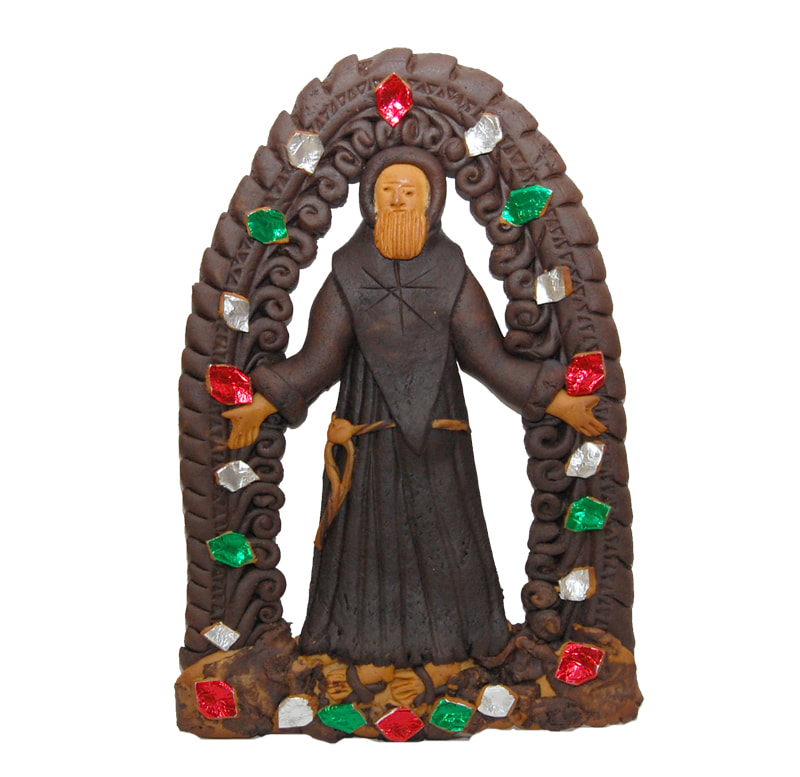
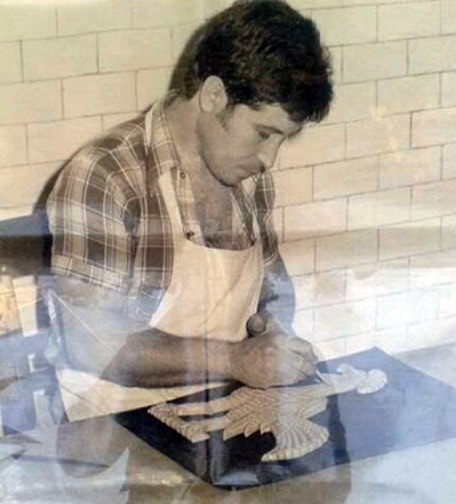
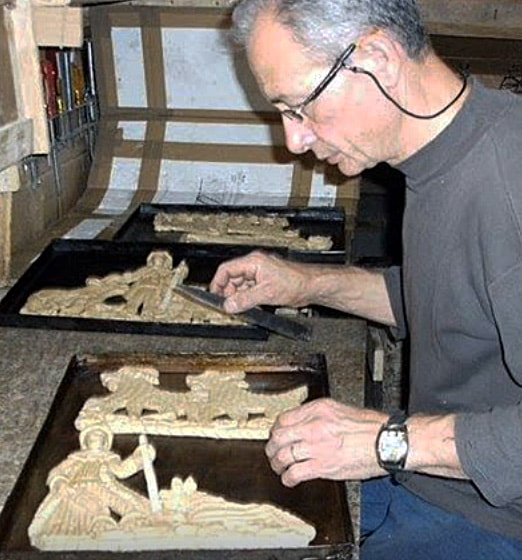
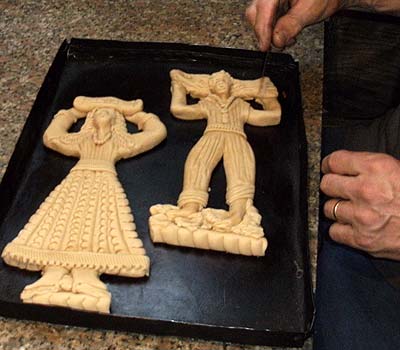
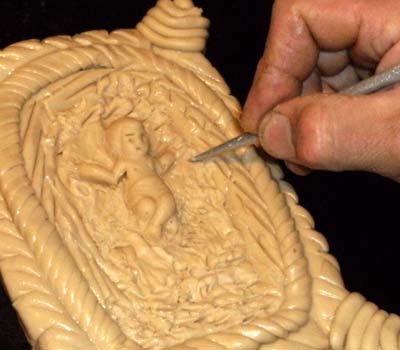
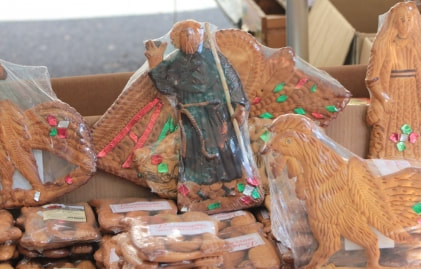
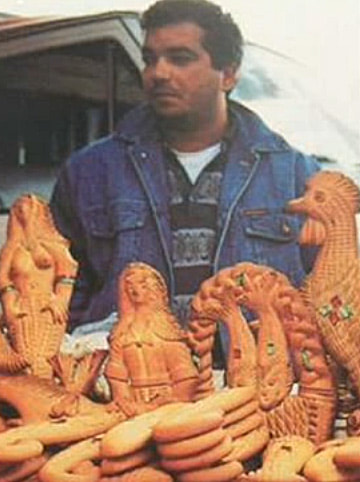
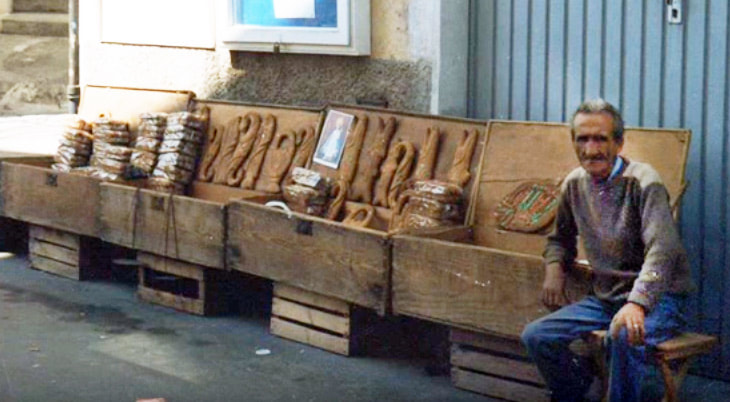
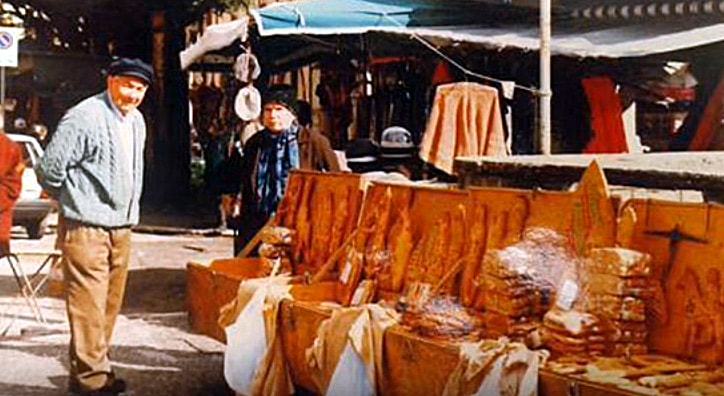
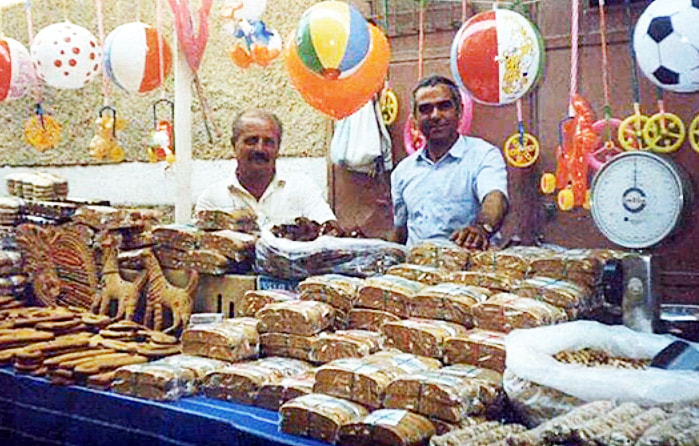
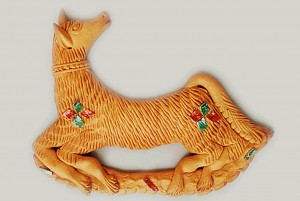
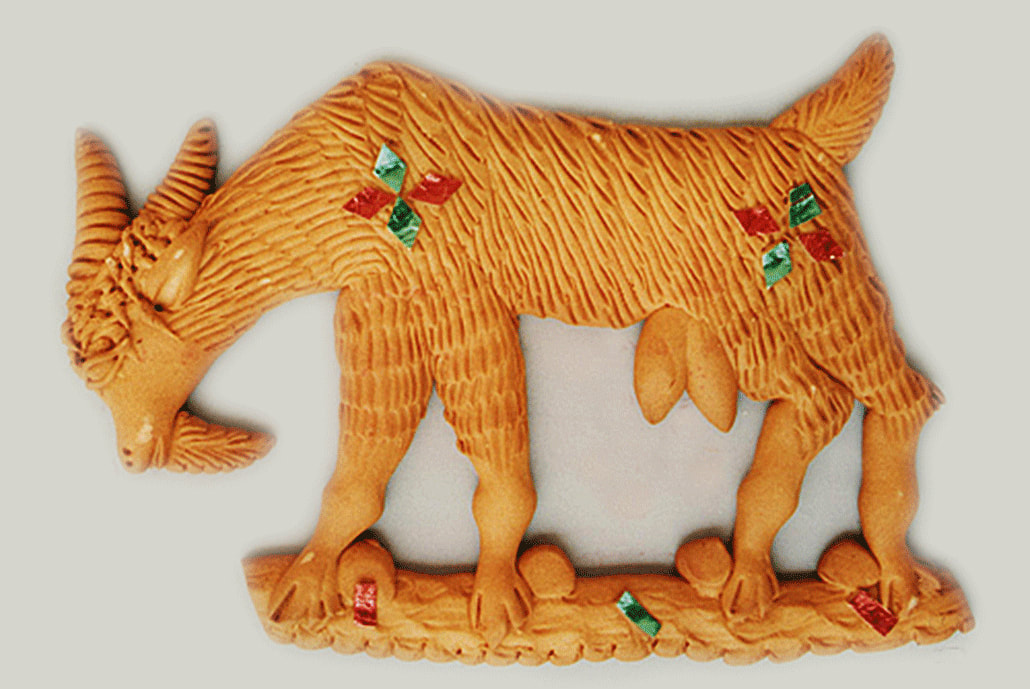
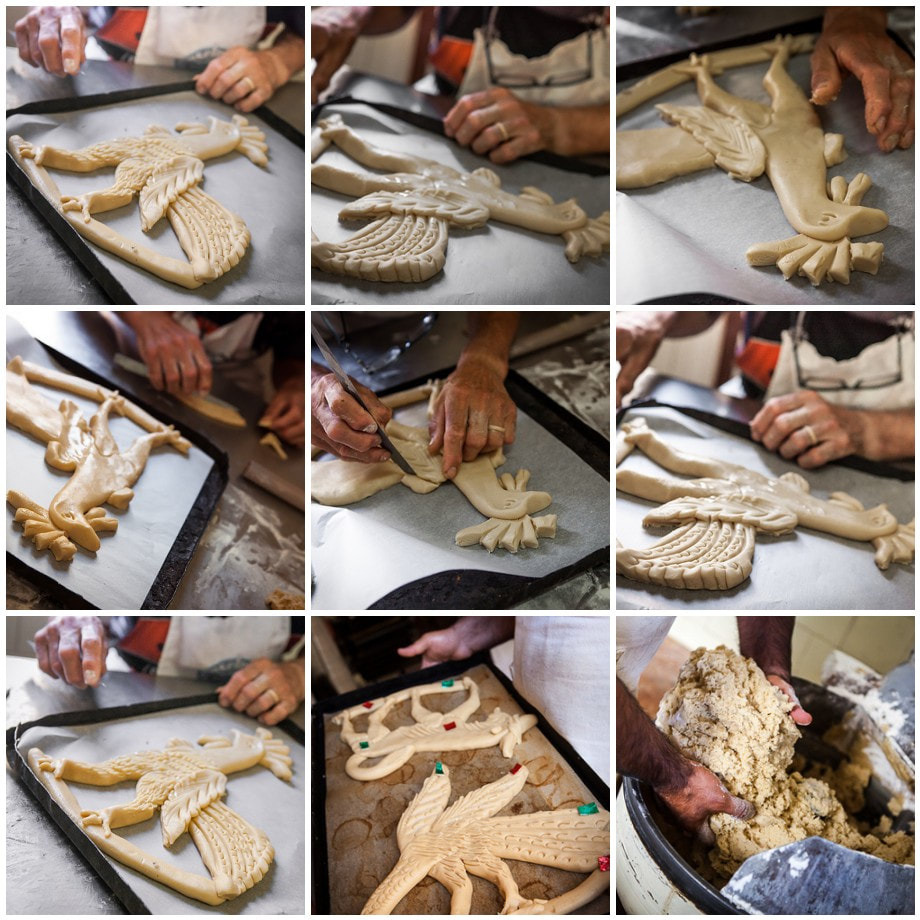
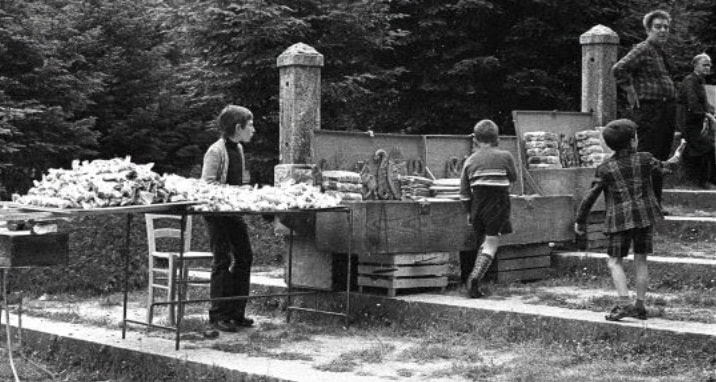
The trouble with completing our project was that time was not on our side. For example, to create our gingerbread Colosseum it took about 6 weeks, from planning through baking all the components to finished construction. I don't know how time slipped away from us, but we only had about 10 days to plan and complete our A&P store, which would be difficult to impossible due to all the new techniques we were going to employ for the first time: melted candy windows, poured clear gelatin window "glass", creating miniature products and produce, fondant checkerboard tile floor and fondant asphalt paving, edible printed signage and timed electrical lighting! Well, somehow we did it! We delivered our project within 15 minutes of the delivery deadline! In the end, we won First Place in the Authentic Reproduction of a Significant Building category. I think we won based on to Lucas' concept and especially his skill in creating the brick textures and miniature details (fruitcake, fruit, watermelons, pumpkins, baguettes, a cheese board and much more) and his graphic design for all the signage! Oh, and of course, as usual, my wife Lisa helped with the preparation of the gingerbread dough and fondant. We Three make a great gingerbread team, don't you think? Buon Natale! --Jerry Finzi 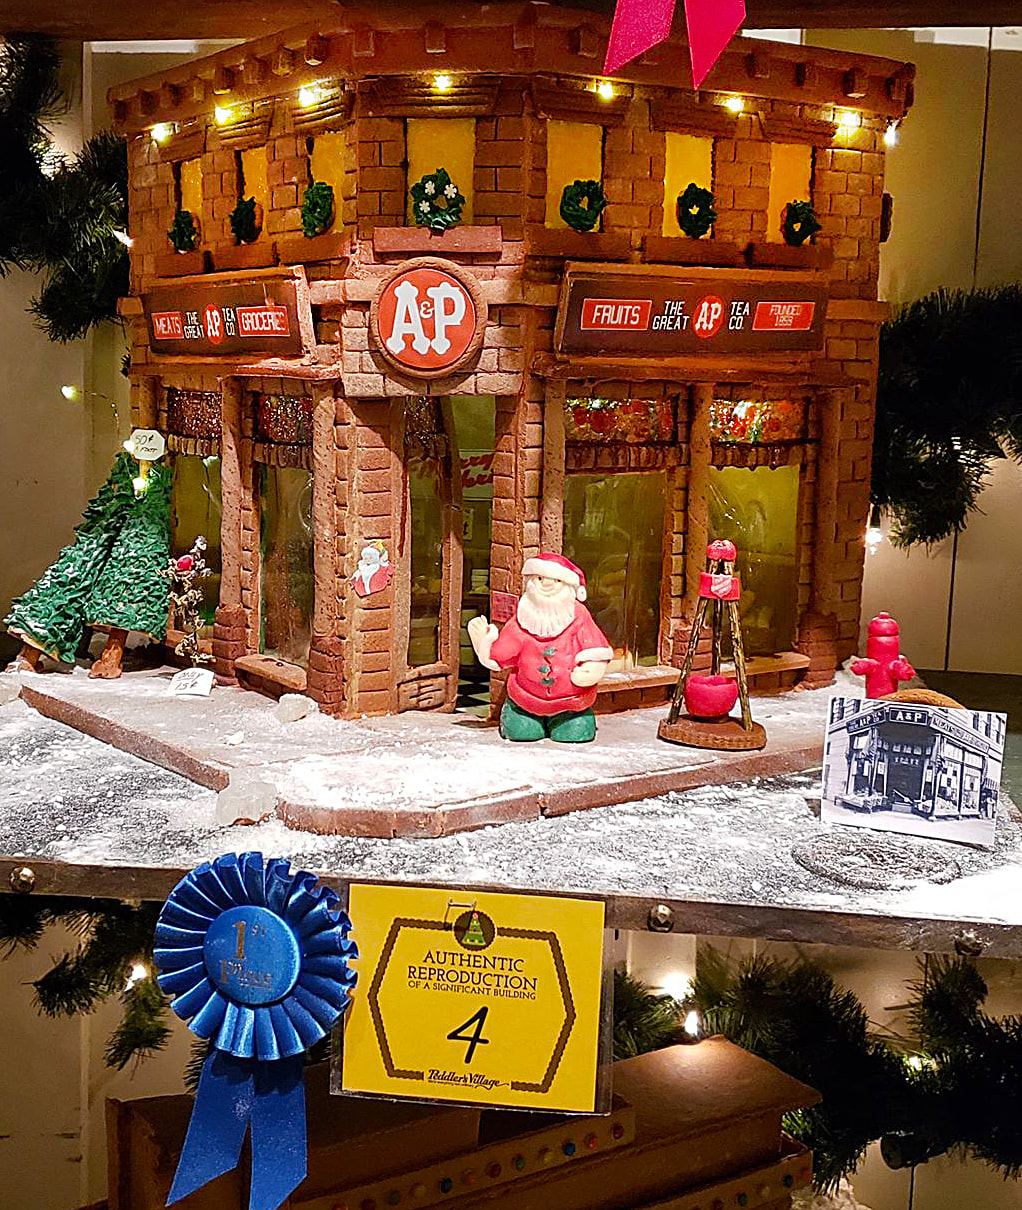  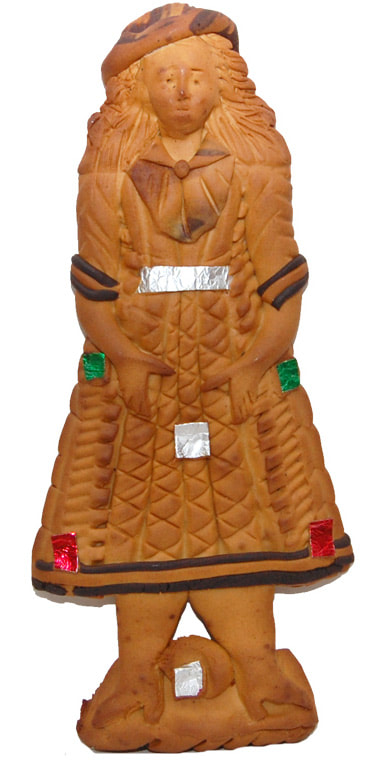 The ancient town of of Soriano Calabro sits between the hills of Calabria and is known for the hard, spiced and shaped biscuits known as Mostaccioli (also, Mastazzola, Mustazzoli). They are traditionally made using grape must, a byproduct from wine-making process. These ornately decorated and shaped treats are popular for festivals, weddings, Christmas and Easter. The more traditional shapes include a parma (the palm), u panaru (the basket), a grasta (the heart), u pisci spada (the swordfish), and a sirena (the siren). Aside from the myriad of shapes, they are decorated with colored foil and some might even have been created using different colors of dough. These are not molded but cut and assembled by hand. 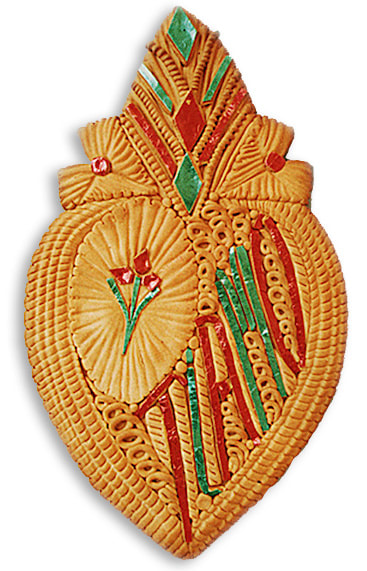 You can still see Mastazzolari (vendors) selling plastic wrapped Mostaccioli from their wooden trunks at sagre in the region, with parents buying ones shaped like a horse or bird for their children, or the devoted purchasing one shaped like a saint, angel, fish or basket as an offering on a saint's day. A heart shaped one might be given on a wedding, engagement or on San Valentino's day. 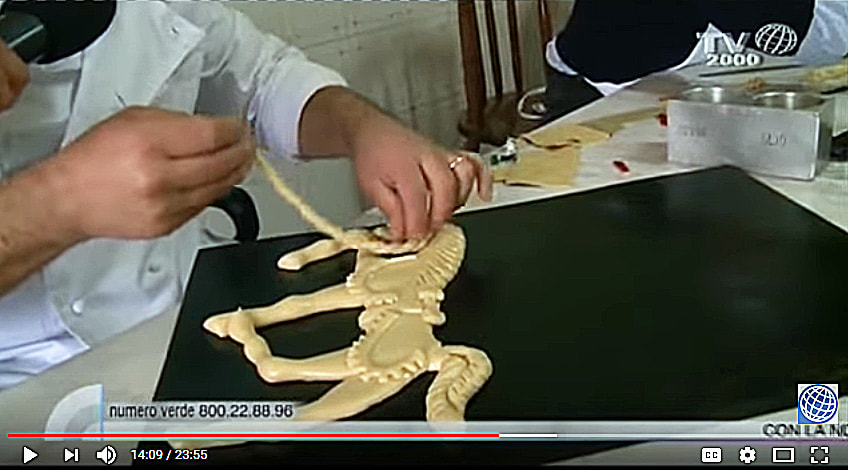 Or, if you prefer, you can watch the video right here... Click below. 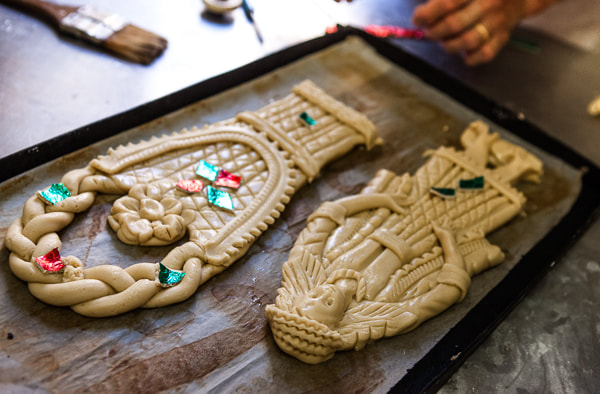 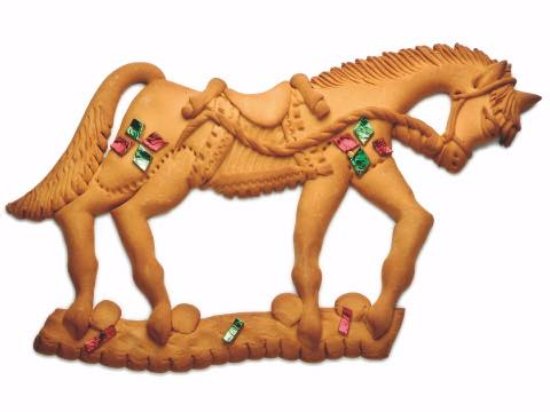
 Creating Mostaccioli
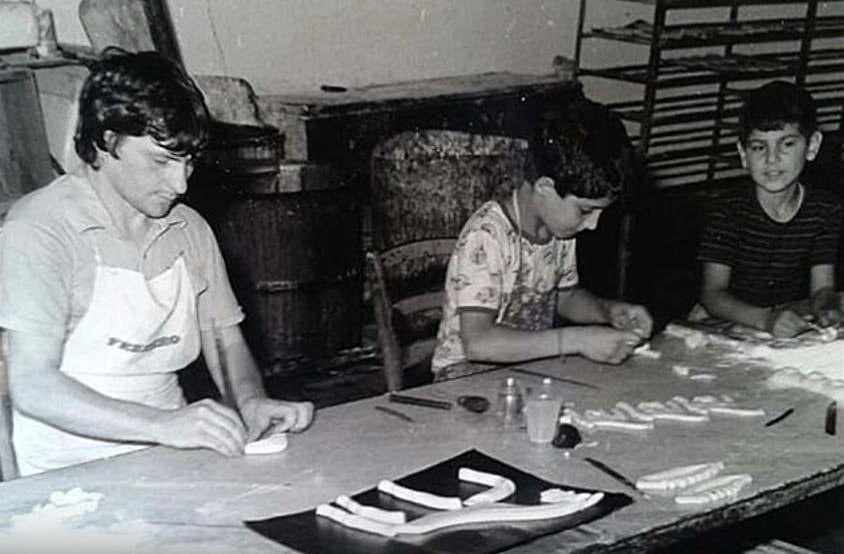 
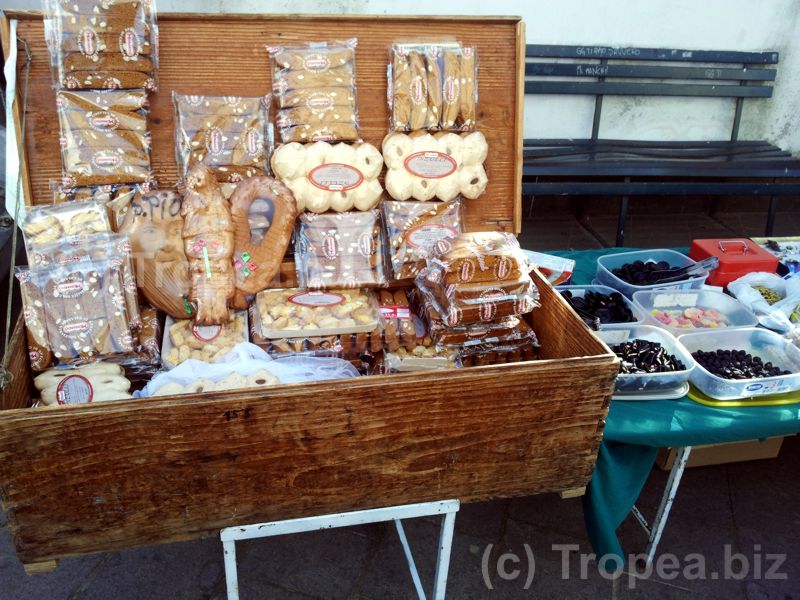
Mastazzolari and How They Sell Their Wares 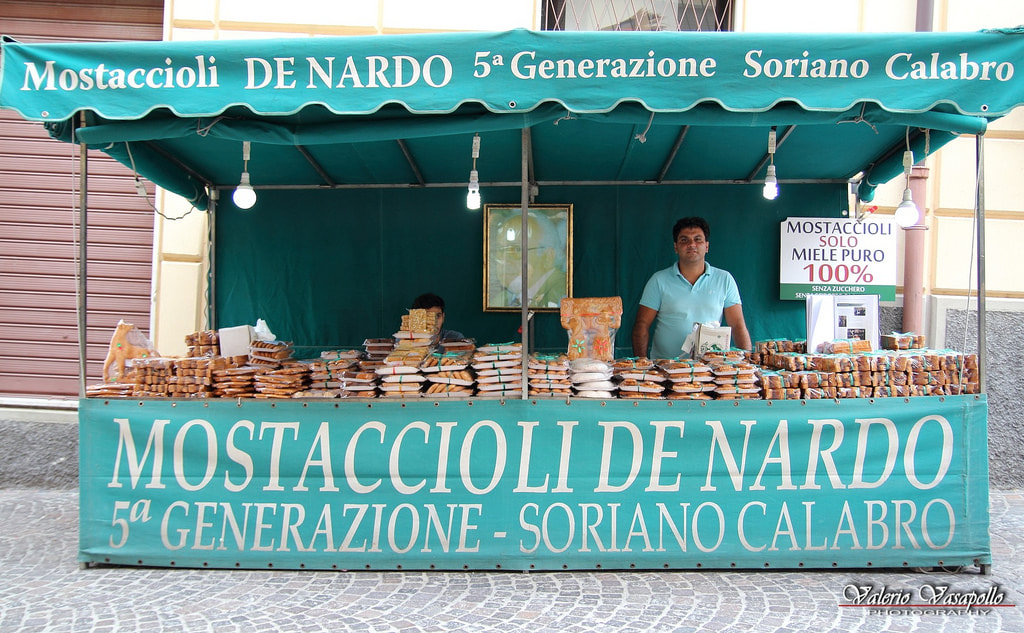 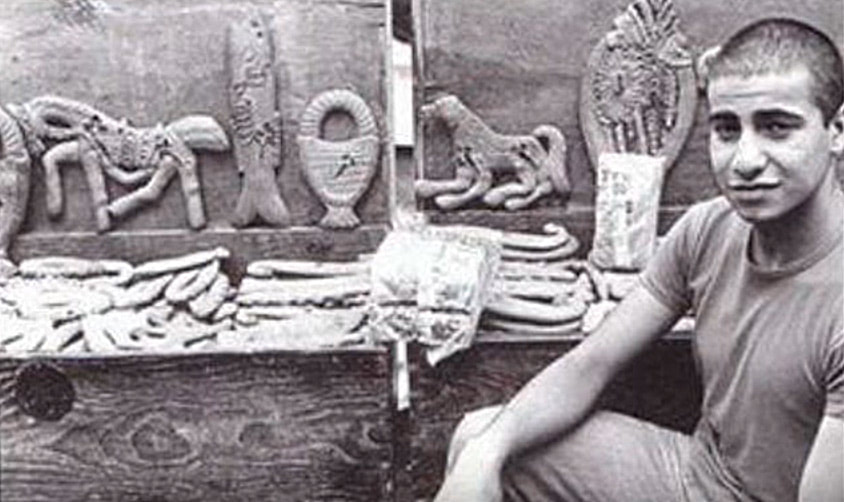
 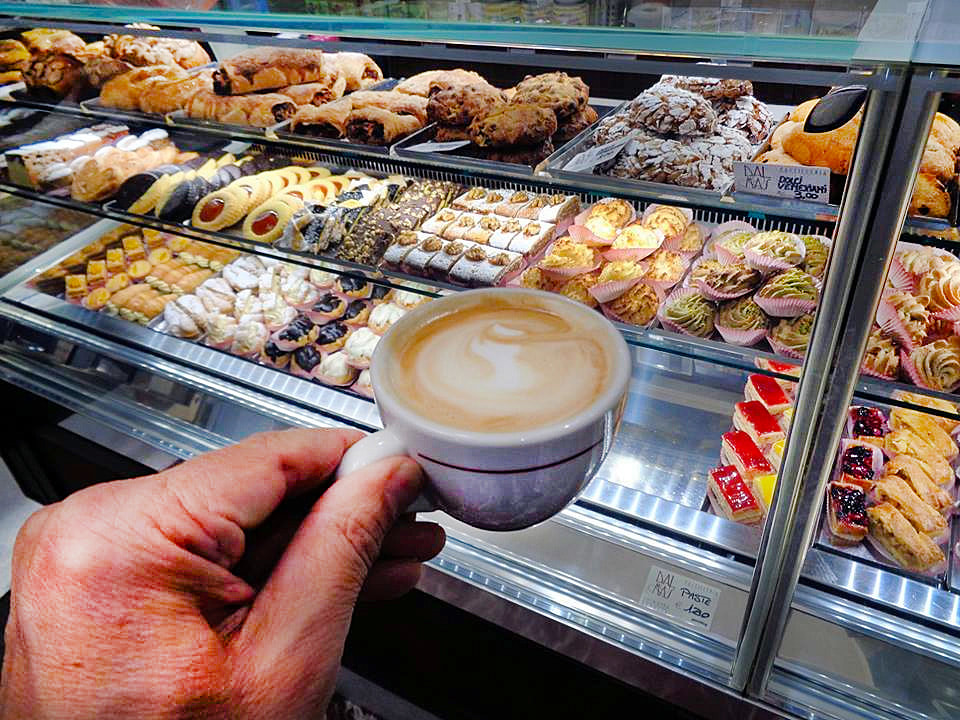 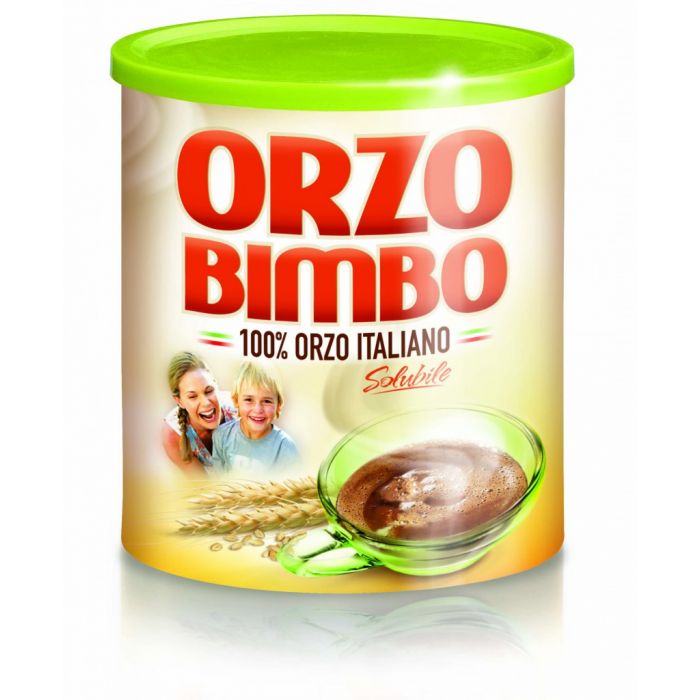 The coffee alternative for your bimbo (baby) The coffee alternative for your bimbo (baby) Italian colazione (breakfast) is a simple daily ritual, and if not at home, had while standing at bar on the way to work: perhaps a scalding espresso, cappuccino (espresso and a dollop of foamed milk) or caffè latte (say "latte" alone and you'll get a glass of milk.) For those Italians wanting to avoid caffeine, they never order "decaf", but might order a drink unknown to Americans: Orzo, a hot, nutty, roasted-barley beverage that looks like cocoa. Orzo means barley in Italian. It was originally intended as non-coffee substitute for children but has gained wide acceptance as a healthy alternative to the caffeine overdose experienced by espresso and cappuccino. 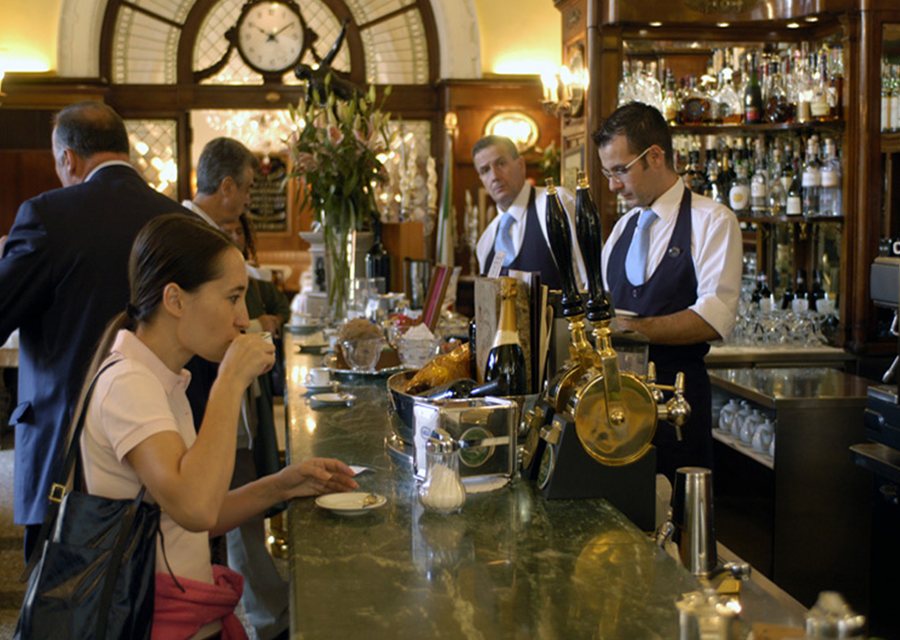 Stand-up, Order, Slurp and Go 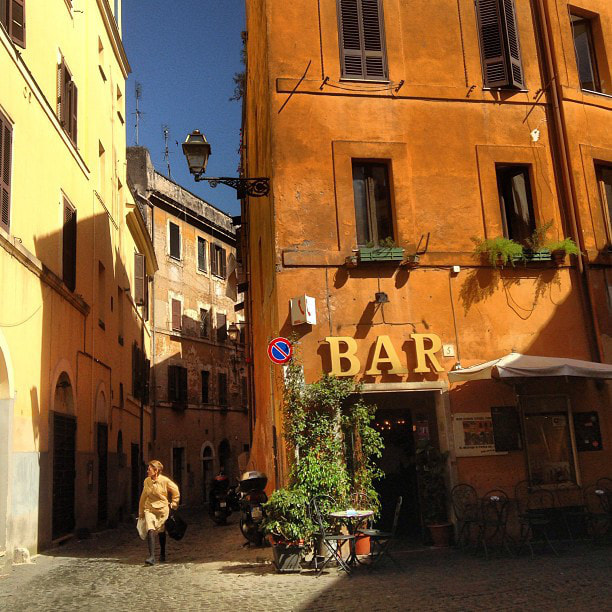 A friendly, neighborhood, Italian bar A friendly, neighborhood, Italian bar While the espresso starts their engines, they still need to fill their tanks in the morning. At home, Italians won't have bacon and eggs but might have cereal or a biscuit, fruit, juice and an espresso. If on the run, they will tend to start their day at a local bar with espresso and a dose of starch and sugar... pasticcini (pastries). Here are some common choices: The cornetto is the less flaky, less buttery version of French croissant. Cornetti ripieni (filled) come with jam, cheese, pastry creme or Nutella. A plain one is a cornetto semplice or cornetto vuoto (empty). By the way, when you see the rectangular shaped ones filled with chocolate, they are called saccottino al cioccolato (sacks of chocolate) not pain au chocolat. This is Italy, after all. A crostata is a fruit tart with a crust of pasta frolla, filled with either amarena (sour cherry), albicocca (apricot) or frutti di bosco (wild berry). The ciambella is basically an Italian doughnut often filled with jam or custard. Viennoiserie are the fancier, more refined pastries with a French influence. They might include brioches, strudel di mele, eclairs and more. For the Italian rushing to work, he has perhaps 5 minutes of chit-chat with a neighbor while standing-up at the neighborhood bar, slurping down his espresso and cornetto in quick order before rushing out the door to work. --Jerry Finzi 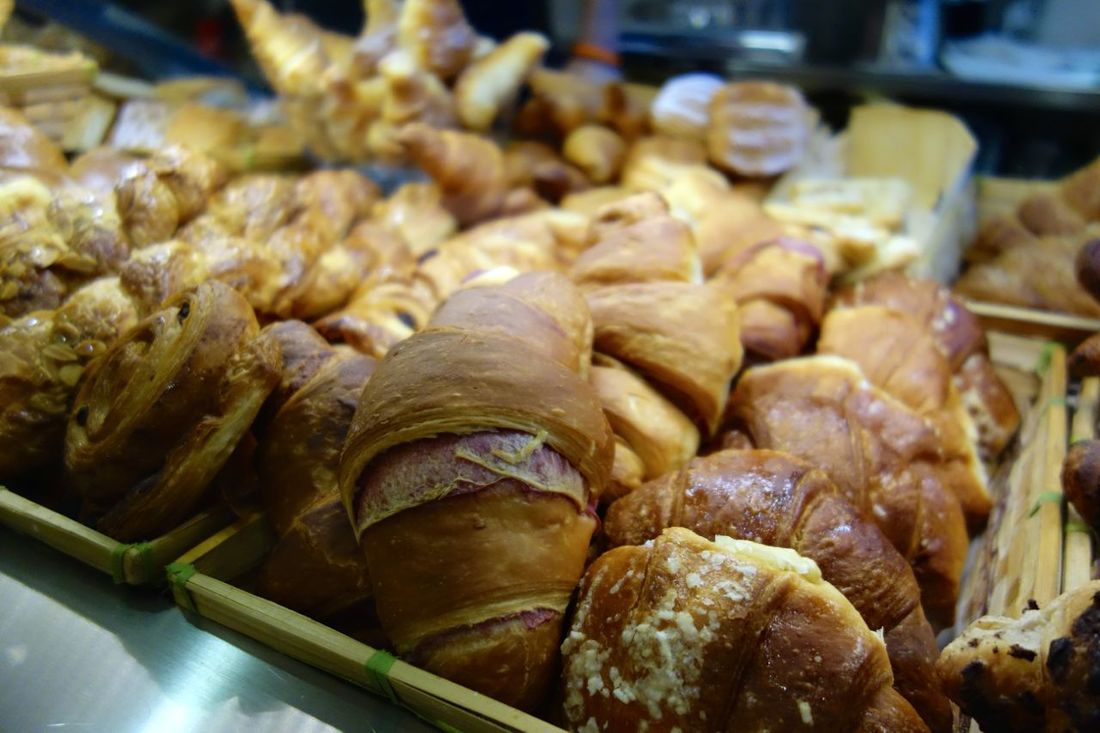 Selections of pastries at a bar in Rome Voyage Tips:
If you are staying at a B&B in Italy, by law they are only allowed to supply you with pre-packaged breakfasts pastries, toasts and biscuits. A "Bar" in Italy is not like bars in the States. They are places to go for breakfast, espresso, pastries and for lunch they offer panini, small pizzas and focaccia... families with children are welcome. During the lunchtime "riposa", when most places (including restaurants in small towns) close for 2-3 hours, the local Bar is where you would stop for a quick lunch. 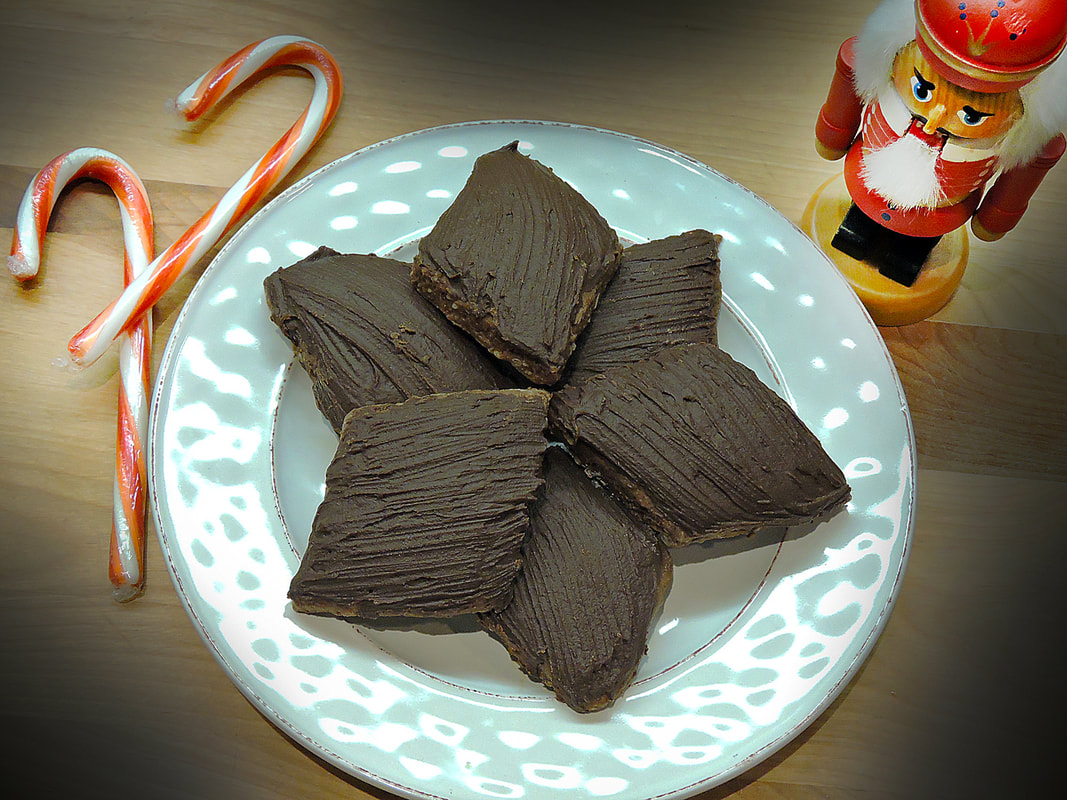
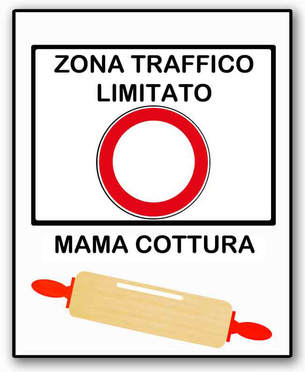
Every holiday season, my wife Lisa bakes. And bakes. And bakes. We've even made a special sign for our kitchen for these turbulent times... Translated, the sign says "Limited Traffic Zone, Mama Cooking". It's often tense when she's trying new recipes and techniques, so Lucas and I have learned to stay out of harms way. I mean, after all, there are many big chef's knives and large mattarelli (rolling pins) in our kitchen!
This year, we put the sign up again, knowing things might get a bit tense--Lisa was trying several new traditional Italian recipes. This time, she was making an authentic spiced cookie recipe: Mostaccioli. This cookie can be thought of as an Italian gingerbread. There are two basic types: one for forming and sculpting cookies shaped like animals, angels and the like; and the other, a diamond (or rhombus) shaped, chocolate coated cookie. 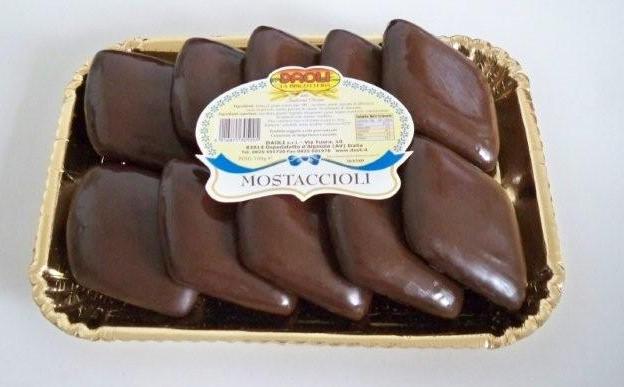
Oddly, in Italy, not many people make this cookie any longer, but buy them at Christmas in cellophane wrapped trays--factory made. Lisa wanted to make a traditional, authentic recipe... just like her Sicilian grandmother would have made back in Corleone, where it might have been called mustazzoli in local dialect.
Traditionally, Sicilians use either vino cotto or honey to make these cookies. Many others will use a mixture of honey and grape juice. Grape molasses is available in Middle Eastern grocery or specialty food stores, but Lisa simply used a good quality honey.
Ingredients
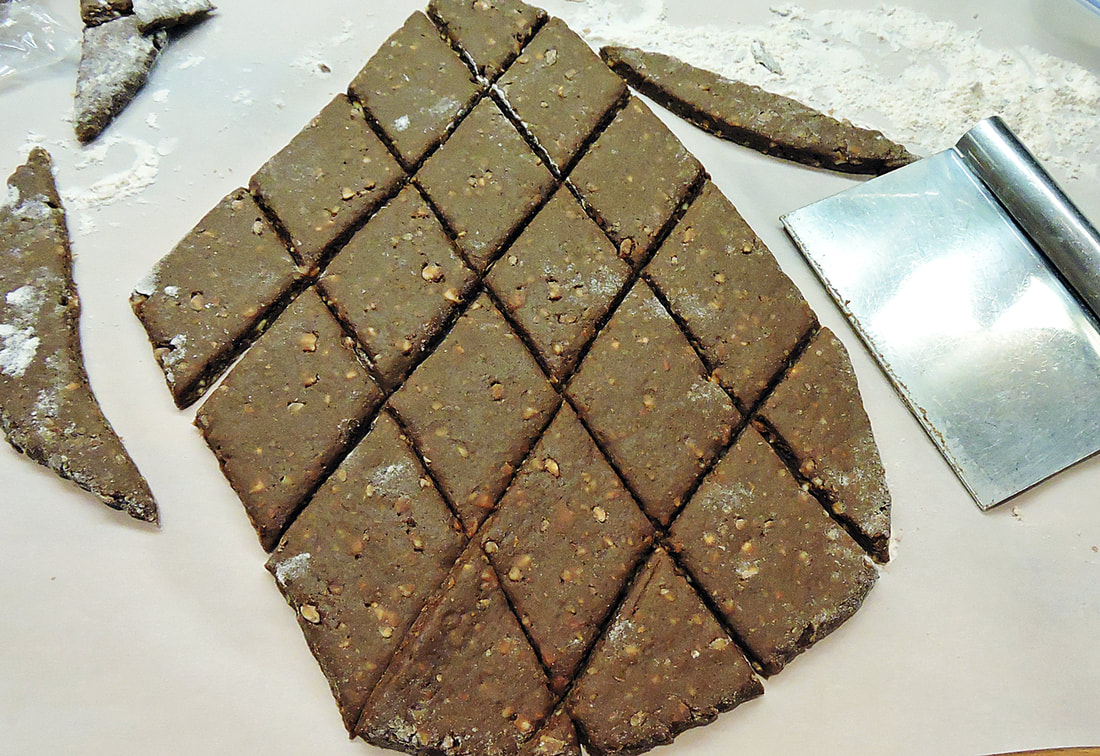
Cutting the rhombus/diamond shapes with a bench scraper
Directions
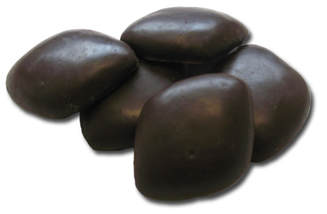
In this recipe, Lisa wanted a rustic bark texture, so she brushed on her melted chocolate. But if you want a more traditional, super-shiny coating, you'll need to learn how to properly temper your chocolate. Here's a great article by King Arthur Flour on tempering chocolate for a shiny coating.
With mostaccioli, you can either place the cookies on a cooling rack and pour the tempered chocolate over them using a large spoon, or using a small spatula or tongs you can dip your cookies into a bowl or measuring cup into your tempered chocolate. I highly recommend leaving a couple of your Mostaccioli out for Babbo Natale along with a mug of cioccolata calda on Christmas Eve. Buon Natale! --Jerry Finzi 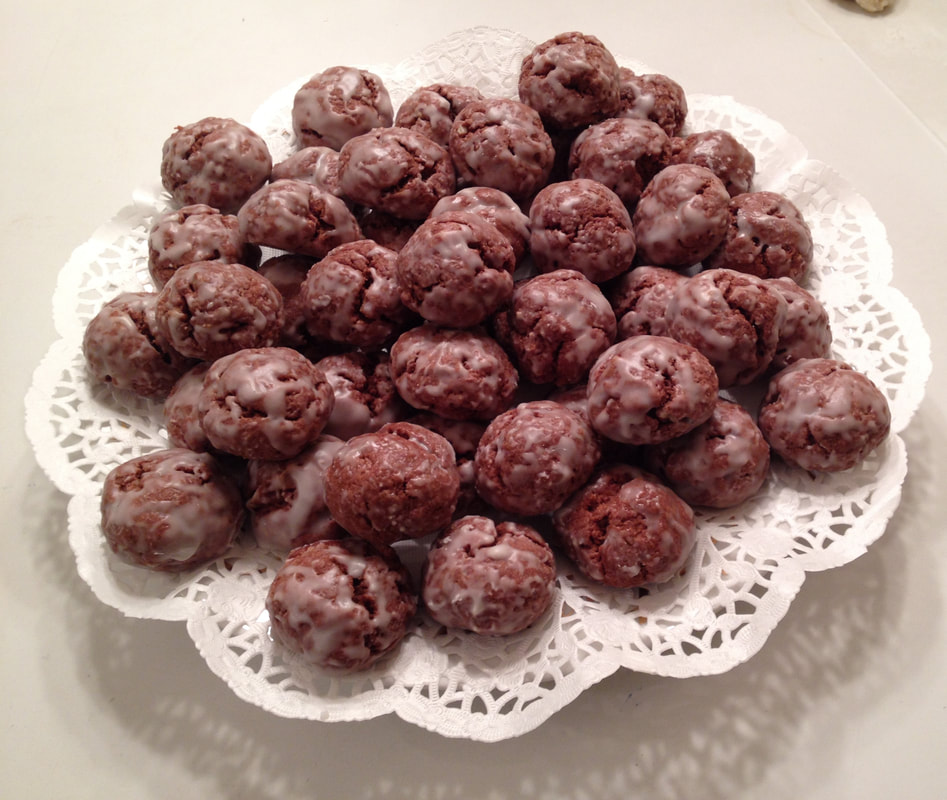 Chocolate Spicy Meatball (Biscotti)
Ingredients 1/3 cups granulated sugar 1/2 cup cocoa 1/2 tsp. baking soda 3 tbsp. baking powder 5 cups flour 2 tsp. cinnamon 2 tsp. ground cloves 2 tsp. nutmeg 1 tsp. salt 1 cup chopped walnuts 3 cups (18 oz.) semi-sweet chocolate chips 3 eggs, slightly beaten 1/2 cup corn or canola oil 2/3 cup milk Directions
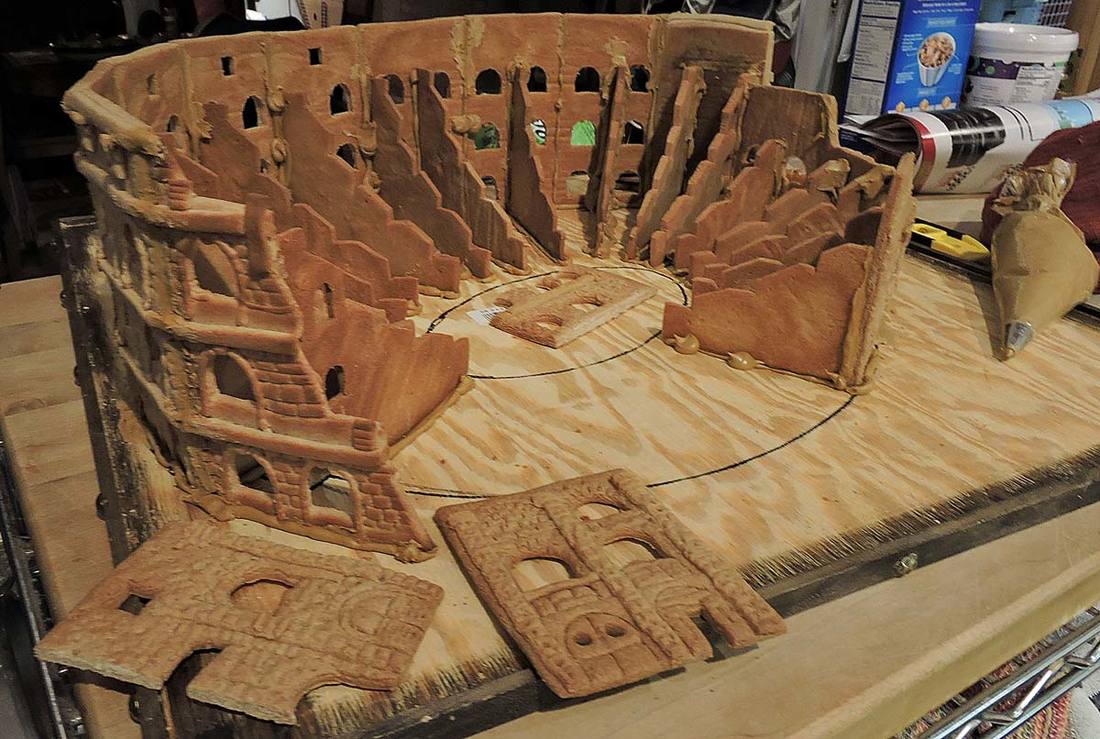
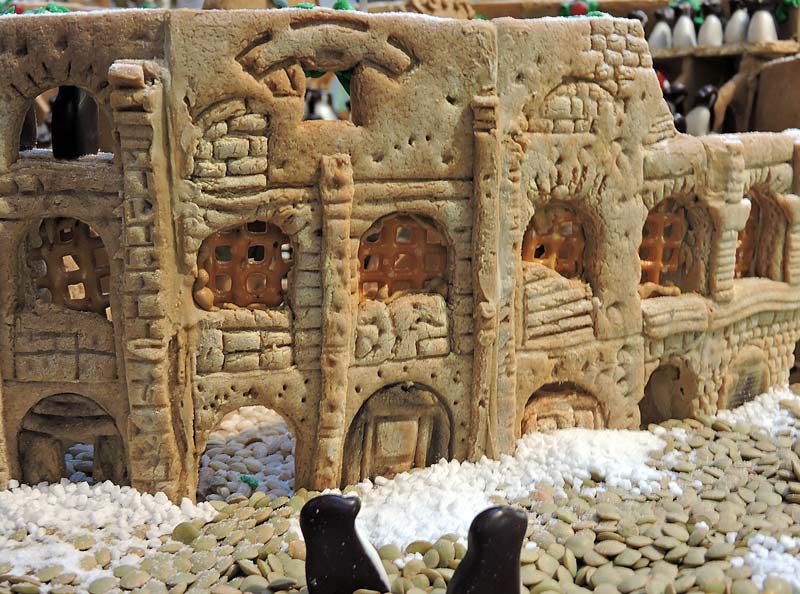
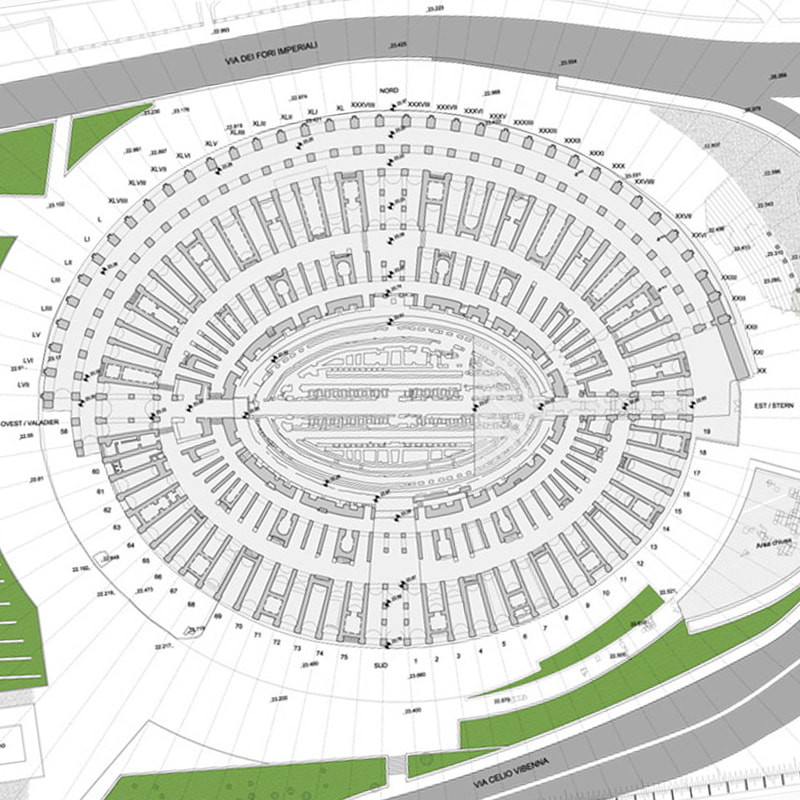
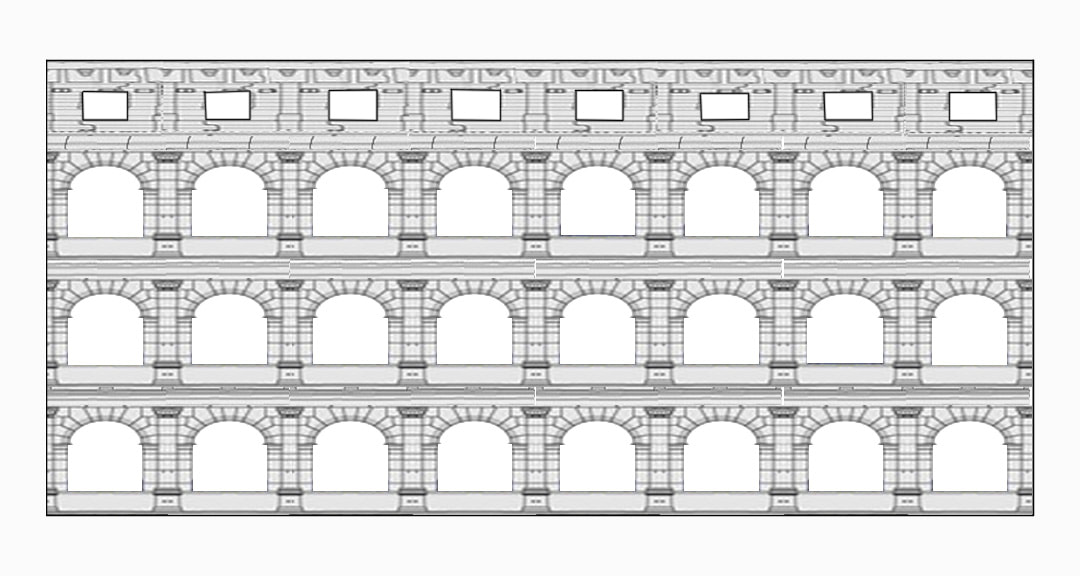
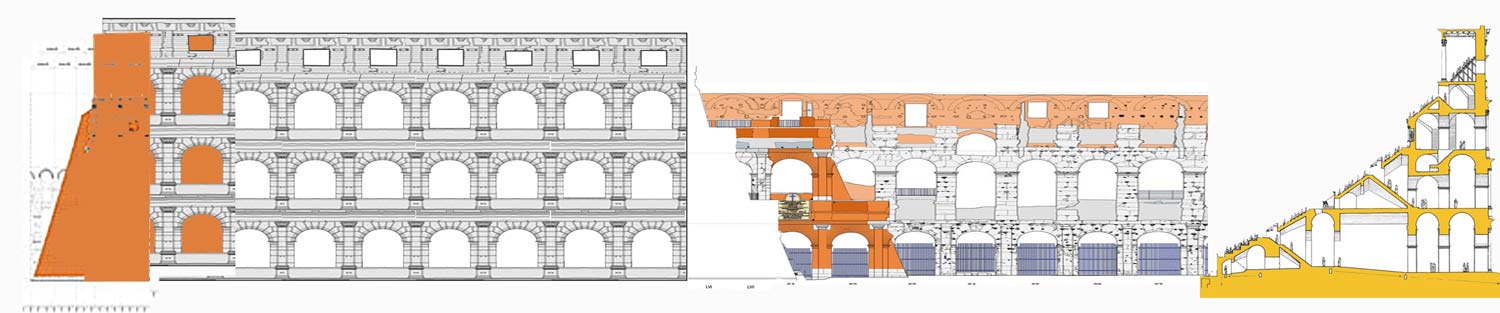
Icing Combine 2 cups confectioner's sugar, 1 tsp. vanilla extract and enough milk to make a thin (but not too thin) icing (approximately 2 tbsp.). Mix until smooth and drizzle over cooled cookies or dip tops of cookies into icing and let stand until dry. 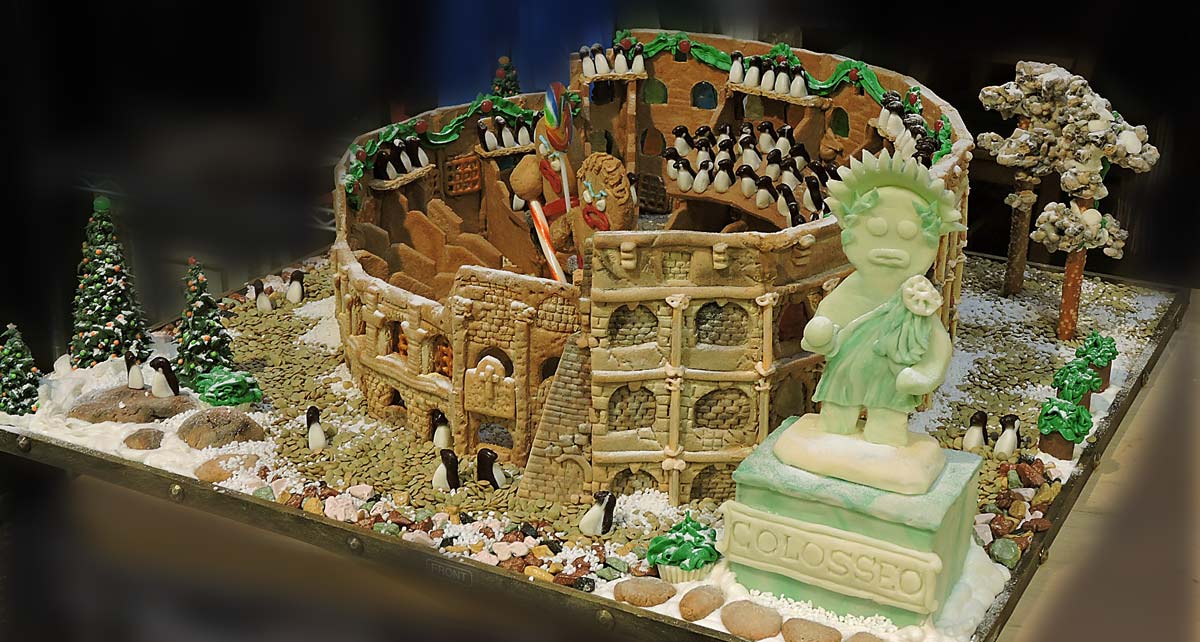 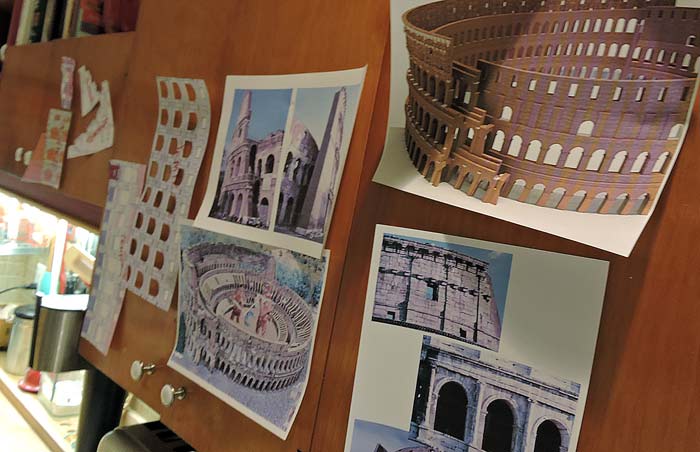 We had reference photos of the real Colosseum tacked up all around the kitchen as we worked We had reference photos of the real Colosseum tacked up all around the kitchen as we worked Last year, our Leaning Tower of Pisa gingerbread project got an honorable mention from our local county competition. We knew we'd have to ratchet it up for this year, so we decided to build a the Roman Colosseum in gingerbread. The first thing to decide is how to create the curves for the oval shape of the Colosseum's walls. Last year, we developed a technique to mold sections of gingerbread as soon as they come out of the oven a bit under-done... we formed the curved walls of the Pisa tower like this. But in this case, the Colosseum is oval with each section of wall at a different radius. I would have had to build large multi-sectioned forms to create the curved parts. Instead, considering the scale we were working in (on a 24" square base) we thought we would make the walls in sections and then cut them apart and mortar them back together with colored royal icing. OK, so we had a basic plan to approach the overall shape, but how about the details?  Playing with the 3-D paper model until we were sure everything would fit together  We used lego parts for some cutter shapes and textures, cleaning up cuts with a paring knife or razor blades We used lego parts for some cutter shapes and textures, cleaning up cuts with a paring knife or razor blades After some exhaustive research, I found architectural drawings of both the floor plan and the wall elevations and used Photoshop to scale them to fit our 24" square board onto which our Colosseum would be built. I had to make adjustments to the scale of certain elements of the plans first. Instead of 80 arches I cut it in half to 40, afraid that if I cut arches to scale out of the gingerbread, the narrow arches (they would have been less than 1/2" wide) might have closed up as the gingerbread baked. I also wanted larger arches so I could install something to represent the statues in each arch as it appeared in ancient times. We were going to use gummy bears for the statues. It took some doing, scaling things up and down, taking lots of measurements and Photoshop work, then porting the resulting plans over to MS Publisher so I could print the plans out life size as tiled prints, which I taped back together. There were sets of prints that I used to make templates for walls and other elements, and other prints that I used to assemble a three dimensional paper model so I could figure out where specific elements needed to go or where I might have to tweak the scale a bit more (for instance, we shortened the inner wall a bit so our audience could more easily look into the arena to see the "Battle of the Colossus" we were planning to install.
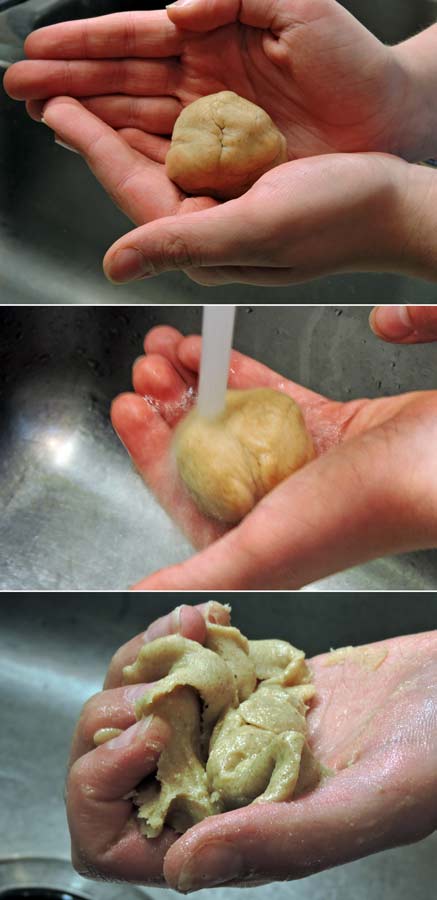
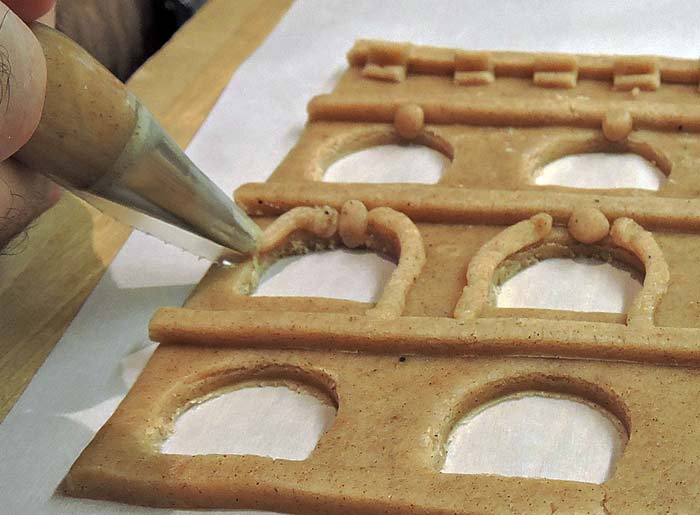
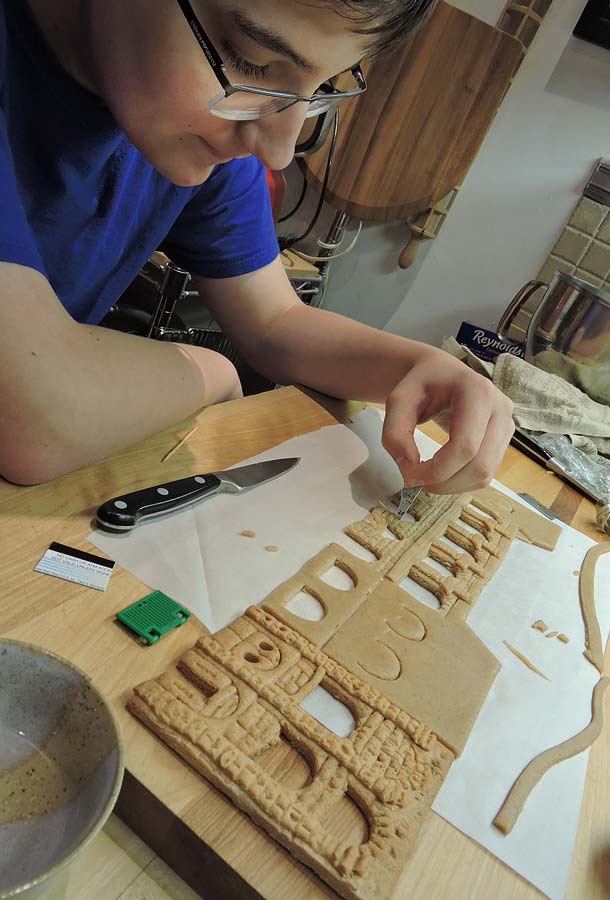
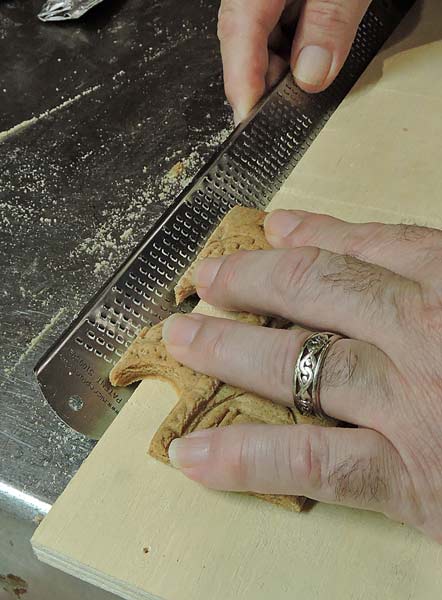
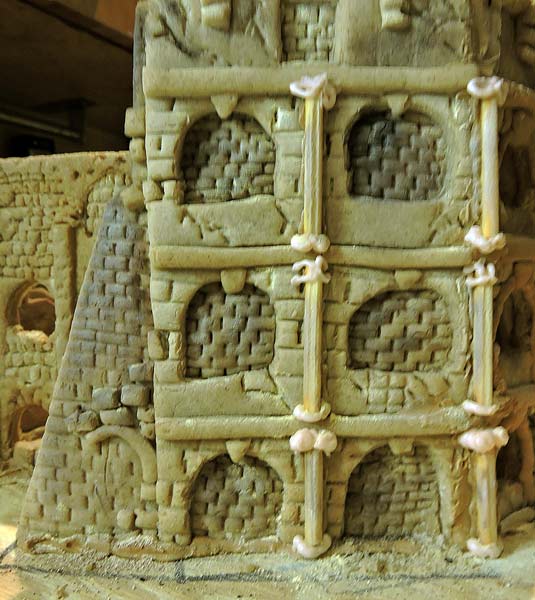
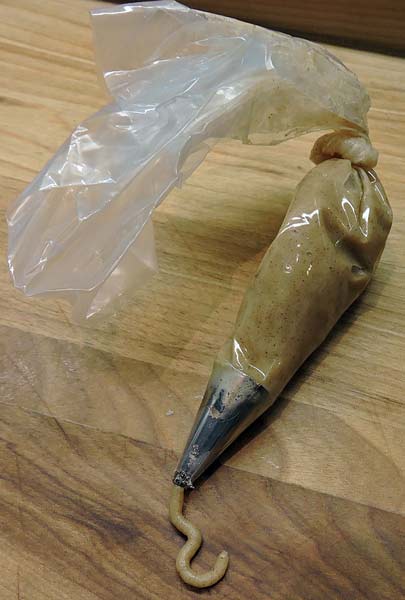 After we had our templates cut out, we started to roll out gingerbread from a special recipe we use for construction--it's harder and spreads less than standard recipes. We used two batches: one with light corn syrup and one with dark corn syrup so we would have two slightly different colors of walls or elements to work with. (The real Colosseum has many different colors of earth tones on its facade). Both my son Lucas and I worked on making the elements... cutting out arches, hand cutting special shapes, texturing the walls to look like brick and stone, and sawing apart wall sections to make the appearance of curved walls. As you can see in the photos above, we even developed a technique to pipe the gingerbread dough. We took balls of dough and wet them briefly under the faucet, then worked water into the dough until it got very slushy without being too wet--just slippery enough to be pumped out of a piping bag and pastry tip. It worked fantastically. 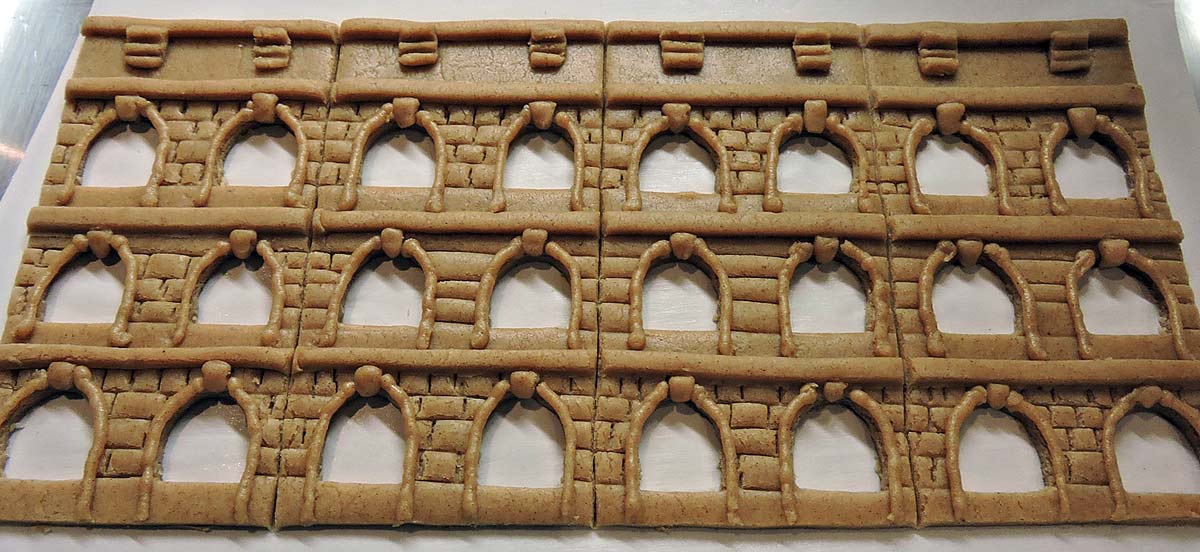 A section of outer wall, textured and sectioned (two arches wide for each panel) ready to go into the oven. 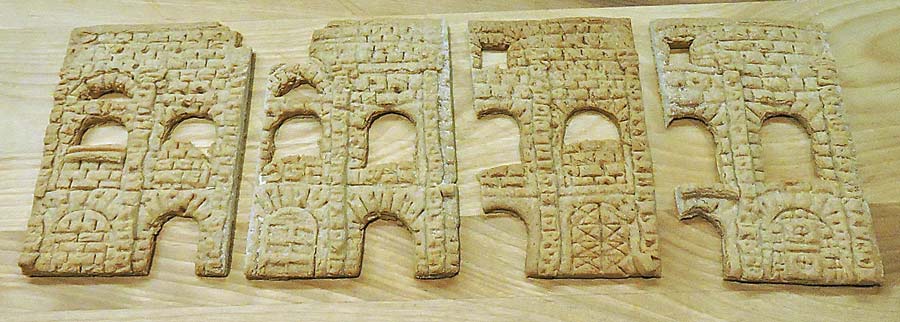 A section of inner wall cooled down and cut apart using a carpenter's dovetail saw. After about a week of research and another 3 days of baking and prepping wall sections and other elements, we filled three pizza boxes with all the gingerbread parts for our Colosseum and got to work assembling with only two days left before we had to present our creation...
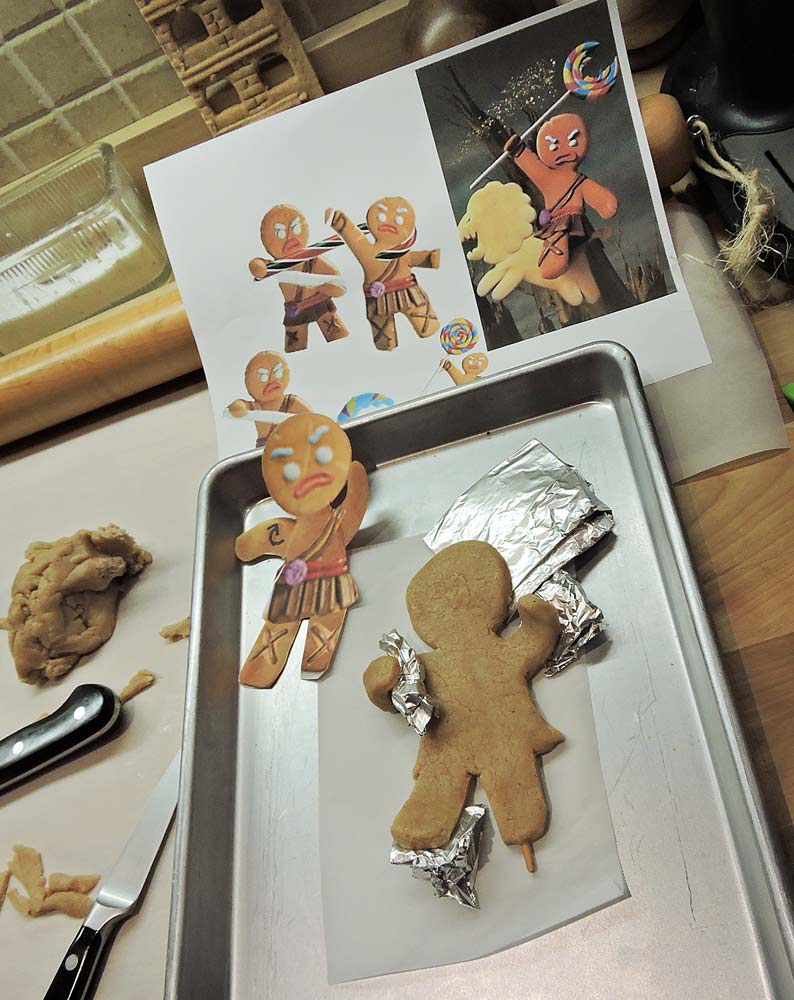
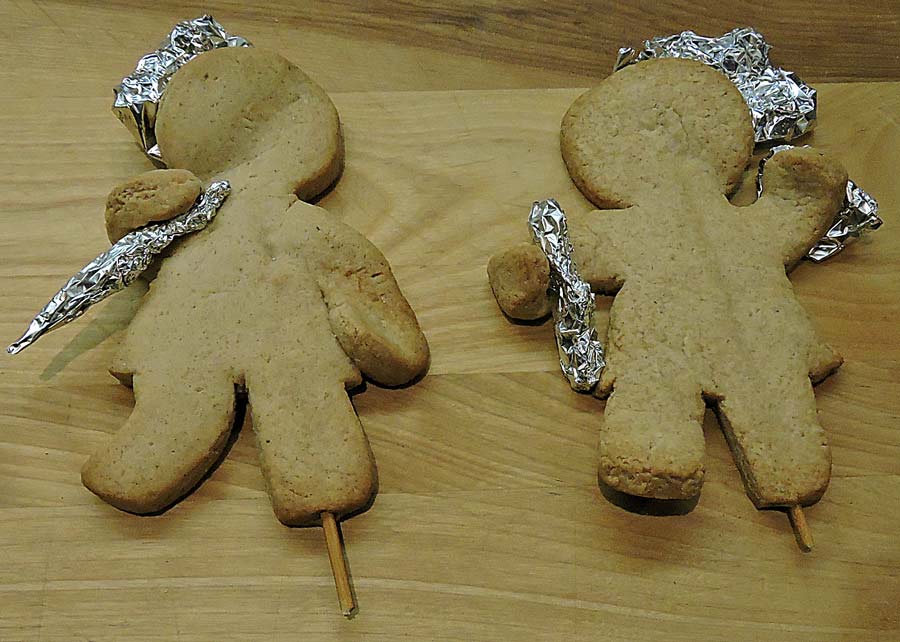
Although we were entered into the "Authentic Reproduction of a Significant Structure" category, we wanted to add a bit of humorous element for the kids that would be viewing our Colosseum for 6 weeks during the holiday season. We decided to place two gladiator combatant Gingerbread Men in the arena styled after the "Gingy" character from the Shrek film franchise. We would have one tripping the other using a candy cane, and the other bopping a lollipop sucker over his head. I wanted these to look animated, so I used foil to prop up parts of the arms, legs and heads during baking. A long bamboo skewer for support was baked into each gingerbread gladiator and would be hot glued into the plywood base of the arena.
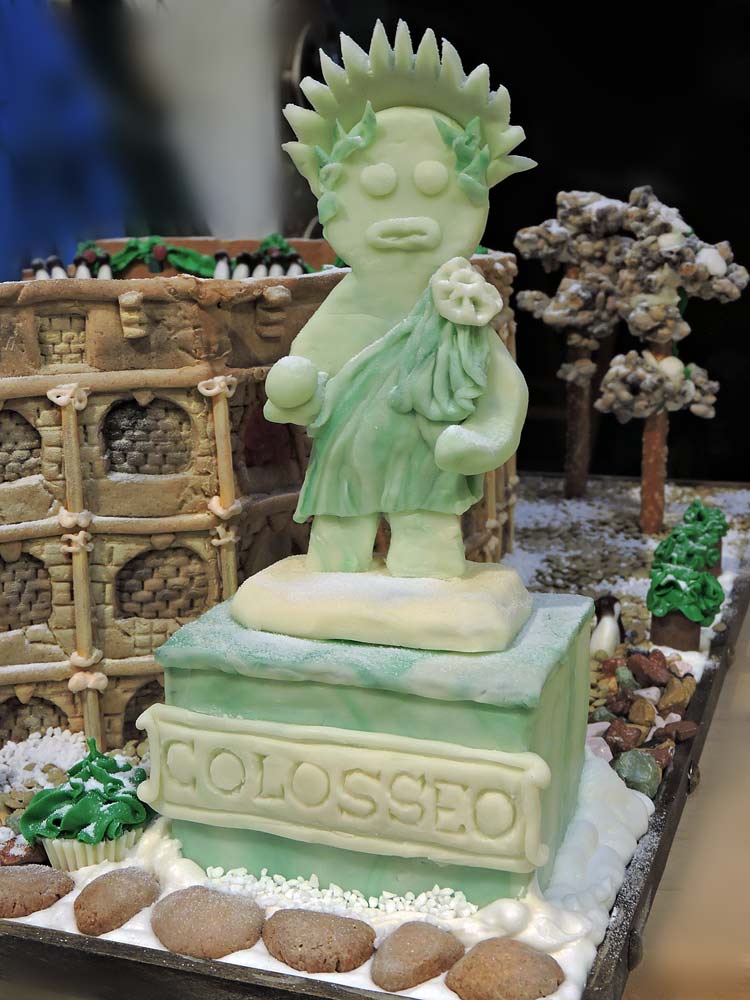
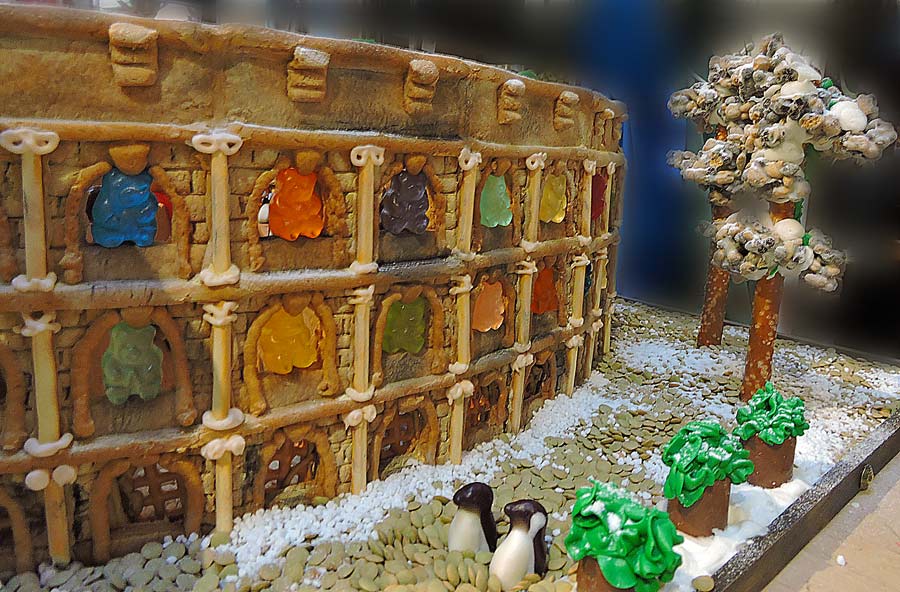
I was originally going to sculpt a human form for our Sun God-Colossus statue, but thought it would be funnier to make him into a gingerbread man--except instead of bronze (I didn't have any bronze Luster Dust) I used modeling chocolate to sculpt a marble statue. 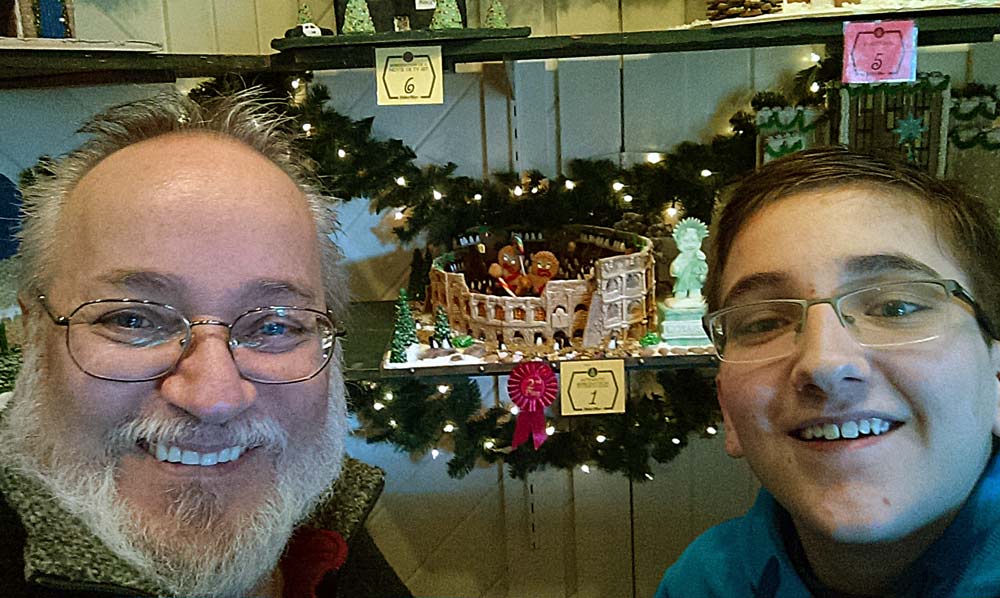 In the end, we were very satisfied with the results and won Second Place (with a decent cash prize and ribbon) for our efforts. I will admit to being frustrated and confused about not taking First Place over the poorly executed and not architecturally correct "Rockefeller Center Ice Skating Rink" that won the grand prize. We had put so many different techniques into ours and had built a nearly architecturally correct Colosseum, while the First Place winner had only flat panels of gingerbread and no architectural details at all (no gold statue of Prometheus?) No matter, we're still proud of our effort this year! What do you think? --Jerry Finzi 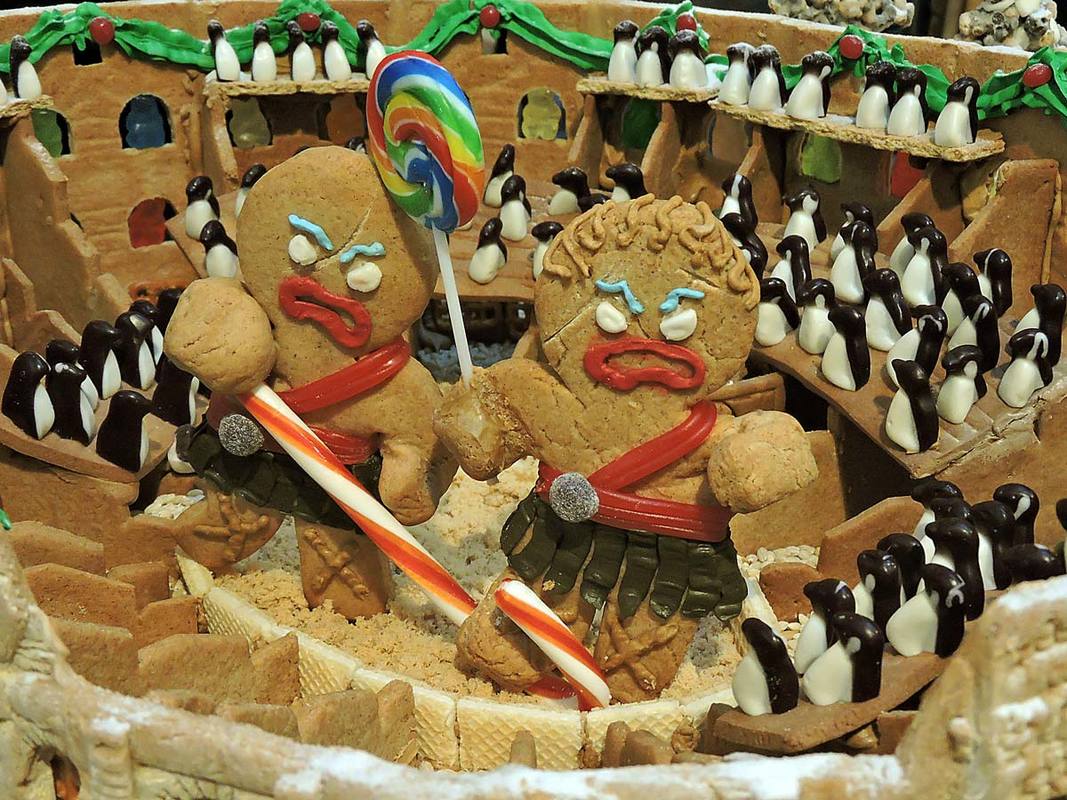 Our "Gingy" Gladiators doing battle, while penguin citizens enjoy the show
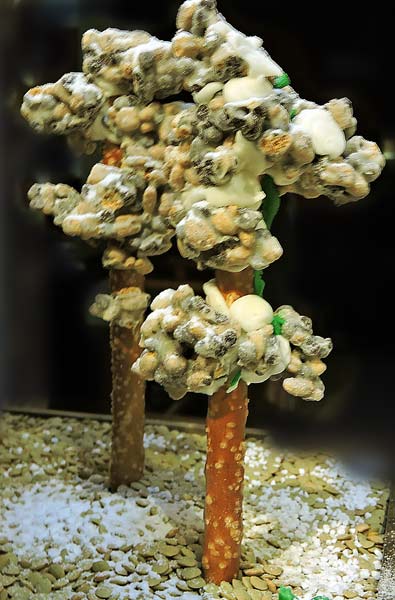
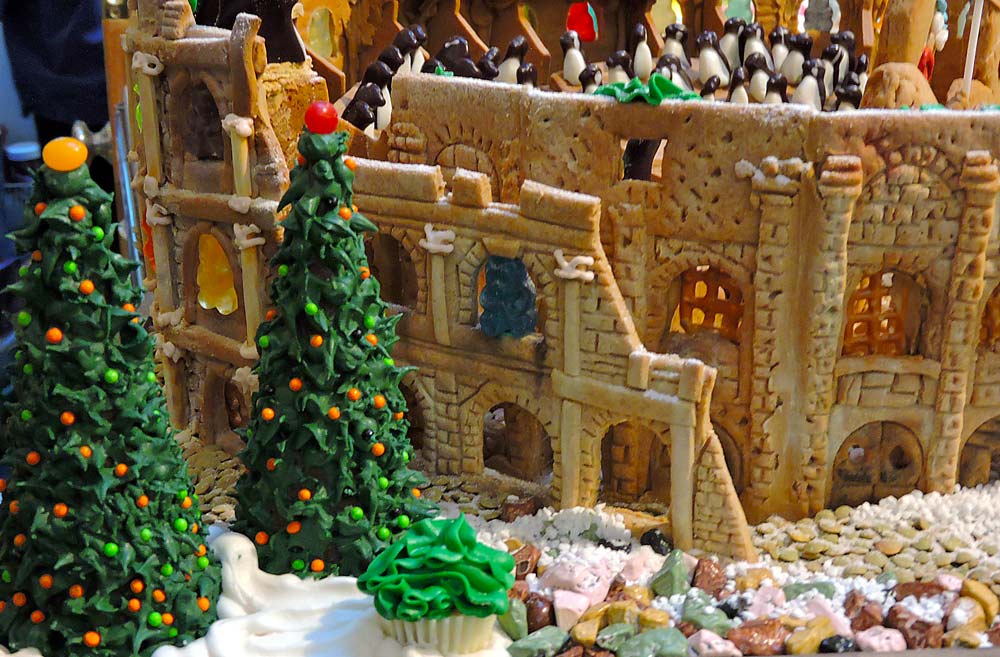 Exterior with piped Christmas trees over inverted ice cream cones, chocolate stones and lentils for the paths  We decided on using penguin gummies for the audience 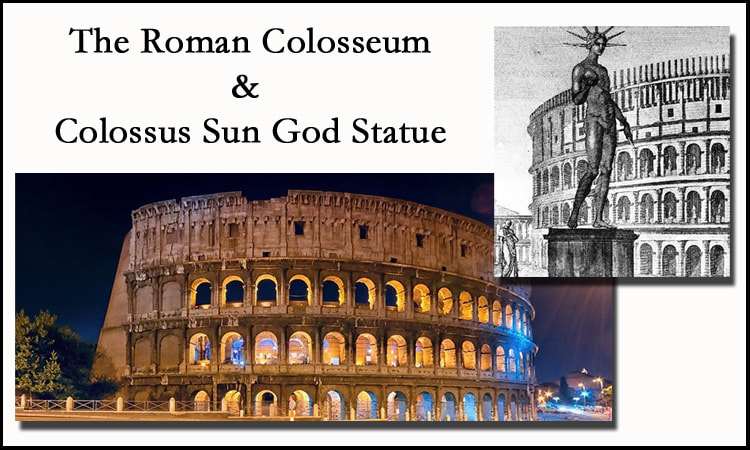  360 degrees of details captured from Google Earth and pasted together for reference in Photoshop
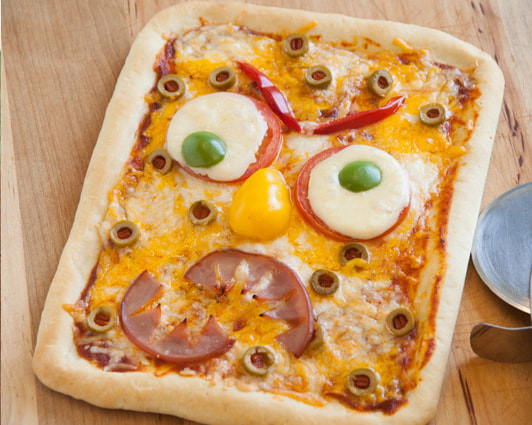
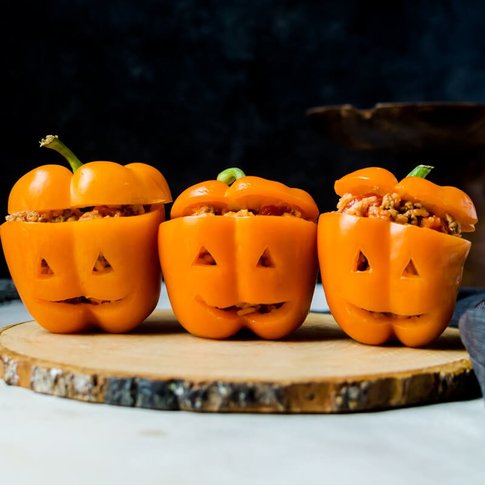
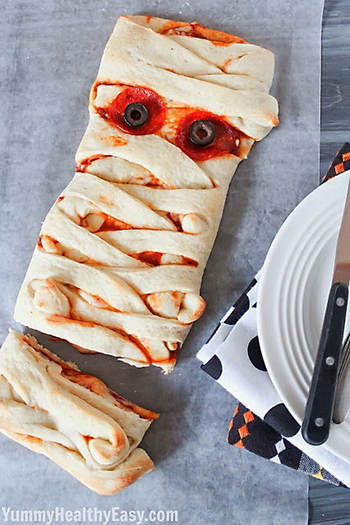
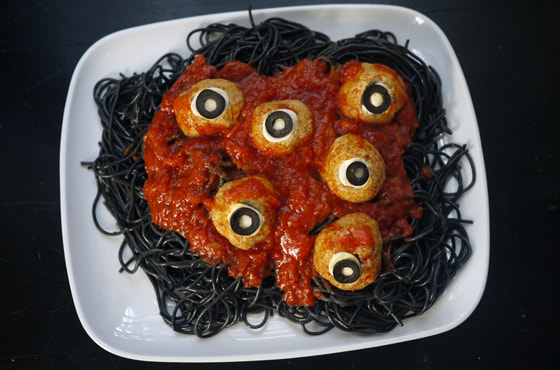
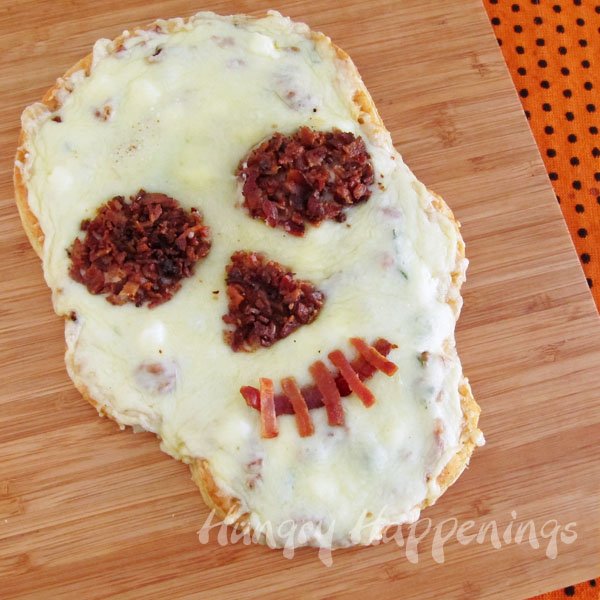
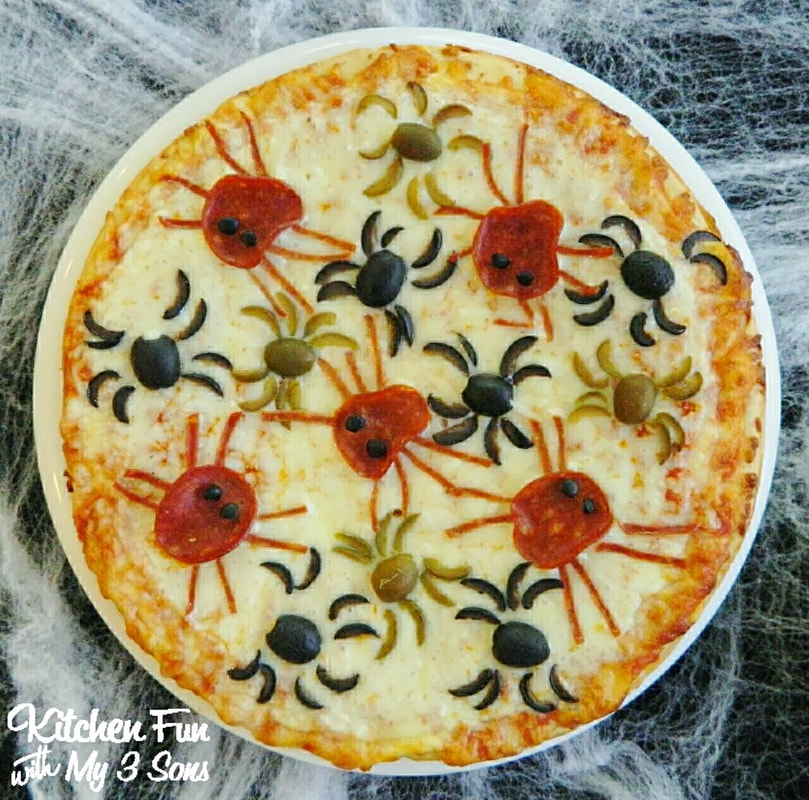
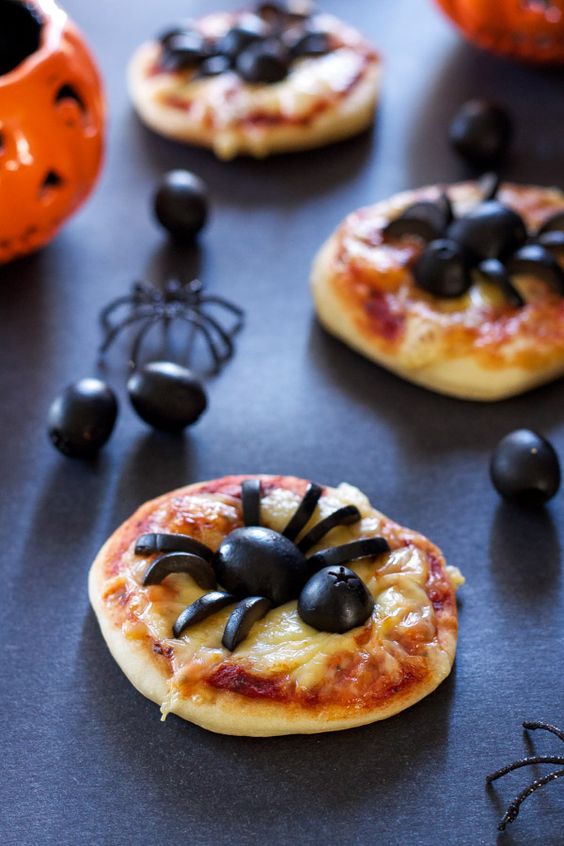
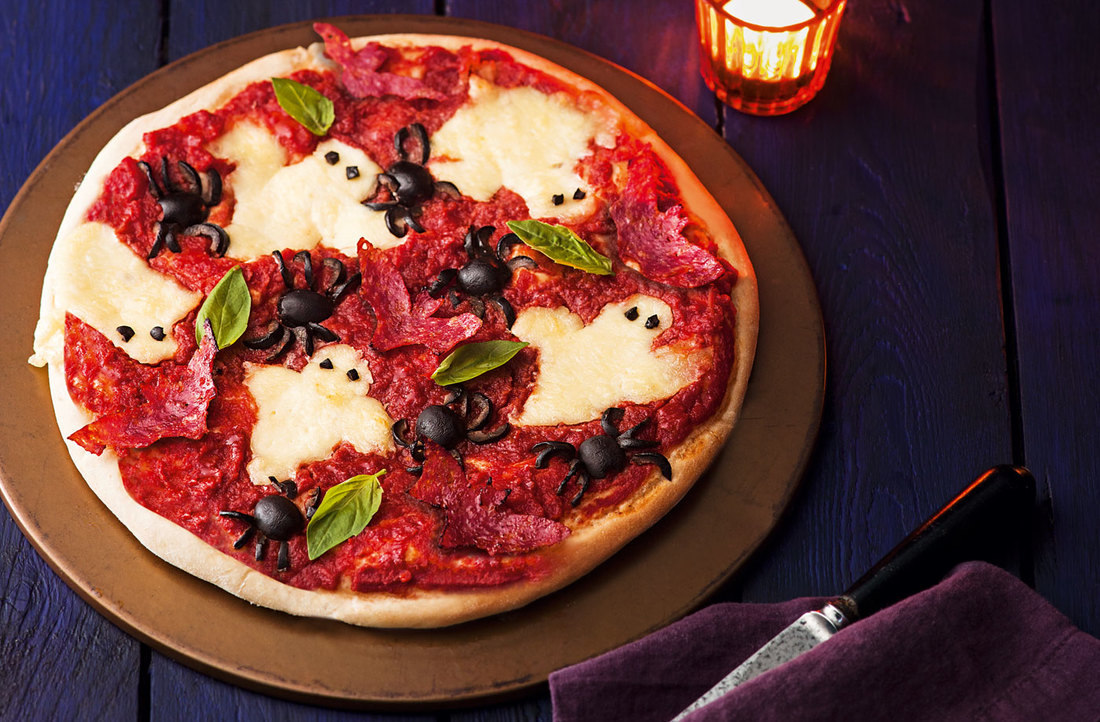
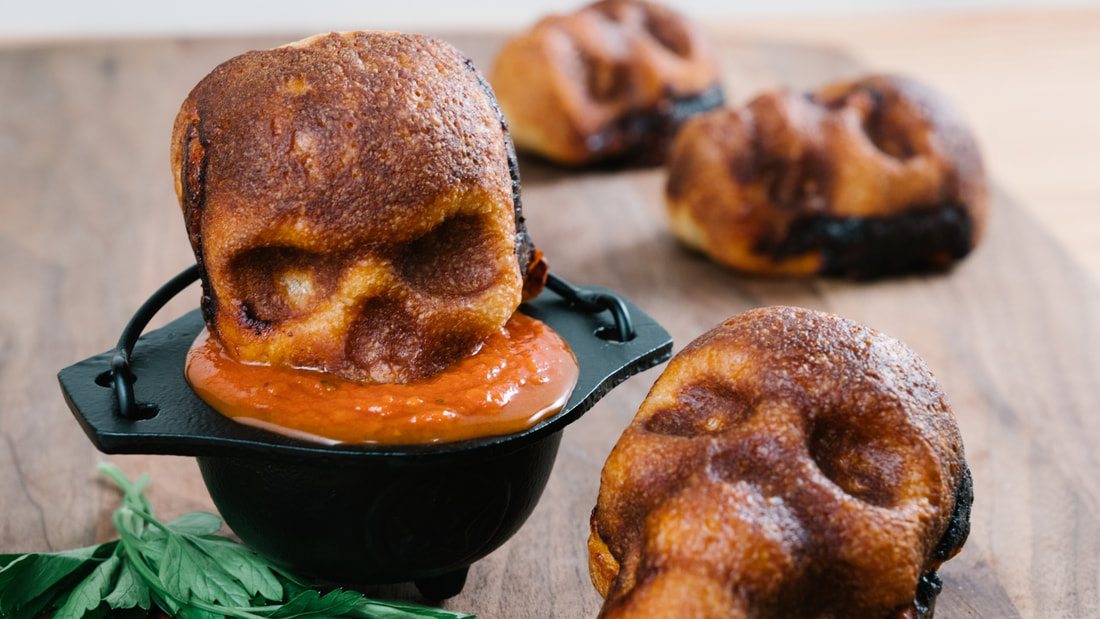
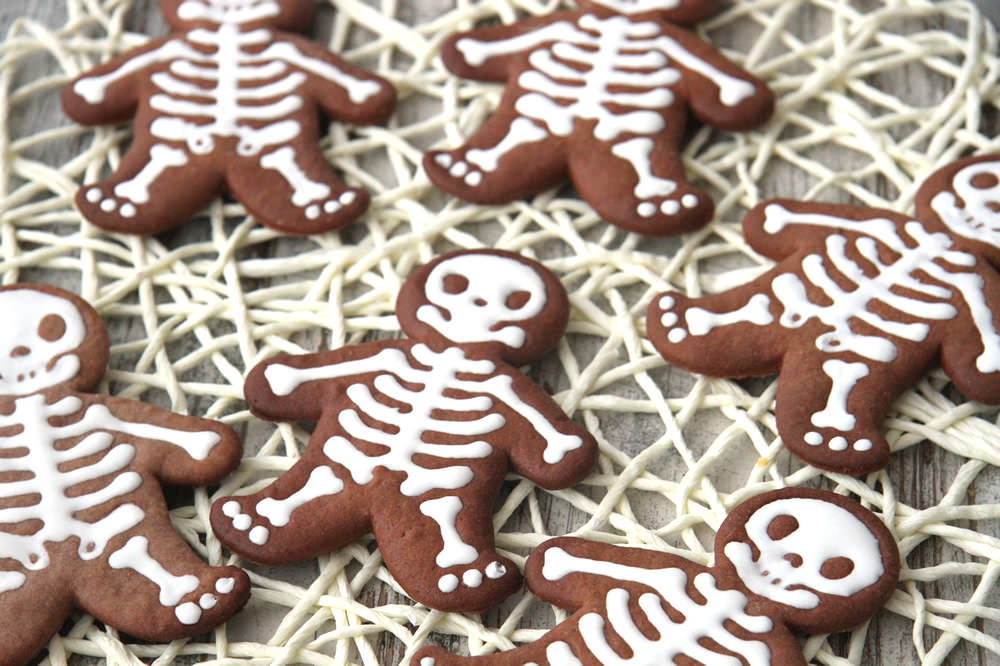
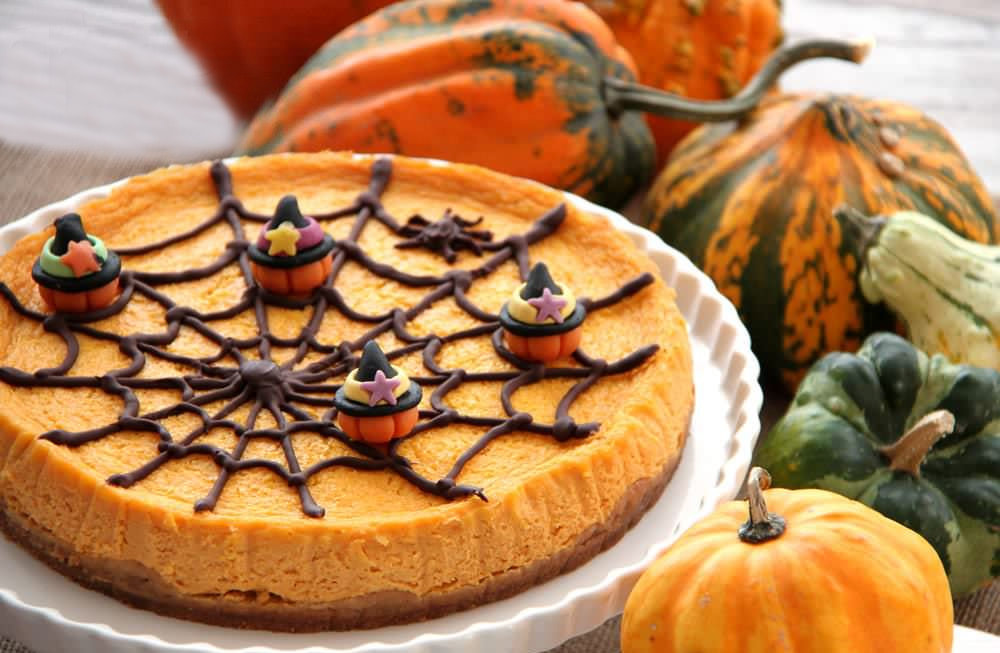
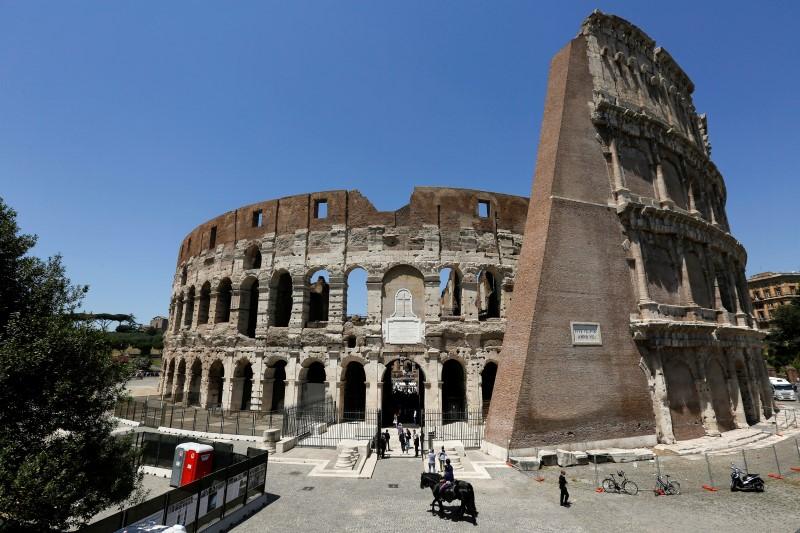 As the Colosseum stands today 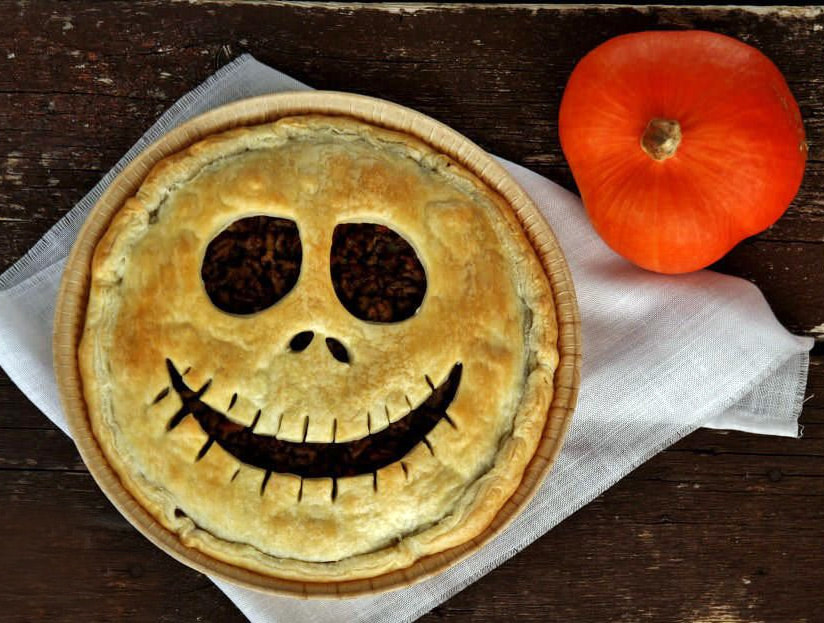 Here are some great recipe ideas for your Halloween parties... Italian style! Click on the photos to take you to each recipe. Enjoy! --Jerry Finzi 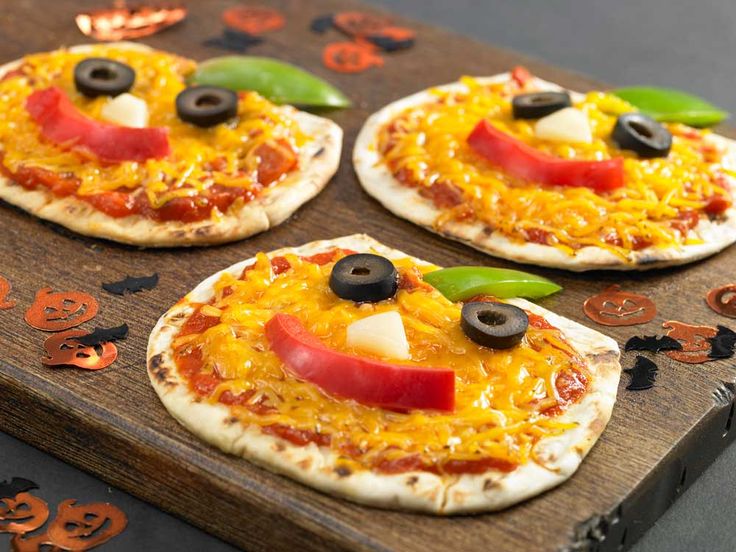
   Each year, we create a gingerbread house with last year being our first time in a local competition. (We received an Honorable Mention for our Gingerbread Leaning Tower of Pisa). But Lucas, Lisa and I have a real challenge ahead of us this year... a project we've wanted to do for the last three years: The Roman Colosseum! This past week we started planning it, and are coming to the realization that this will be one of the most challenging creations to date. As an inspiration, we've been looking all over Google, Pinterest and You Tube for other Colosseum gingerbread and cake creations. It's going to be a tough project for sure. Here's two of the better cakes we found that blew us away, even though they are partial scenes of the Colosseum. We love the amazing details done in modeling chocolate... |

Archives
May 2024
Categories
All
|