GRAND VOYAGE ITALY
  • Piazza
    • Older Posts
  • Travel
    • Our Family's Voyage
  • Cucina
  • Culture
  • History
  • Style
  • Photos
  • Videos
    • Music Videos
  • About
    • Survey
    • Links
  • Shop 🛒
  • Piazza
    • Older Posts
  • Travel
    • Our Family's Voyage
  • Cucina
  • Culture
  • History
  • Style
  • Photos
  • Videos
    • Music Videos
  • About
    • Survey
    • Links
  • Shop 🛒
We're All About Italy

Cucina

Stracotto: Italian Style Pot Roast

4/17/2018

Comments

 
Picture
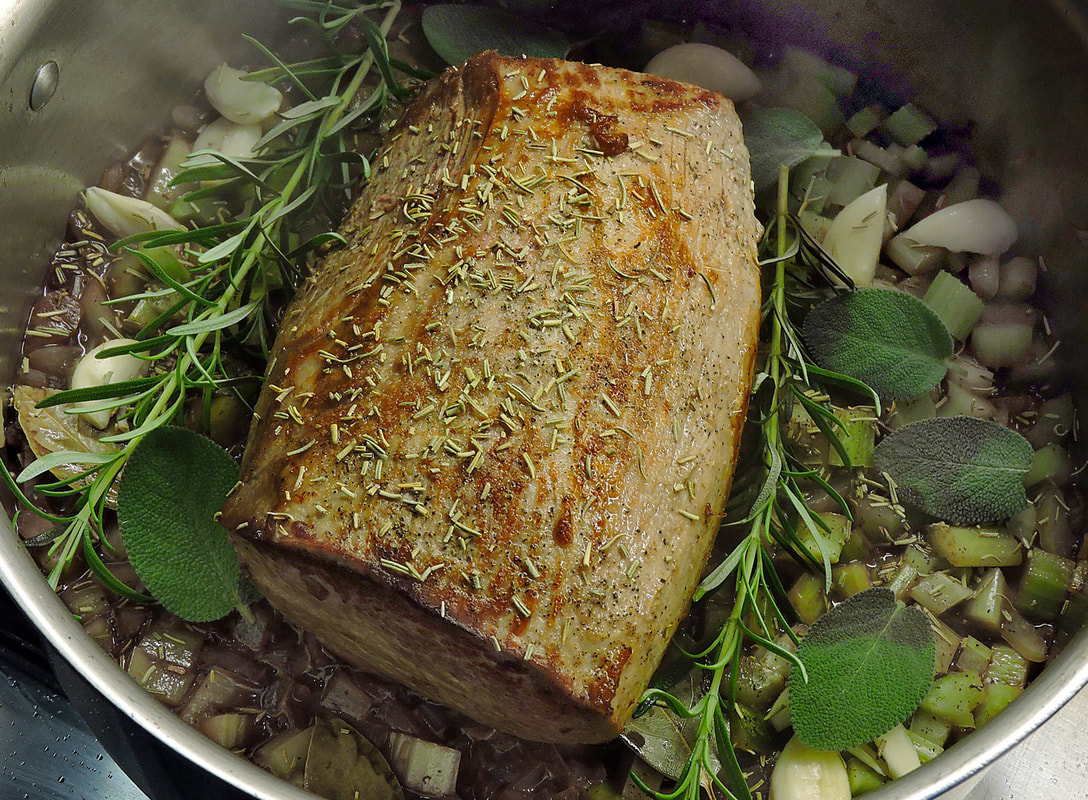
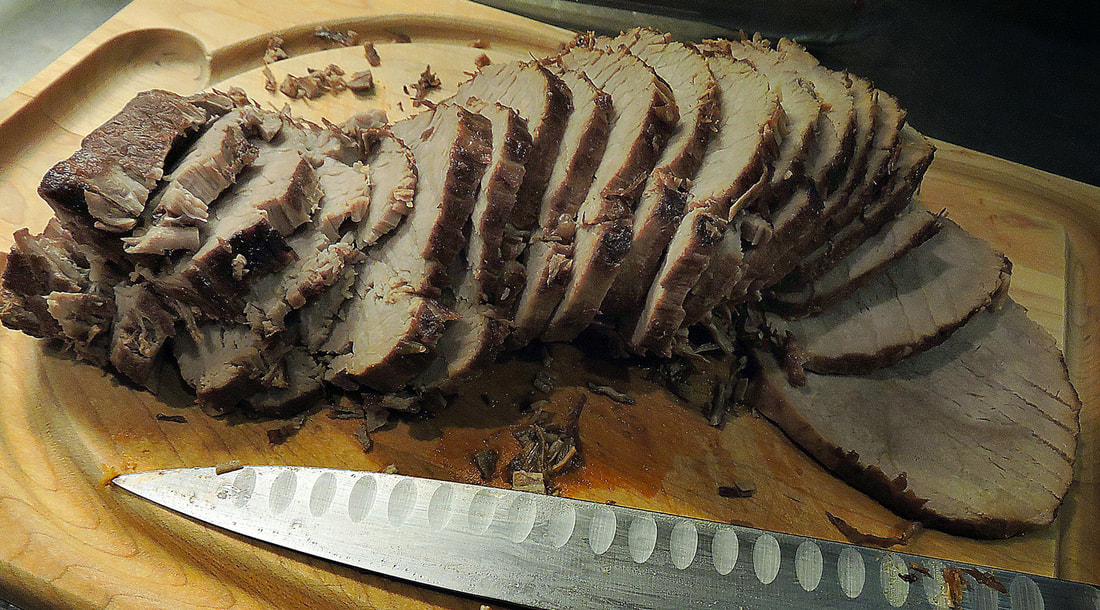
Of course, I was first introduced to pot roast by my Mom, but being a working mother, she always looked for shortcuts--a big thing for Moms back in the 50s and sixties. Although it was delicious, her shortcut was to use cans of Campbell's Onion Soup and to cook it in her very scary, rattling pressure cooker (Mom managed to blow up a few of those beasts). Even as I moved on to my own life, he loved making this for me as a special treat, believing it was my "favorite" meal. (I really liked her lasagna much better).

Well into my thirties, as I developed my own culinary skills, I wanted something more authentic, so I opted for using sweet onions like Vidalia or Walla Walla to add a sweet, deep flavor to my version. In recent years, I've developed my Italian Style Pot Roast, reminiscent of Sugo (Sunday Gravy), but with a much lighter stew type sauce. In Italy, this type of recipe is called Stracotto (literally, overcooked), because of its slow cook time. Another name for this recipe, or rather, style of preparation is simply Brasato di Manzo (braised beef).
Picture
Simple ingredients, make a robust meal
To ensure that the meat is tender, you should plan this as a weekend meal, allowing most of the afternoon to slow cook the roast on a gas range (OK, electric would be fine also). Yes, as my mother did, this pot roast isn't done in the oven but rather in a heavy pot on a cooktop. This method takes a minimum of 4 hours of slow-cooking. Technically, it's a braise and not a true roast. (One day soon I should show you how I do my Dad's Oven Roasted Beef).

I cook mine in our tri-bond, stainless steel, flat-bottomed All-Clad Stockpot,  rather than our Dutch oven. I find the wider base spreads the heat out rather than concentrating it in the center, as the narrow-bottomed Dutch oven does. (Which would tighten the proteins in the beef rather than relax them). I also use a heavy cast iron Heat Diffuser over our medium diameter gas burner to diffuse the heat even further. I suppose I could also use one of our other options, like our Staub Coq au Vin Cocotte or our Emile Henry Brasier (for a smaller roast) but I like working with steel.
Picture
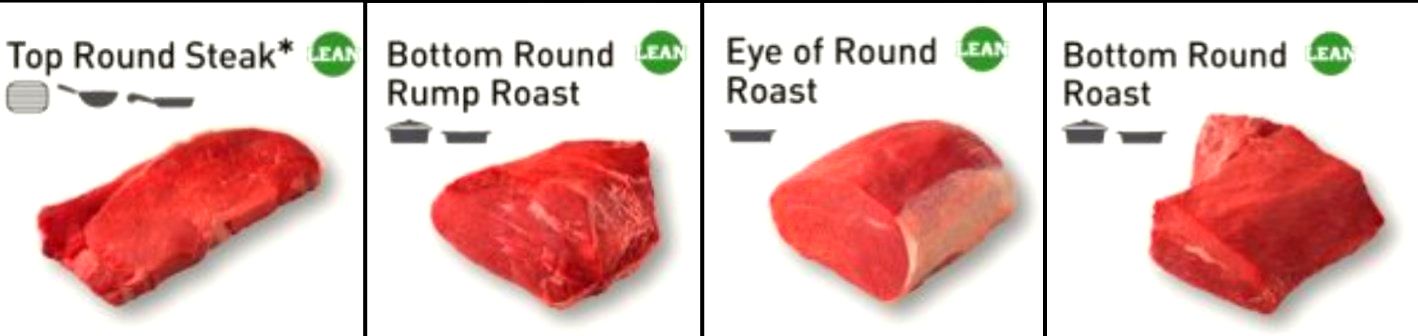
What Cut of Beef?
You will see cuts of beef labeled "chuck roast" in the supermarket, but you can use pretty much any type of beef--as long as it's a tough cut--not tender. A slow cooking time and very low temperature really define the process--not the cut of beef. Pot roast is a braise (slow cooked in liquid) that cooks at a low temperature for a long period of time.

The tougher cuts work best because the slow cooking gently breaks down the proteins and collagen, giving you a luscious, nearly-fall apart, fork-cutting texture.  These cuts are from the parts of the animal that are very muscular with lots of connective tissue and very little fat. If you quickly grilled these cuts, the result would be very tough.

The following three cuts will all make a fine pot roast:
  1. Chuck: From the front portion of the animal. Look for chuck roast, shoulder steak, boneless chuck roast, chuck shoulder pot roast. In the case of shoulder cuts with lobed sections, you might have to use butcher's twine to tie the roast into a cylindrical shape for better handling while browning.
  2. Brisket: From the breast or lower chest with long strands of meat. Brisket is best sliced across the grain of the meat for maximum tenderness.
  3. Round: From the rear leg of the animal. Look for rump roast or bottom round.
 
Picture
Ingredients
  • 1 - beef chuck roast, 2-1/2 to 3 pounds
  • 2 tablespoons olive oil (for browning)
  • 1-1/2 cups red wine (Chianti, Primitivo, Sangiovese, etc.)
  • 2 cups beef broth
  • 1 large Vidalia or Walla Walla (sweet onion), diced or sliced--your choice (a texture difference)
  • 4-5 plum tomatoes, diced (alternate: 14.5 ounce can diced or crushed tomatoes)
  • 3 carrots, diced or larger cuts, your choice
  • 3 celery stalks, diced or larger cuts
  • 12-15 garlic cloves, paper removed.
  • 2 sprigs fresh rosemary (or 1 tablespoon dry)
  • 6 fresh sage leaves (or 1 teaspoon dry)
  • 1 teaspoon dried thyme
  • 1 teaspoon dried oregano
  • 1 tablespoon dried basil
  • 5 bay leaves (remove before serving!)
  • 1/2 teaspoon red pepper flakes (pepperoncino)
  • 20 cracks of fresh black pepper (from pepper mill, or 1/2 teaspoon ground)
  • 2 teaspoons sea salt
Picture
PictureHeat Diffuser
Directions
  1. Dry the beef chuck roast with paper towels. If there is any tough silver skin or a very thick fat along one side, remove it with a filet knife, but leaving some fat.
  2. With a sharp paring knife, cut 6-8 slits into the beef on all sides, about 2" deep. Shove a clove of garlic deep into each hole. These will impart amazing flavor into the roast as it cooks.
  3. Salt well, then crack some pepper on all sides of the roast.
  4. Drizzle 2 tablespoons olive oil into your stock pot and turn the heat on medium-high.
  5. Wait until the pan is hot, then place your roast into it, with the fat side facing downward. You should hear a sizzle. If your pot isn't hot enough, the roast will stick.
  6. After browning the first side, use tongs to turn and brown all sides equally. Don't forget the ends--standing the roast up on its ends and leaning on one side of the pot usually works well, otherwise hold in place with tongs.  Remove the  pan from the heat at this point, and place the roast on a dish while you prepare the vegetables. Do NOT wipe out or clean the pan.
  7. Prep your vegetables: Shave the carrots and cut into a small dice if you want them to cook down into the sauce, or in larger pieces if you prefer to have the stewed carrots in the final results. Do the same with the celery.
  8. If using fresh tomatoes, dice them and set them aside.
  9. Dice, slice or chop the onion. The texture is a personal choice. I like dicing the onions so they melt into the sauce. You might like to have more rustic cut onions.
  10. Place your pot over a medium heat again and when hot, deglaze the pan by drizzling in some of the wine. Using a flat bottom wooden spoon, scrape away at the fond (the brown bits) that developed when browning the beef until the bottom of the pan looks clean again.
  11. Place the onions into the same pot, heat still on medium and simmer until they are translucent and have taken on the color of the wine.
  12. Add the rest of your vegetables into the pot, along with the rest of the wine and beef stock. If using canned diced tomatoes, add them now.
  13. Add all the spices into the pot, then mix well into the vegetable mixture. If using springs of rosemary, place them on the sides, then place your roast on top of the vegetables, fat side up. Briefly, spoon some of the liquids over the roast.
  14. Cover the pot and place on the smallest burner of your cooktop or on a medium burner using a cast iron flame retarder (heat diffuser) under the pot. Cook for 3 hours, occasionally spooning sauce on top of the roast.
  15. After the roast is tender, but before reaching a "fall apart" stage, remove the roast and place onto a cutting board, letting it cool to the touch for a few minutes. Slice into half-inch slices. Carefully, return each slice back into the pot, making sure each one is under the surface of the sauce. Continue cooking on a low temperature for an additional 30 minutes. This should make your slices fork-tender--you won't need a knife when eating.
  16. When finished,  decide if your sauce is as thick as you would like. If you would like it a bit thicker, you can stir in a handful of dried breadcrumbs (and old Nonna trick). Personally, I like the sauce a little on the runny side so I can use a scarpetta while eating to sop it up.
You can serve this as Italians do, as a Secundo (second course) after the Primo (pasta course). Or as we do, a casa Finzi... served over a bed of ziti rigati or risotto. Another option is to service it as northern Italians might, with fresh made spaetzel, the Austrian-German style of dumpling (look for my recipe soon). Definitely serve with a rich Italian wine, a Barolo, Primativo or even a bright Chianti. And try the "Ratatouille" test that my son Lucas and I picked up from the animated film: take a forkful of beef, then a sip of wine. Close your eyes and see how they merge into a wonderful mix of flavors in your mouth...

Allora... Buon appitito!


Don't forget to write and tell me how yours turned out...
--Jerry Finzi


GVI CUCINA HACK
In this recipe, I shared the trick of thickening with breadcrumbs, which gives a rustic charm to the dish. Of course, if you'd like a richer, even more tomato-y version, you can thicken the sauce during cooking by adding a little tomato paste--perhaps a couple of tablespoons. You can also thicken by using cornstarch... dissolve a tablespoon of cornstarch in a 1/4 cup of cold water and then stir it into the hot, bubbling sauce while stirring to distribute it. (High heat is needed for it to thicken).
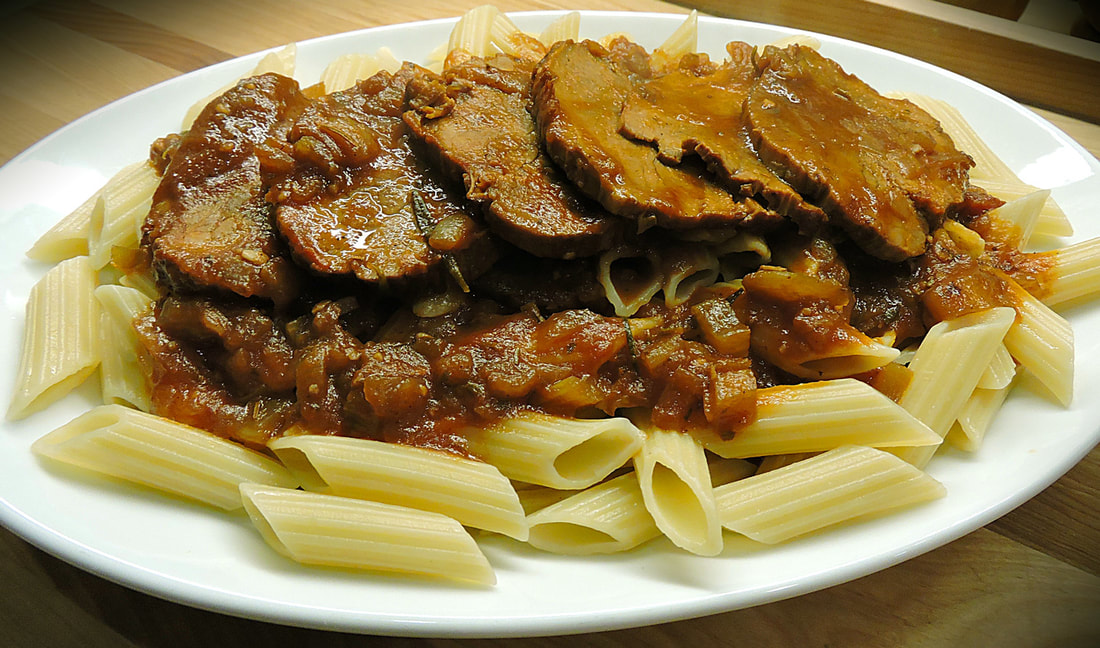

Picture
Comments
    Picture

    Archives

    March 2025
    July 2024
    May 2024
    April 2024
    July 2023
    March 2023
    January 2023
    August 2022
    July 2022
    May 2021
    December 2020
    October 2020
    August 2020
    July 2020
    May 2020
    April 2020
    March 2020
    February 2020
    December 2019
    November 2019
    August 2019
    April 2019
    March 2019
    February 2019
    December 2018
    November 2018
    September 2018
    August 2018
    July 2018
    June 2018
    May 2018
    April 2018
    March 2018
    February 2018
    January 2018
    December 2017
    November 2017
    October 2017
    September 2017
    August 2017
    July 2017
    June 2017
    May 2017
    April 2017
    March 2017
    February 2017
    January 2017
    March 2016
    October 2014
    September 2014

    Categories

    All
    Antipasti
    Baking
    Beverages
    Caffè
    Carne
    Colazione
    Dolce
    Education
    Formaggio
    Hacks & Tips
    Healthy Diet
    History
    Holiday Recipes
    Humor
    Kids Recipes
    Kiitchen Style
    Olive Oil & Balsamic
    Pane
    Panini
    Pasta
    Pastry
    Pesce
    Pizza
    Pranzo
    Primo
    Restaurants
    Riso
    Sauces
    Shopping In Italy
    The Italian Gardener
    Tomatoes
    Tools For La Cucina
    Vedura
    Vino
    Zuppe

Copyright 2014 - 2024 by GrandVoyageItaly.com
Picture
  • Piazza
    • Older Posts
  • Travel
    • Our Family's Voyage
  • Cucina
  • Culture
  • History
  • Style
  • Photos
  • Videos
    • Music Videos
  • About
    • Survey
    • Links
  • Shop 🛒