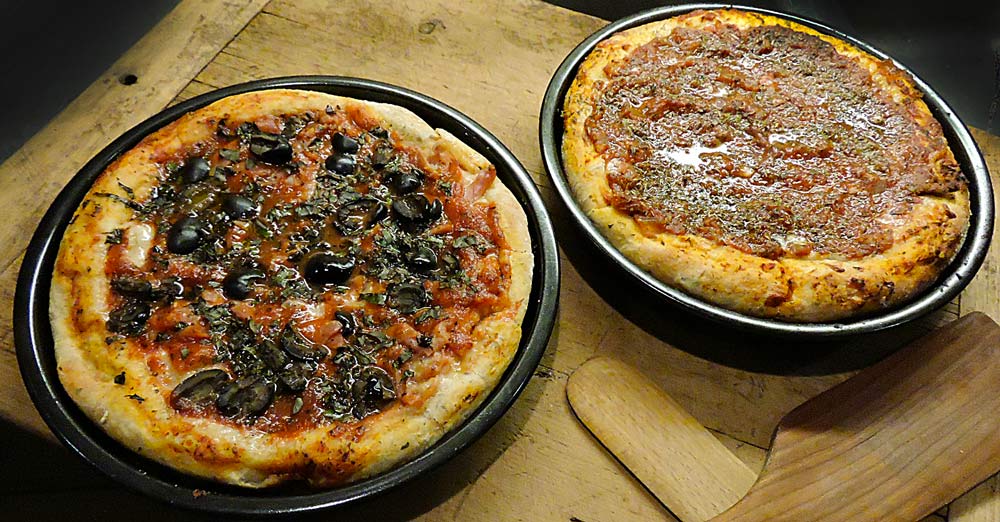
GRAND VOYAGE ITALY
  • Piazza
    • Older Posts
  • Travel
    • Our Family's Voyage
  • Cucina
  • Culture
  • History
  • Style
  • Photos
  • Videos
    • Music Videos
  • About
    • Survey
    • Links
  • Shop 🛒
  • Piazza
    • Older Posts
  • Travel
    • Our Family's Voyage
  • Cucina
  • Culture
  • History
  • Style
  • Photos
  • Videos
    • Music Videos
  • About
    • Survey
    • Links
  • Shop 🛒
We're All About Italy

Nostra Cucina: Deep Dish Chicago Style Pizza Recipe - the Upside-Down Pizza

10/5/2015

0 Comments

 
Picture
Fresh out of my oven...
PictureClick for a store about Goldberg's Pizza
The first time I ever ate a deep dish pizza, I didn't realize I was eating a "Chicago style" pizza. In Manhattan in the seventies, there was a pizzeria with an unexpected name... Goldberg's Pizzeria. The late, great Larry Goldberg actually had three locations in Manhattan. One was down on 20th and Third Avenue, near my studio. Sure, Larry offered his famous--or infamous--"Goldilox" pizza featuring lox, but most of their offerings were very Italian. Some say that Larry bribed an employee at Uno's Pizzeria in Chicago (Larry's hometown) for their recipe, but I've since eaten Uno's pizza and it's nothing like I remember Goldberg's was.
I used to go to Goldberg's often to enjoy deep dish pizzas delivered to your high back booth table--lots of privacy for dates when I'd order their heart shaped pizza to make an impression. Larry's pizza's were thick, sweet and cheesy. While the crust was thick and steamy inside, the bottom and edge of the crust were nicely browned and there was always tons of fillings on top. He had a secret ingredient that he took to his grave (rye flour or corn flour in the crust?) Their meatball topping was amazing. The SMOG pizza had Sausage, Mushrooms, Onions and Garlic (s-m-o-g)--get it? The other thing that made Goldberg's so special was their sauce. It was sweet with a hint of spice. Perfetto! Or should I say, Mazoltov!

Fast forward to the age of foodie channels on the boob tube. After I started seeing lots of food shows profiling Chicago deep dish pizzas I knew I had to try making my own. The curious thing about what I learned is, typically, the fillings are put on in an upside-down manner. The meat would go on first, then the cheese, and the the sauce on top. 

The pans are also crucial to making a successful Chicago style pizza. You need a 9-10" round pan that is black in color and about 2 inches high. Th black color is to ensure that the bottom of the crust is browned nicely at about the same time the toppings are ready. Here's my recipe for two  9 inch Windy City special pies:

Ingredients

Dough
2 cups King Arthur's Bread Flour
1 cup King Arthur's Whole Wheat Flour
1 tablespoon salt
1 tablespoon sugar
2 tablespoons extra virgin olive oil

Yeast mixture
1 tablespoon dry active yeast
1-3/4 cups water (at 115 F)
1 tablespoon sugar for "proofing" the yeast

Toppings:
1 cup of my Nostra Cucina Pizza Sauce Recipe
2 teaspoons dried basil
2 teaspoons dried oregano
Extra virgin olive oil (for drizzling on top)
cheese of your choice (fontina, provolone, mozzarella, etc.)
for meat, try home made sliced meatballs, thin sliced prosciutto, smoked ham or diced Canadian bacon.

Picture
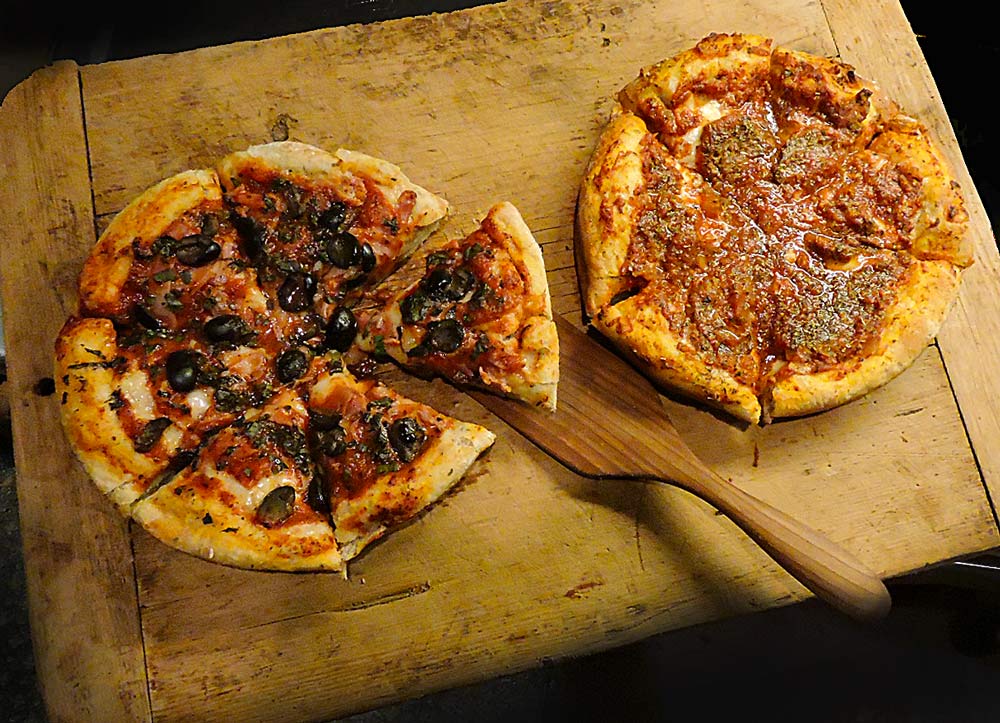
The one on the left is provolone, olives and proscuitto - The one on the right is fontina/mozzarella with meatballs
You'll need two black, deep dish pizza pans (or cake pans) about 2 inches deep, like this one on Amazon.
  1. Preheat your oven with a pizza stone set on a center rack to 425F. (Or use a pizza steel)
  2. Mix the yeast and sugar into your water and set aside to mix in a small bowl to "proof" (foam up)-about 10 minutes.
  3. Put 1 cup of Bread Flour, 1 tablespoon of salt and 1 tablespoon sugar into the bowl of a stand mixer (with a dough hook attached). Mix briefly.
  4. After the yeast has proofed, add it to the flour and mix on low speed until all the ingredients are wet. Use a rubber spatula to scrape down the sides of the bowl occasionally while mixing the dough.
  5. Next add the olive oil and the 1 cup of whole wheat flour and mix until blended well.
  6. Now, add the remaining flour little by little until you see the dough mass separating from the bowl. It will want to climb up the hook a bit. Stop the mixer and scrape the hook clean, then mix again. If the mix looks too wet, add a bit more flour. You do NOT want the dough totally dry.
  7. Once the ball of dough looks well formed, and still a bit sticky (but not wet), turn out the dough ball onto a floured work surface and sprinkle some flour on top.
  8. Knead the dough for a couple of minutes with your floured hands.
  9. Place the dough ball into a well oiled bowl, turning to coat both sides with oil. Cover with plastic wrap, or a damp cotton kitchen towel and set aside to rise for about 45 minutes. 
  10. Lightly oil 2 nine inch black pans (use olive or canola oil).
  11. When the dough has risen, turn it out onto your floured work table and cut into two equal pieces. Knead each piece into a ball and then flatten into a 4-5" thick round. Let rest for 5 minutes.
  12. Next, place one of the rounds into a pan and using your fingers, starting at the center, work the shape out to fill your pan. (You don't want the bottom too thin.) Then press the dough up the sides of the pan all the way to the top edge. If you like a thick, bready edge, make it thick, if you like it thinned press it thinner. To make sure you don't get a bubble rising in the center, use a fork (or a "docker") to poke small holes in the bottom of the crust. This lets air escape during baking.
  13. Time to fill your pizza. Place any meat toppings spread across the bottom first. Next, spread your cheese. Then add your pizza sauce topped off by your spices--oregano and basil, or either one by itself... or you can even use a good quality "Italian Spices" mix. Use fresh spices from your garden if available.
  14. Drizzle some extra virgin olive oil on top.
  15. Place both pans on opposite corners of your pizza stone and bake for 15 minutes at 425F until the bottom of the crust looks browned and the top looks cooked. Baking on a stone helps brown the bottom. Depending on how evenly your oven bakes, consider rotating the pans halfway through the baking.

After removing from the oven, let these pizzas rest for at least 5 minutes before trying to cut and serve. They tend to be very wet in the middle, depending on the amount and thickness of the toppings. To slice, I really recommend using a thin spatula or knife to help loosen the pizza from the pan, then place the pizzas on a cutting boat where you can cut pieces using a large chef's knife or a large mezzaluna (THIS is the one I use).

Serve with a nice Primativo wine from Puglia.

Buon Appetito!

--Jerry Finzi

If you enjoyed this recipe, please share it, post it to your favorite recipe site, but please tell them where the recipe came from. Ciao!

Copyright 2015, Jerry Finzi - All rights reserved.
0 Comments

Your comment will be posted after it is approved.


Leave a Reply.


    Categories

    All
    1 Making Plans
    2 Gear And Tips
    3 Getting Around
    4 Tuscany
    5 Amalfi Coast
    6 Basilicata
    7 Puglia
    8 Rome
    9 Postcards
    Fotos Di Finzi
    History For Italians
    Humor
    La Cucina & Recipes
    More Than Gelato Pizza
    More-than-gelato-pizza
    News Del Giiorno
    Off The Tourist Path

    Archive

    January 2021
    January 2019
    December 2018
    November 2018
    August 2018
    April 2018
    March 2018
    February 2018
    January 2018
    December 2017
    November 2017
    October 2017
    September 2017
    August 2017
    July 2017
    June 2017
    May 2017
    April 2017
    March 2017
    February 2017
    January 2017
    December 2016
    November 2016
    October 2016
    September 2016
    August 2016
    July 2016
    June 2016
    May 2016
    April 2016
    March 2016
    February 2016
    January 2016
    December 2015
    November 2015
    October 2015
    September 2015
    August 2015
    July 2015
    June 2015
    May 2015
    April 2015
    March 2015
    February 2015
    January 2015
    December 2014
    November 2014
    October 2014
    September 2014
    August 2014
    July 2014

    RSS Feed

Copyright 2014 - 2022 by GrandVoyageItaly.com
Picture
  • Piazza
    • Older Posts
  • Travel
    • Our Family's Voyage
  • Cucina
  • Culture
  • History
  • Style
  • Photos
  • Videos
    • Music Videos
  • About
    • Survey
    • Links
  • Shop 🛒