 on AMAZON on AMAZON Beef Ragu over Cheesy Polenta
A rustic, belly-filling recipe from simple ingredients. The cook time from pan to table is under an hour, so it's great for a quick family meal during the workweek... Ingredients Polenta
Directions
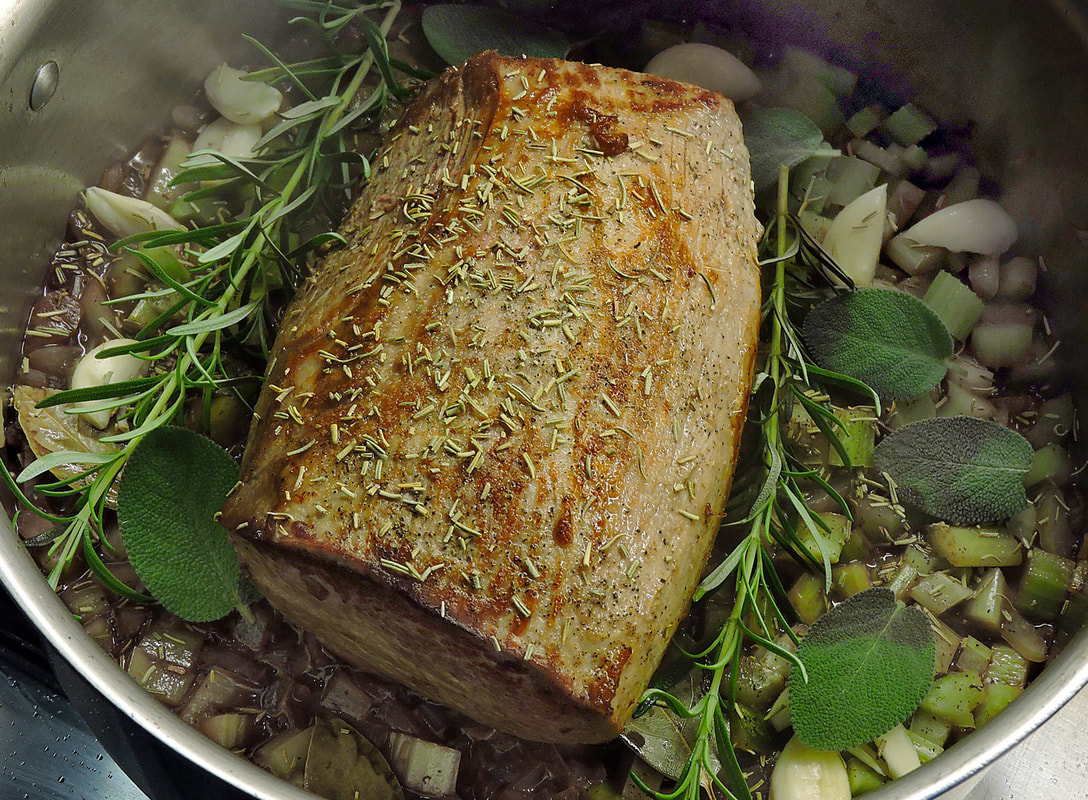
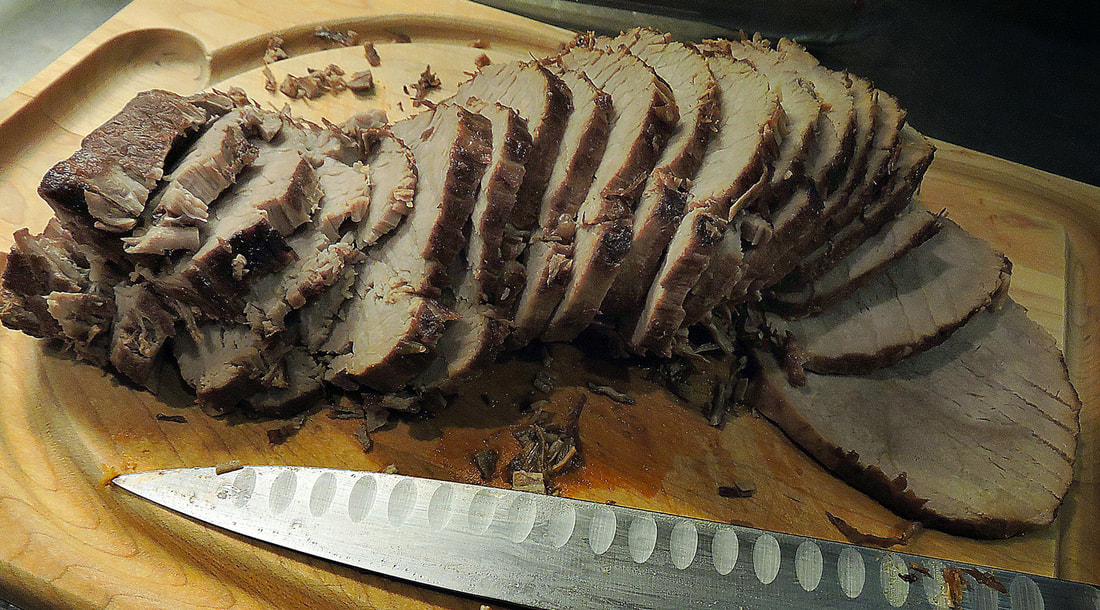
--Jerry Finzi  Of course, I was first introduced to pot roast by my Mom, but being a working mother, she always looked for shortcuts--a big thing for Moms back in the 50s and sixties. Although it was delicious, her shortcut was to use cans of Campbell's Onion Soup and to cook it in her very scary, rattling pressure cooker (Mom managed to blow up a few of those beasts). Even as I moved on to my own life, he loved making this for me as a special treat, believing it was my "favorite" meal. (I really liked her lasagna much better). Well into my thirties, as I developed my own culinary skills, I wanted something more authentic, so I opted for using sweet onions like Vidalia or Walla Walla to add a sweet, deep flavor to my version. In recent years, I've developed my Italian Style Pot Roast, reminiscent of Sugo (Sunday Gravy), but with a much lighter stew type sauce. In Italy, this type of recipe is called Stracotto (literally, overcooked), because of its slow cook time. Another name for this recipe, or rather, style of preparation is simply Brasato di Manzo (braised beef).  Simple ingredients, make a robust meal To ensure that the meat is tender, you should plan this as a weekend meal, allowing most of the afternoon to slow cook the roast on a gas range (OK, electric would be fine also). Yes, as my mother did, this pot roast isn't done in the oven but rather in a heavy pot on a cooktop. This method takes a minimum of 4 hours of slow-cooking. Technically, it's a braise and not a true roast. (One day soon I should show you how I do my Dad's Oven Roasted Beef). I cook mine in our tri-bond, stainless steel, flat-bottomed All-Clad Stockpot, rather than our Dutch oven. I find the wider base spreads the heat out rather than concentrating it in the center, as the narrow-bottomed Dutch oven does. (Which would tighten the proteins in the beef rather than relax them). I also use a heavy cast iron Heat Diffuser over our medium diameter gas burner to diffuse the heat even further. I suppose I could also use one of our other options, like our Staub Coq au Vin Cocotte or our Emile Henry Brasier (for a smaller roast) but I like working with steel. 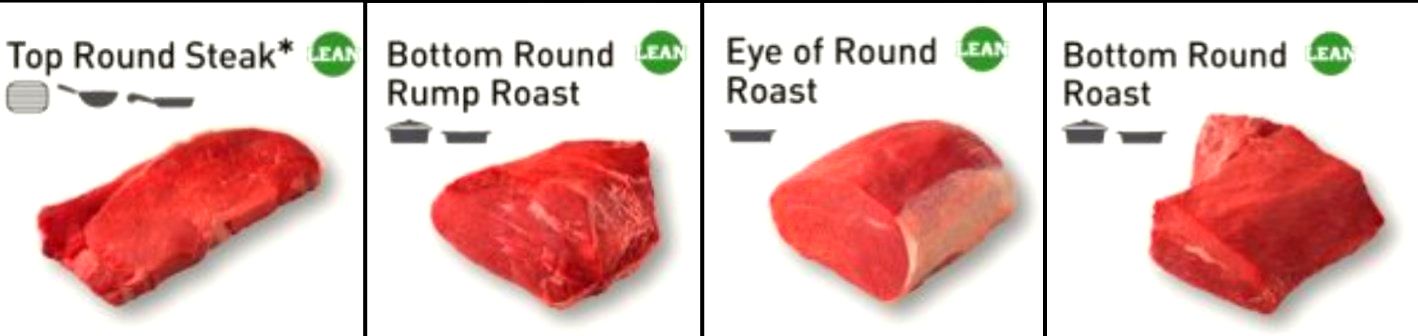 What Cut of Beef? You will see cuts of beef labeled "chuck roast" in the supermarket, but you can use pretty much any type of beef--as long as it's a tough cut--not tender. A slow cooking time and very low temperature really define the process--not the cut of beef. Pot roast is a braise (slow cooked in liquid) that cooks at a low temperature for a long period of time. The tougher cuts work best because the slow cooking gently breaks down the proteins and collagen, giving you a luscious, nearly-fall apart, fork-cutting texture. These cuts are from the parts of the animal that are very muscular with lots of connective tissue and very little fat. If you quickly grilled these cuts, the result would be very tough. The following three cuts will all make a fine pot roast:
 Ingredients
  Heat Diffuser Heat Diffuser Directions
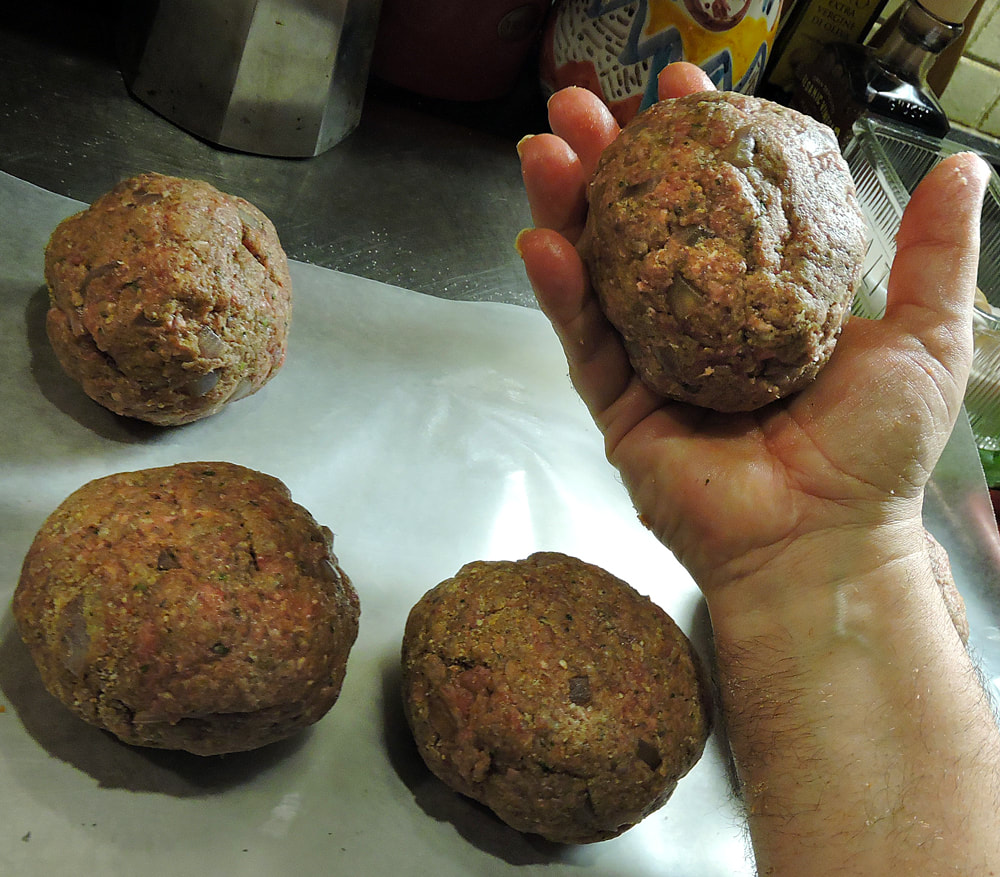
Allora... Buon appitito! Don't forget to write and tell me how yours turned out... --Jerry Finzi GVI CUCINA HACK In this recipe, I shared the trick of thickening with breadcrumbs, which gives a rustic charm to the dish. Of course, if you'd like a richer, even more tomato-y version, you can thicken the sauce during cooking by adding a little tomato paste--perhaps a couple of tablespoons. You can also thicken by using cornstarch... dissolve a tablespoon of cornstarch in a 1/4 cup of cold water and then stir it into the hot, bubbling sauce while stirring to distribute it. (High heat is needed for it to thicken). 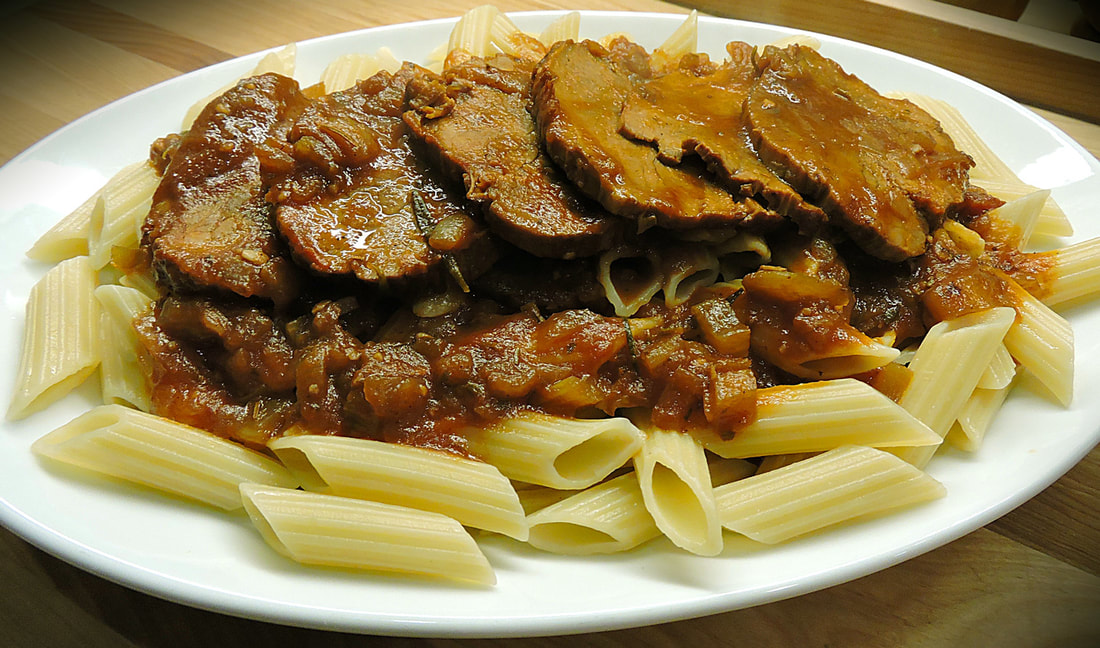 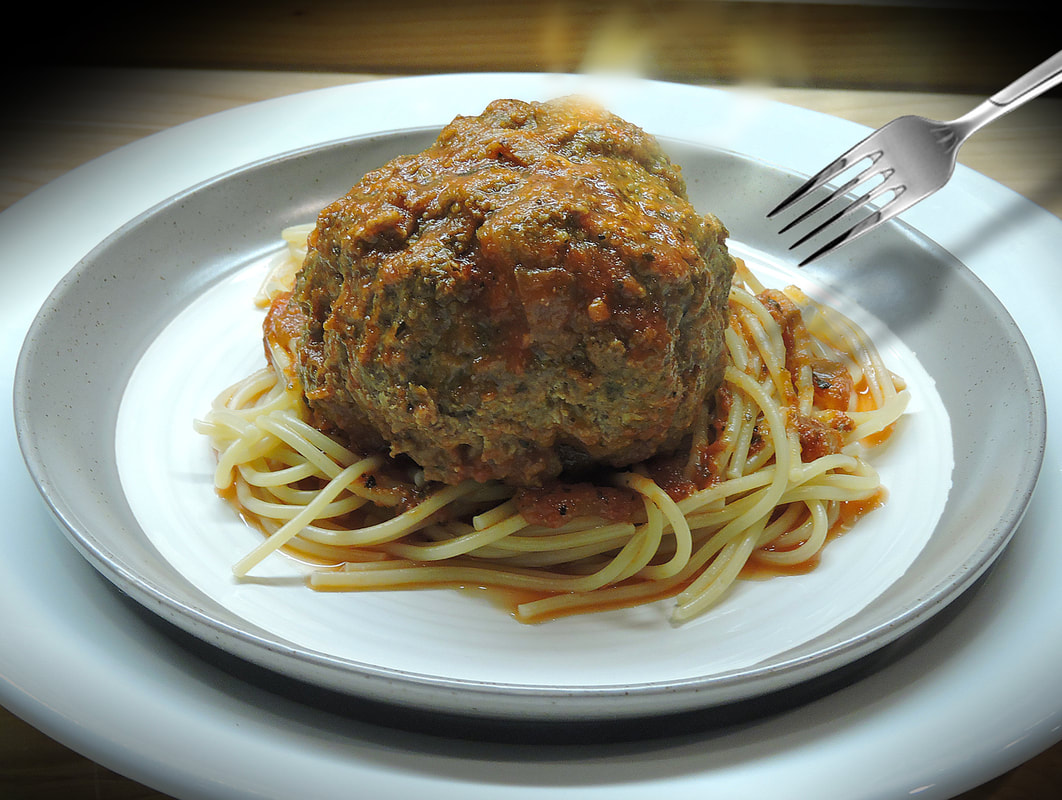 My dad, Sal was a great cook. He loved food and worked with it every day, starting out selling produce down by the Hoboken waterfront with his brother Anselmo and their "three-legged (lame) horse " and cart. Later on he worked as a greengrocer and as a deli man. He even grew food in our tiny backyard garden--especially tomatoes. When his customers saw him around the county, they'd shout out "There's My Baloney Man!" My Mom did all the daily cooking--soups, chicken, pastas and all that, but my Dad did the special meals: Thanksgiving turkey, Christmas Baked Ham, Roast Beef and lots of other Italian specialties like smelts, fried eel, and quick lunches like his "potatoes and egg" frittata. He was always great at making something from pretty much anything he found in the fridge. But what I loved best was the way he made fist-sized meatballs in the deli. Only one of them would fit into a pint sized container. It was always a special treat when he brought some home. One of these giants on a plate with spaghetti was a feast--one meatball equal to about 4 or 5 the way my mother made them. No need to ask for any other meatballs--one was certainly more than enough. Once every few years, in honor of Dad, I set out to make his meatballs, his way. His size.
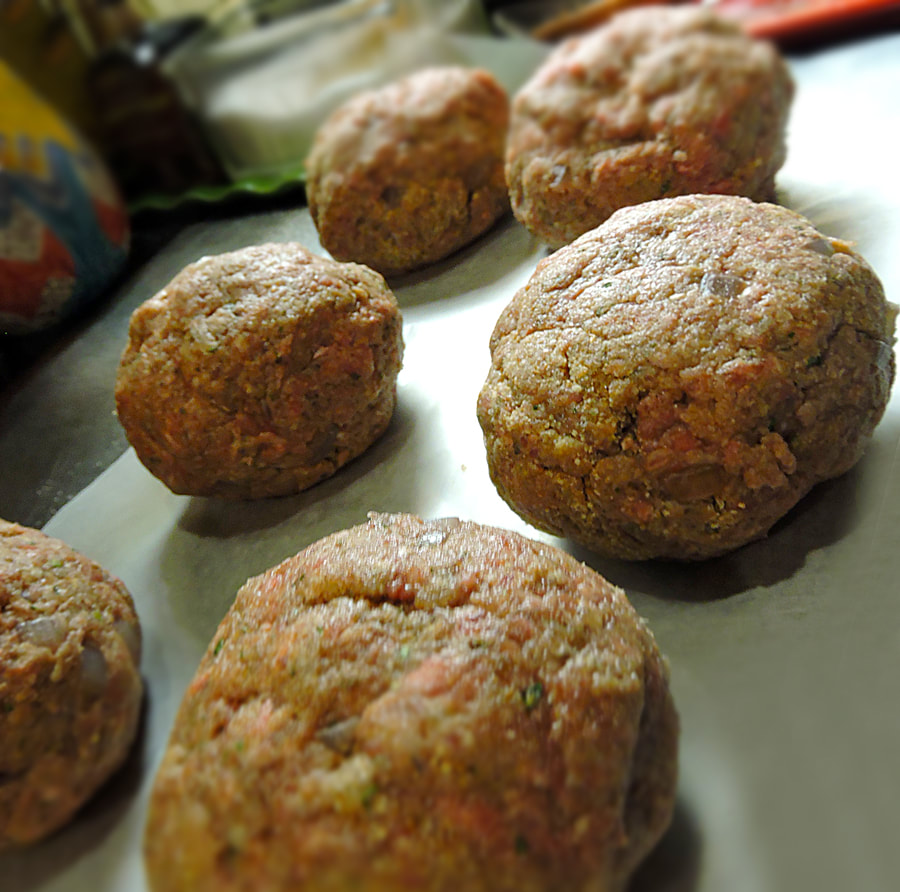
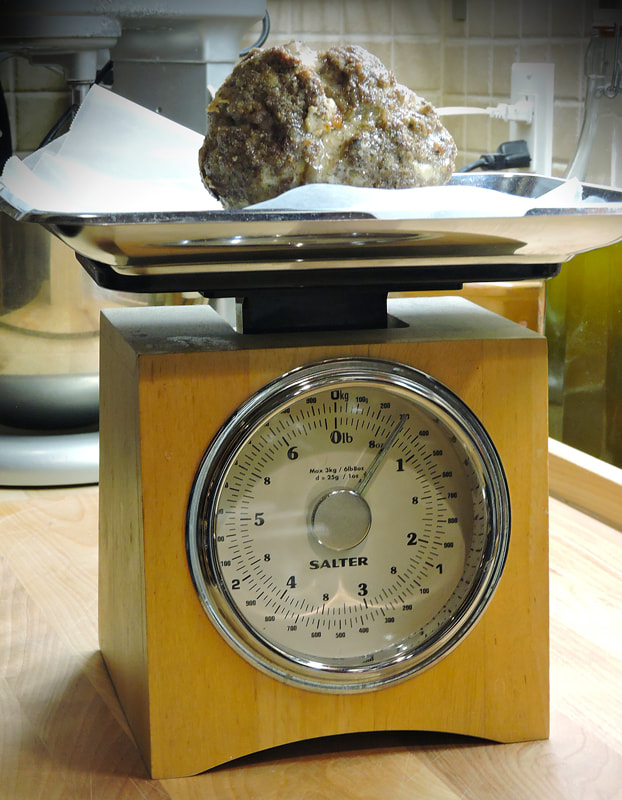
 They measure around 3-1/2" in diameter  Before roasting, I brush them with some Extra Virgin olive oil
In this recipe, we used about 4 pounds of beef--ground chuck. You can use your own family's meatballs recipe or ours HERE. The ingredients would need to be increased to account for the 4 pounds (if you're making a lot), or simply make less meatballs. Four pounds would give you from 6-8 giant meatballs--2 pounds, probably 4 meatballs.
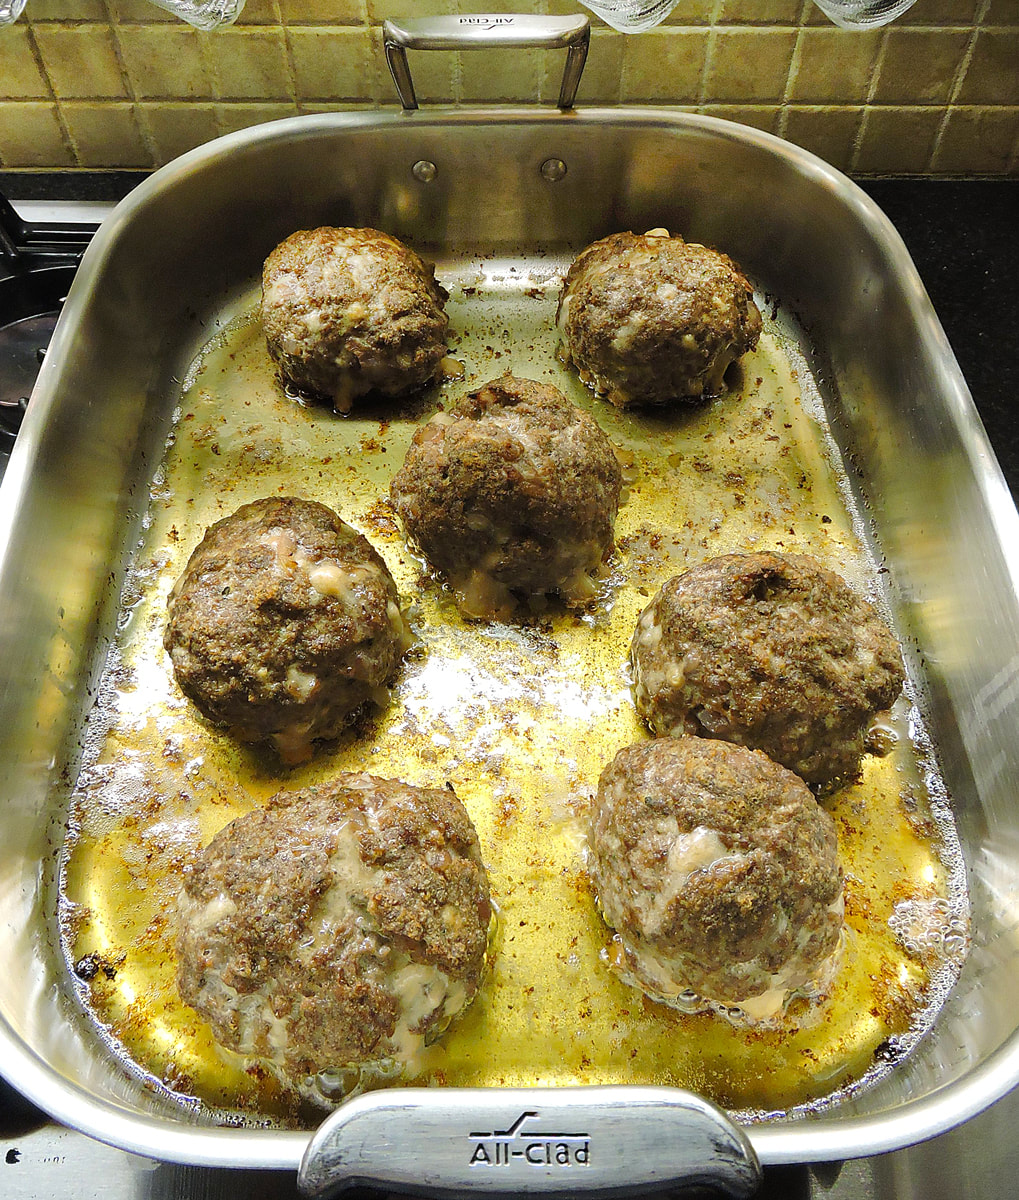
In the bottom of a roasting pan, I placed light olive oil, about 1/4" deep. The meatballs are placed in the pan and brushed with Extra Virgin Olive Oil to help the browning. The oven should be pre-heated to 450 F at first, then roasting the meatballs, uncovered for about 30 minutes. Next, cover lightly with foil and turn the oven down to 350 F and bake for another 30-45 minutes (ovens vary). Check occasionally to ensure the bottoms aren't burning. Turn the meatballs over a few times if necessary. You want them nicely browned, or until the internal temperature reaches 165 F (using an instant digital probe thermometer). After the meatballs are done, you can serve over pasta with some of your tomato sauce, or place them into a large pot of your Sugo (Sunday Gravy) to flavor the sauce. You can also cut up one meatball to make a large meatball hero (sub) sandwich, topped with grated parmagiano and toasted in the oven, or smash one with sauce and sliced provolone cheese inside a large flatbread, like the type used to make a muffaletta sandwich. You might also serve half a meatball, cut side down on separate plates with pasta for an intimate supper... calling the half-moon dish Mezzaluna. "When the Moon Hits Your Eye... That's Amore!" No matter how you enjoy them, you'll love making these huge polpette--my dad, Sal's Giant Meatballs. Buon appetito! --Jerry Finzi (Share this post with your friends!) 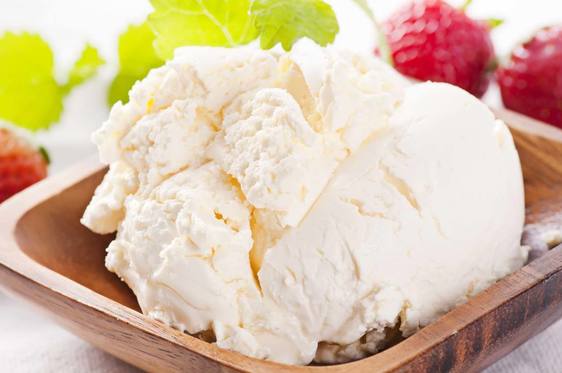  Zabaglione with peaches Zabaglione with peaches Mascarpone: Pronunciation, mas-car-POH-nay A key ingredient in tiramisu and zabaglione, mascarpone is velvety soft, slightly acidic, and expensive. Mascarpone is milky-white in color and is easy to spread. It is used in various Lombardy dishes, and is considered a specialty in the region. Mascarpone originated in the area between Lodi and Abbiategrasso, southwest of Milan, probably in the late 16th or early 17th century. The name more than likely is derived from mascarpa, an unrelated milk product made from the whey of stracchino (a young, barely aged cheese), or from mascarpia, a word in the local dialect for ricotta. Others claims the name comes from the Spanish mas que bueno, "better than good." Ricotta, unlike mascarpone, is also made from whey. Usually sold fresh in tubs, It is one of the main ingredients in the modern Italian dessert known as tiramisu, and is sometimes used instead of butter or Parmesan cheese to thicken and enrich risotto. Mascarpone is also used to produce Italian cheesecakes. It's a highly perishable cheese meant to be consumed as soon as possible after it is made.  Italian cheese made with mascarpone How to Use Mascarpone
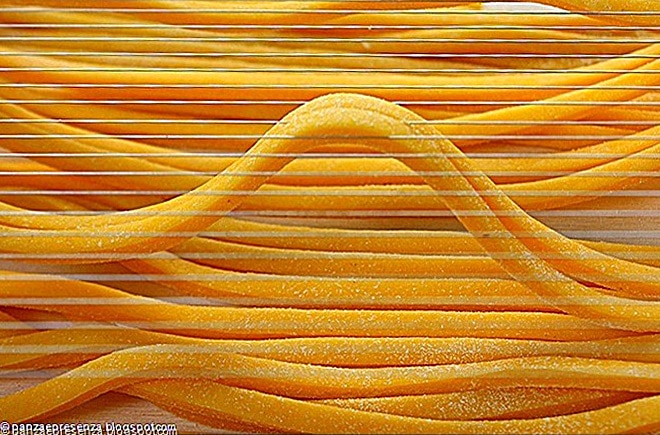
Substitute: Blend 8 ounces softened cream cheese with 1/4 cup whipping cream. Mascarpone is made from two ingredients... whole cream and citric or tartaric acid (to thicken the cream). Click HERE to see how to make your own. Click HERE for Ciao Italia's Italian Cheesecake recipe. --Jerry Finzi 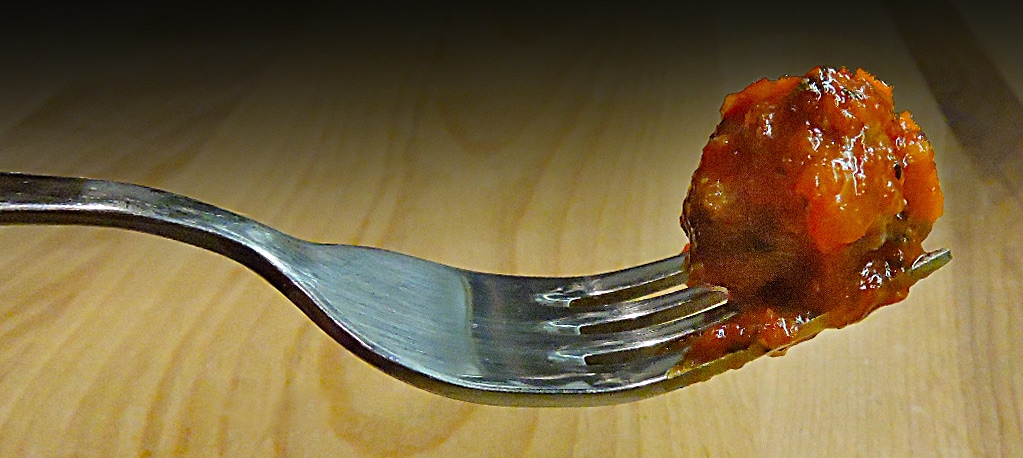 In the province of Teramo, in Abruzzo there is a recipe that rivals the Sugo of the Neapolitan tradition: Chitarra con Pallottini. If there is any ancestor of Italian-American style "spaghetti & meatballs" (a dish that doesn't exist in Italy), then this is it... Let me explain the name first. Chitarra means guitar in Italian, but in this case it refers to the pasta making tool called a chitarra because it's wire strings resemble a guitar (OK, perhaps it looks more like a zither or auto-harp, but let's not quibble.) The chitarra is used to make a type of spaghetti with a square edged profile, called Pasta alla Chitarra. A thin sheet of fresh pasta is laid on top of the chitarra and a small matterello pin is rolled over the pasta to squeeze it down and through the wires, creating the square sides. The pasta falls below, picked up and dried or cooked fresh. Kids would love to help make this pasta. The name of this type of pasta has taken on the name chitarra.
As for the Pallottini... palla means ball, the "-ini" ending means they are small. Small isn't the word. These Abruzzo meatballs are absolutely tiny. When I made this recipe, it took me well over an hour to make 268 tiny pallottine from about 3 pounds of minced, lean chuck. (Yes, I counted them). I should have waited until my son, Lucas came home from school to help me! While making them, I discovered that it was difficult to make the pallotine as small as the ones I found in authentic Abruzzese recipes. Mine came out around 3/4 inch in diameter... instead of the 1/2" or smaller seen in Abruzzo. The problem was trying to pinch a small enough bit of meat in between the tips of my fingers. Perhaps using a 1/4 teaspoon measure would have worked better. Tiny fingers and hands of young children would be perfect for the task, but knowing how tedious this task is, more than likely it would be considered as child labor. On Sundays, when Neapolitan nonnas and mamas are making their Sugo, the kitchens in Abruzzo are filled with similar scents of Nonnas making their Sugo, pasta alla chitarra and pallottine. Traditionally, the dish is accompanied by a rich meat and tomato based Sugo rather than a simple marinara sauce. The sugo is slow-cooked all day with lamb, beef, and pork added to a large pot of crushed tomatoes. The sauce isn't finished until the meat easily falls or shreds apart and can be mixed into the sugo. In my recipe, I slow cooked the pallottine with crushed tomatoes and spices, leaving out the other meats. My thinking was that 3 pounds of tiny meatballs will still add loads of meaty flavor to the resulting sugo. 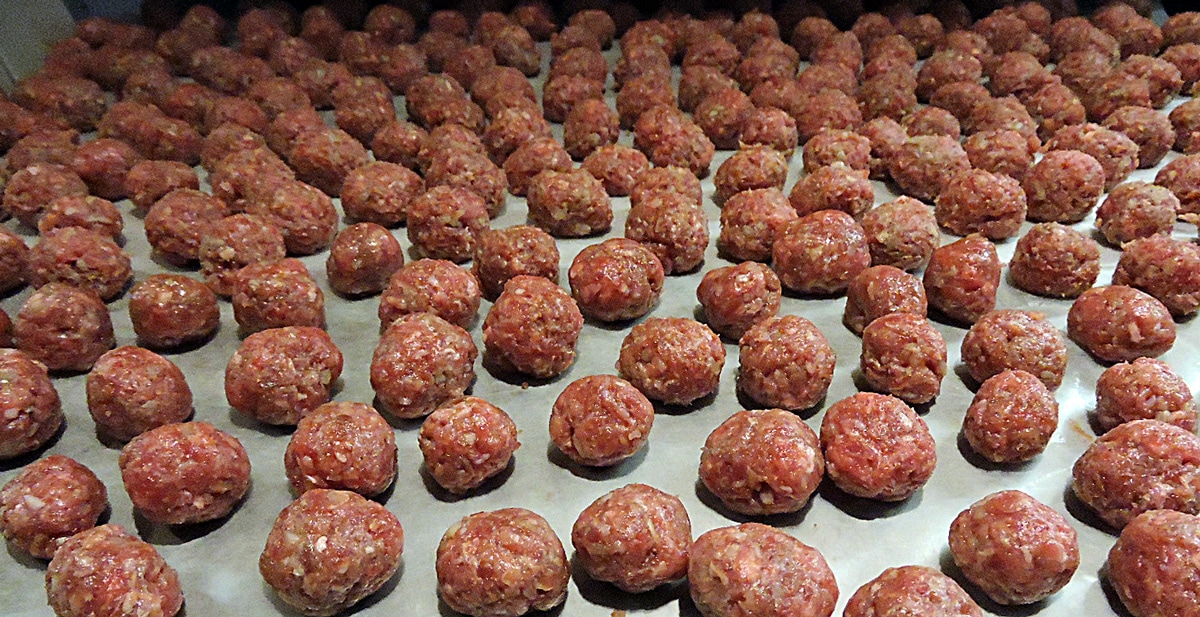 I made 268 little meatballs... And yes, I counted them. Some claim that Chitarra con Pallottini is a dish from the Piedmont region in the north from the early 20th century. In Abruzzo people have been making and eating pallottini since the early 1800s, a full 100 years earlier. To add to the confusion, a recent report by an Italian expert in archeological gastronomy discovered a Piedmont recipe in a monk's cookbook dated 1344 that described tiny meatballs used in a rice and pork blood dish. Wherever it stemmed from, this dish is unique and well worth making...
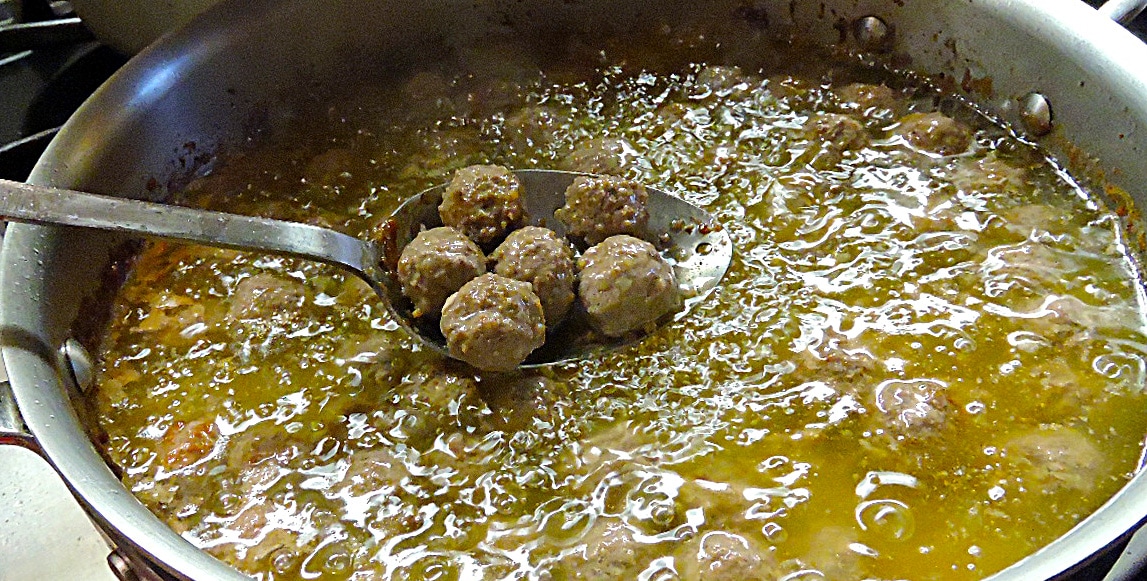
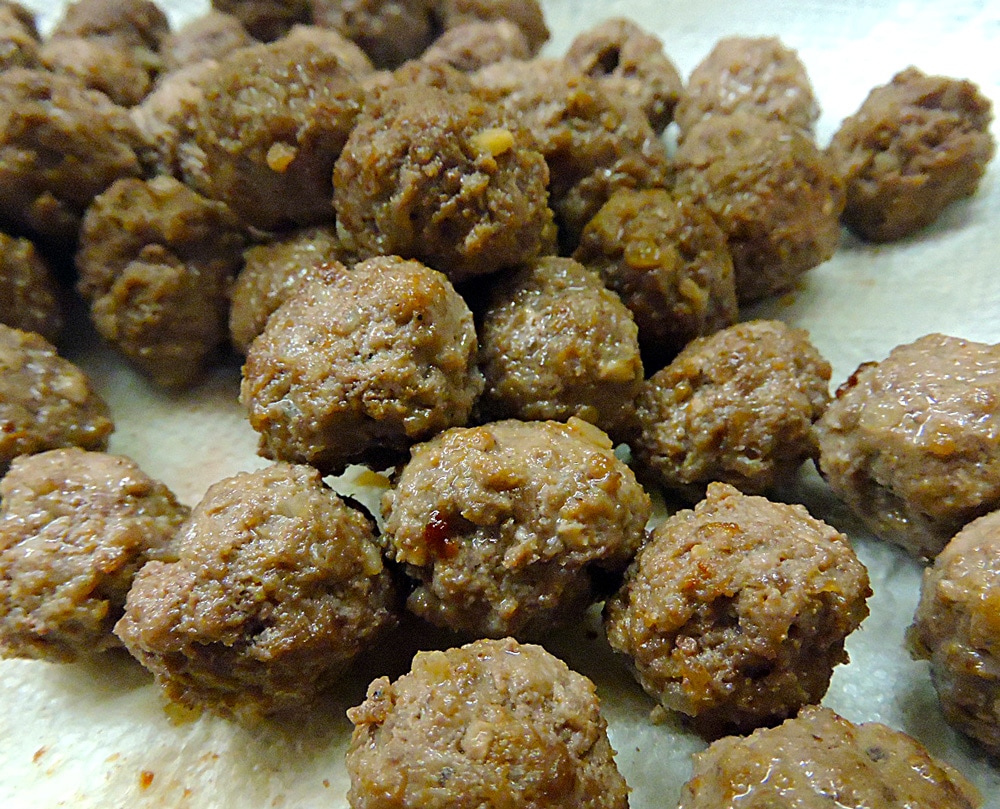
 Amazingly small Pallottine--perhaps half the size of the ones I made--served with the square-edged Chitarra pasta.  Since I didn't have a chitarra to make the proper type of pasta, we had our Pallattine with tagliatelle. (Our Chitarra tool is on order). For scale, this is a salad plate. Since I didn't have a Chitarra when I made this recipe, I used some 3/4 inch wide tagliatelle for my dish. I also changed up the recipe a bit from the originals I found. They tend to use nothing but ground beef, one egg and a sprinkle of nutmeg to make the pallottini. I wanted to add a bit more flavor, so I added a very small minced of garlic (in a jar, imported from Italy) and since these meatballs were SO tiny, I couldn't use fresh diced onions as I do in normal sized polpette. Instead, I used dried onion flakes, knowing they would re-hydrate when added to the meat mixture. I won't get into the recipe for the traditional Sugo here, but if you like, you can make my recipe HERE. Otherwise, for a fresher sauce, make a quick marinara with crushed tomatoes, a bit of sugar, and a decent amount of dried basil. Ingredients (pallottini) 3 pounds of lean, chopped (minced) chuck/beef 2 tablespoons dried onion flakes 2 teaspoon minced garlic (in jar) 2 tablespoons fine sea salt 40 cracks fresh black pepper 1/2 teaspoon red pepper flakes 1 beaten egg Directions In a large mixing bowl, mix the minced chuck with the beaten egg, the minced garlic and all the other dry spices. Get in there with your hands and mix really well, until you are certain that each and every tiny meatball will get an assortment of garlic, onion flakes and other spices. Lay out several sheets of wax paper on your work counter and start making the pallotine. If using your bare hands, barely pinch a little bit of meat mixture in between the tips of your thumb and two forefingers. Roll the meat into a ball shape between your palms. As I mentioned, the pallottine should be less than 3/4 inch around. If you want to try a 1/4 teaspoon measure, this might help to measure out a smaller amount. Once you finished making all of the pallottine, heat a large saute pan with light olive oil filled to a depth of 3/4 inch deep. If you would like to brown the pallottine a bit more, you can use half the amount of oil, but you will have to pay much more attention to turning them as they brown. These tiny balls cook quickly! Cook them in batches and remove with a slotted spoon, then place on a large baking tray covered with several layers of paper towels to drain. When completed, you can place them in your marinara or Sugo and slowly simmer for about 1-1/2 hours or longer if you are adding them to a Sugo with several other meats. So, the next time someone claims there is no such thing as Spaghetti and Meatballs in Italy, try winning a bar bet with your knowledge of Pallottine!
Buon appetito! P.S. When I get my Chitarra tool, I'll update this article with photos of the Pallottine on top of fresh made Pasta alla Chitarra. --Jerry Finzi  4/7/2015 Nearly every Sunday of my early childhood my Mom made something most Italian-Americans (especially those from Naples) called Sunday Gravy. Simply put, Sunday Gravy is essentially a large batch of tomato sauce with various types of meat slow cooked into it. In Italian, the word salsa means sauce... a sauce is made from something other than meat. Like putting a fruit or cheese sauce over meat, chicken or fish. The Italian word sugo means gravy. A gravy is made from the liquids and fat that are rendered from various meats--like using turkey drippings to make a gravy. The all-day cooking of meat in tomato sauce gives off a heady scent, that would fill our apartment, and waft out into the hallway for the entire building to smell--"Ahh... the Finzis are making Gravy today!" The secret of Sugo is in its slow cooking, or pippiare (literally, to bubble) technique. Sunday Gravy has it's origins from a beef stew popular in medieval XII-XIV century, way before tomatoes were introduced from the New World--a clay cooker slow cooked the stew of beef and vegetables for hours and hours. This beef stew turned into a ragù, at first created in northern Italy, with the southern Neapolitans evolving the dish further by the eighteenth century. It began as a a dish for nobility, using more expensive cuts of meat, such as beef and veal, but no tomato. (Tomatoes didn't gain popularity right away in Europe... they were thought to be poisonous). This dish was mainly prepared on Sundays, the sauce placed on top of the pasta, with larger cuts of meat served as a second course. One historian described a Sugo using tomatoes in 1857 that was being served in taverns in Naples. You can think of Sunday Gravy is a hybrid of sorts... it starts out as a tomato sauce and becomes a gravy after meats have been added and have rendered their flavors during a long cooking period--the Sunday Gravy of my childhood. 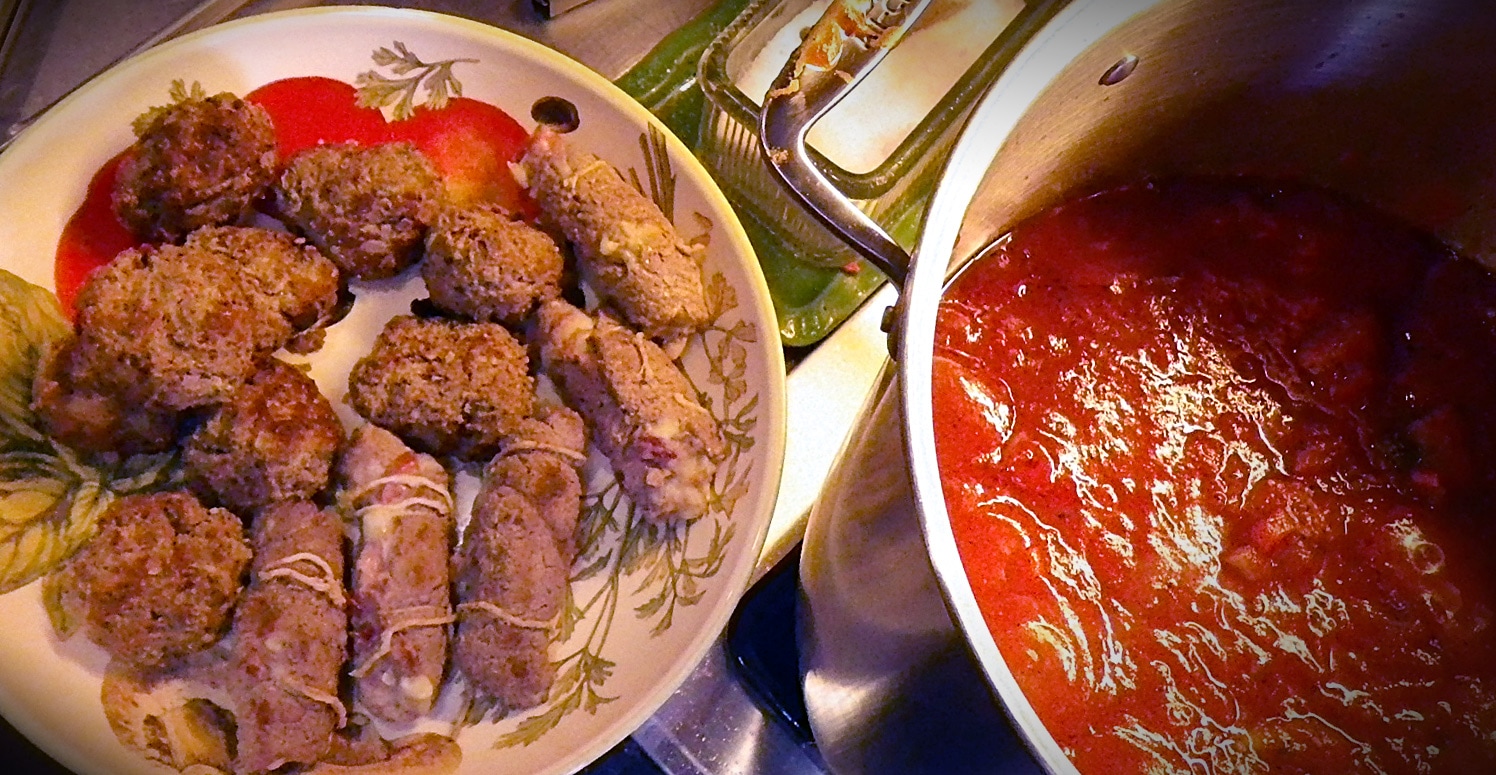 Some of the meat ready to be added to the Gravy Some of the meat ready to be added to the Gravy But Sunday Gravy wasn't just about a making a single meal in la nostra casa. It was an event--a gathering. Making Sunday Gravy is reminiscent of an entire village doing their weekly communal cooking... coming together to make pasta, make bread, make the olive oil, tend the olive trees, fix a roof, gossip, laugh and be together. In Italian communities, ovens were often communal, but ingredients were also communal in many respects--Giuseppe just slaughtered a large pig and barters off some of the meat with Mario, the baker for bread, or perhaps his cousin Maria still has some tomatoes hanging that she would swap, and Marcello's owes him some olive oil to offset the wine that was traded last spring for some pasta. Food was communal. Food was family. And good food takes time and preparation and lasts for more than a single meal... My Mom started making Sunday Gravy sometimes on Saturday... or even in the middle of the week before. Being a working Mom and was frugal with her time. She would make a meat dish one night--maybe the meatballs. Then she'd give us a simple dinner with some of them, but hold most of them for adding to the Sunday Gravy pot. Maybe on Saturday after shopping, she'd make the brasciole and brown the pork ribs under the broiler. These would also go into the fridge, ready for the Sunday Gravy pot. Sunday morning would arrive and I'd go to Mass with one of my sisters and then stop at a bakery to pick up "buns" for our whole family--even my Aunt Rose's family who lived upstairs. In our family's jargon, "Buns" were anything sweet from the bakery... cream donuts dusted with cinnamon, raisin "buns" (my favorite), a crumb cake with crumbs as big as my 5 year old fist, a cheese danish that would fill a plate, and maybe a dozen "mixed buns"... assorted goodies that the person behind the counter would surprise us with
Sunday Gravy wasn't just about the one meal. It was also about what we'd be eating in the coming week--there would be lots of leftovers in that big pot. The gravy might even allow us to cheat a little on "meatless Friday" by using just the tomato sauce without any meat on pasta, ravioli or with fish. And everyone knows that Gravy tastes even better over the next few days. The flavors of all those meats meld into the sauce turning it magically into a true gravy--rendered from meat. It's a carnivore's manna--nectar straight from our Roman and Greek bloodlines. My Dad's very large family ate from a single pot.... and a single bowl in the middle of the table. You can imagine the Sunday Gravy there with brothers and sisters taking a meatball here, a rib there... a couple of these meats, a piece of bread or pasta and some of this gravy and you had an incredible meal. Filling, nutritious and delicious. A necessary thing when our Nonna's had so many mouths to feed with so little. 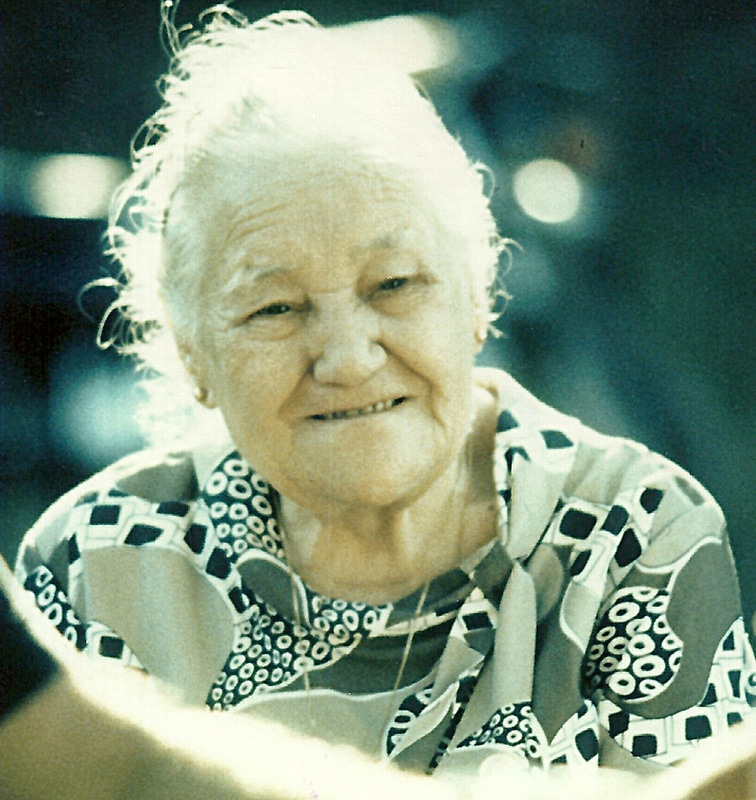 Mariantonia Delulia, my Grandma Mariantonia Delulia, my Grandma In our famiglia, there were lots of mouths to feed--seven of us in our family, and the dog. My cousins and Aunt would stop by, too. Then there were my sisters' girl friends and my brother's crew. There were always extra plates for whoever stopped by. It was about the famiglia... the heritage... the food... the tastes that even our memories had forgotten and unknowingly were our a link to our past.... Naples, Molfetta... and my maternal Grandmother, Mariantonia Delulia. (Once I learned her real name I was compelled to say her full name over and over... like poetry off an Italian tongue... "Maree - ahn-TONE-eaa-ahh Day-LULE-eeah". ) This wonderful lady towered over me (as a small child) at 4' 10", with her greyed hair tucked into a bun in the daytime, but releasing nearly three feet of it down her back at night before bed. Grandma made her own version of Gravy... everyone does it slightly differently. She'd add large strips of peppers and larger chunks of onions, and put pignoli in her meatballs. A cut up pork shoulder (the affordable cut for poor immigrants, when they could afford it) was key to her recipe, along with hot sausage (way too spicy for my young tongue back then).
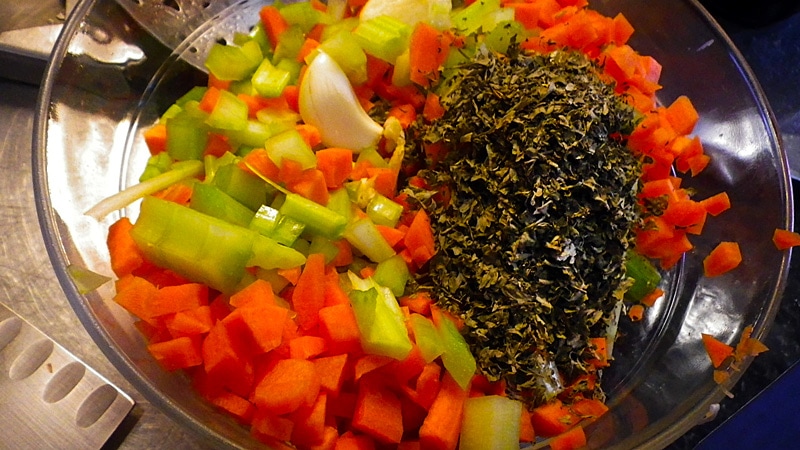
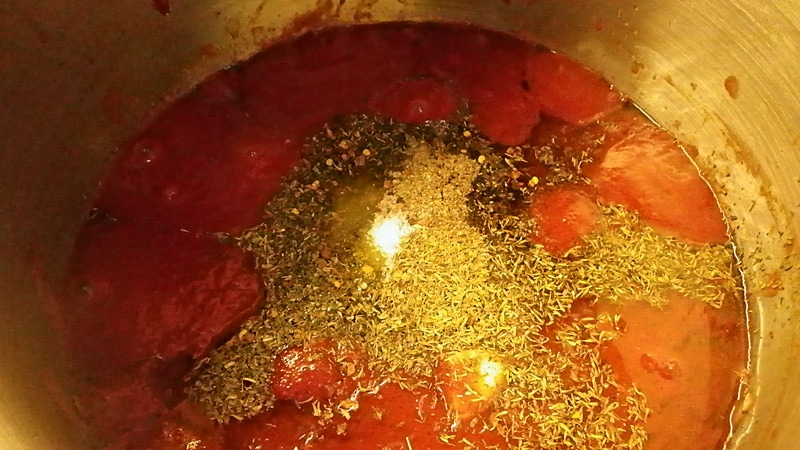
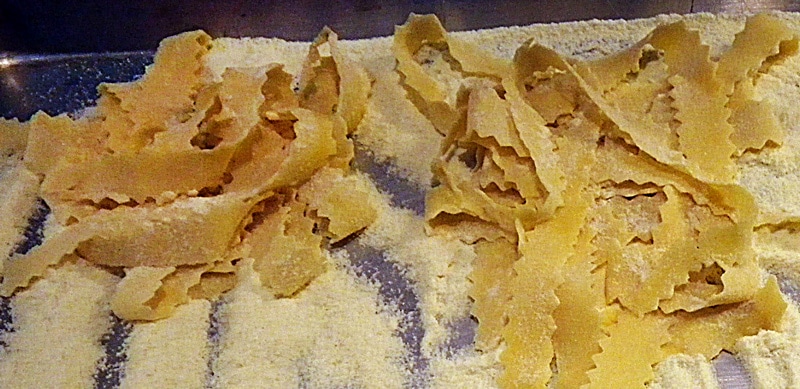
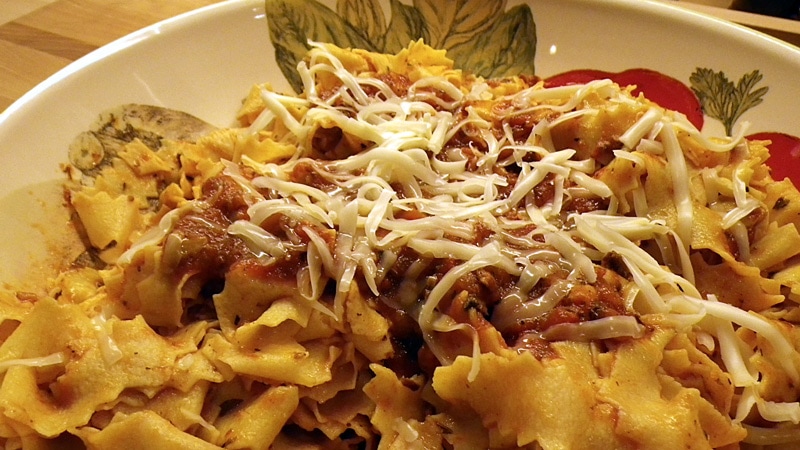
Before we would get through the comics, our little railroad apartment would start to smell differently.... sweet, pungent... Italian. Mom would start by taking a huge onion and cutting it up into small pieces... and sautéing them in the bottom of her huge stock pot on the kitchen stove until they were soft and glistening and letting off their pungent scent. Then she would add the diced carrots, celery and garlic. After that, my Dad would get the wine from the cellar (he'd sometimes have jugs of some home made wine he got from my Uncle down there) and pour some into the pot. Not sure how much.... maybe a couple of cups. Next, Mom would let one of us open the cans--big cans of imported tomato puree. It was fun opening cans using the wall-hung can opener over by the dumb waiter door (nailed shut by Dad so us kids wouldn't try to go for a ride.) About four or five cans would go into the pot. Next came the spices. A handful of sugar to cut the acidity, half-handful each of dried basil, oregano, thyme, garlic powder (or a 5-6 cloves of fresh when Mom had it), a good sprinkle of red pepper flakes, a tablespoon each of salt and pepper, then a quarter cup of olive oil. If Mom had any leftover rinds of cheese from a grating wedge, they'd go in too. Then she'd take out the meat... lots of it. A rack of ribs cut up would be layered in like logs at the bottom of a red lake. Then would come the sausage browned and cut up into 2 inch pieces, then add the brasciole--all tied up like meaty little packages, and then the meatballs. Then the Sunday Gravy pot is put on the back burner--the smallest one--and starts to simmer and simmer, bubbling like a crater of lava from the old world. The aromas get more and more intense as the day goes on--you can taste the flavors turning the tomato sauce into something... luscious. My siblings' friends come and go with an open door policy, my mother always inviting them to have a "bun" or sit down for a meatball sandwich. There was more than enough... a few would never be missed. 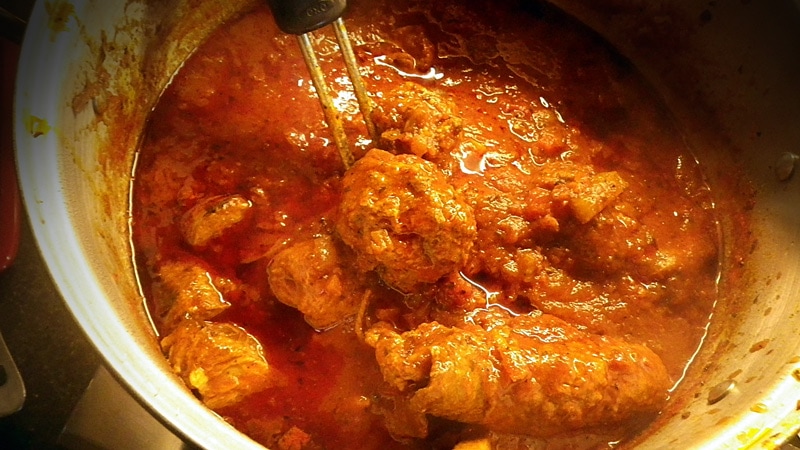 After several hours of bubbling along with the meats, the sauce comes a Gravy. As for us, we would taste the Gravy all day long by getting a piece of bread and spooning some on top. What a treat. I still do this when I make gravy--or sauce. Taste it on top of a piece of bread... fine tune the spices, then simmer some more. Lucas is growing to love this little snack way before dinnertime. In the Fifties we would sometimes eat Sunday "dinner" at 2 in the afternoon if my Mom was lucky enough to get the Sunday Gravy in the pot early enough. Otherwise, we'd eat by 5 or so. There was no set dinner time on Sundays in our house. Besides, we had "buns" in our bellies--the starch, fat and sugars keeping our fluttering young hearts going. No one went hungry on Sundays. 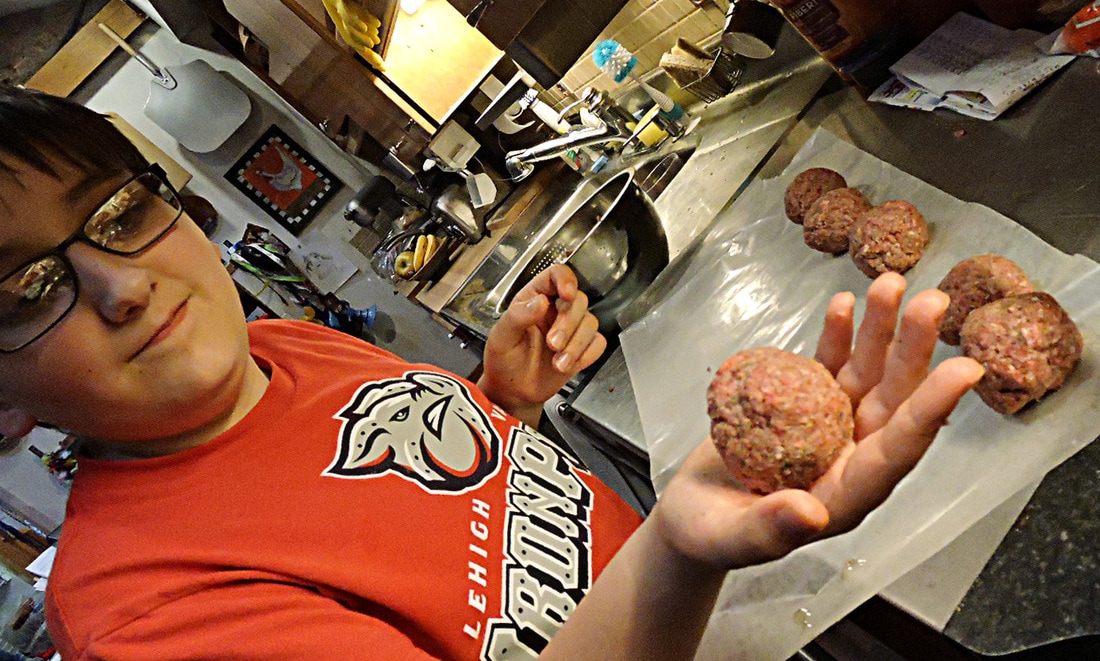 Shaping meatballs Shaping meatballs The New Famiglia Finzi "Gravy" This past Easter I made Sunday Gravy, as I described above. I didn't follow a recipe... I followed my memories. Perhaps this is why I didn't write this article as I would a normal recipe. I don't want people to simple follow the recipe in any strict way. This a recipe that needs to be felt. Vary it with love--the things you love, and share it with people you love. Make meals out of its components both before, during--and after--making it. We've already had two meals from it. It all came together for Easter Sunday's late afternoon meal, as my family had done time and time again so many years ago. We'll probably freeze half of it for future meals. We made home made tagliatelle to have with it the first night and a risotto for another meal on another day. But we also had each other. We shared garlic bread and wine with it--Lucas had a little glass too. I'm teaching Lucas how to drink with a meal rather than drink to get drunk. He places a small forkful of meat in his mouth, chews a bit, sips some wine and discovers the flavors as they mingle and merge into something Godlike.
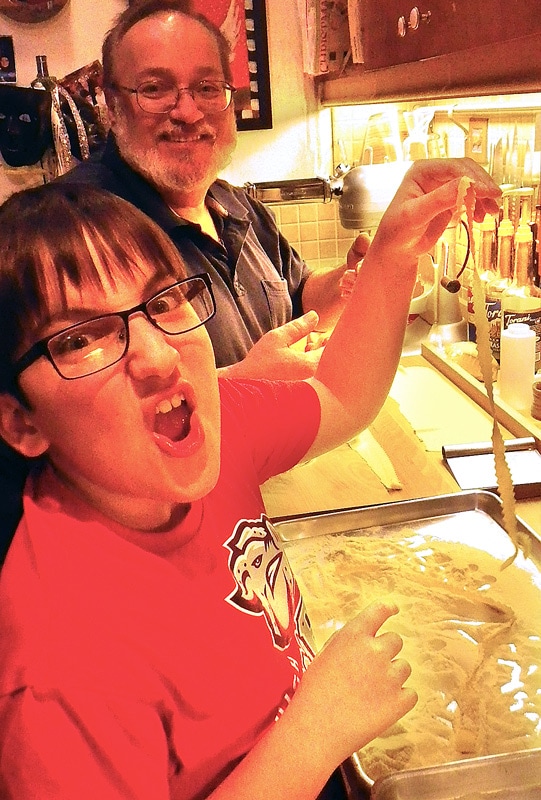 Making the tagliatelle Making the tagliatelle Making Sunday Gravy was like having a family Mass with a prayer beforehand, and more afterwards. It's a joy to watch my boy Lucas' eyes light up as he discovers great flavors. Lisa helped me with some parts of the meat preparations as early as Thursday. Lucas helped make the meatballs and the pasta. Lucas is also a spice expert (great palette on that kid), so I told him to, "Make an Italian tasting spice rub for the ribs". He nailed it. Mom made the risotto we had for our second meal (her first time making risotto... usually I do all the stirring). The Gravy mixing with the rice turning it into something dreamy. 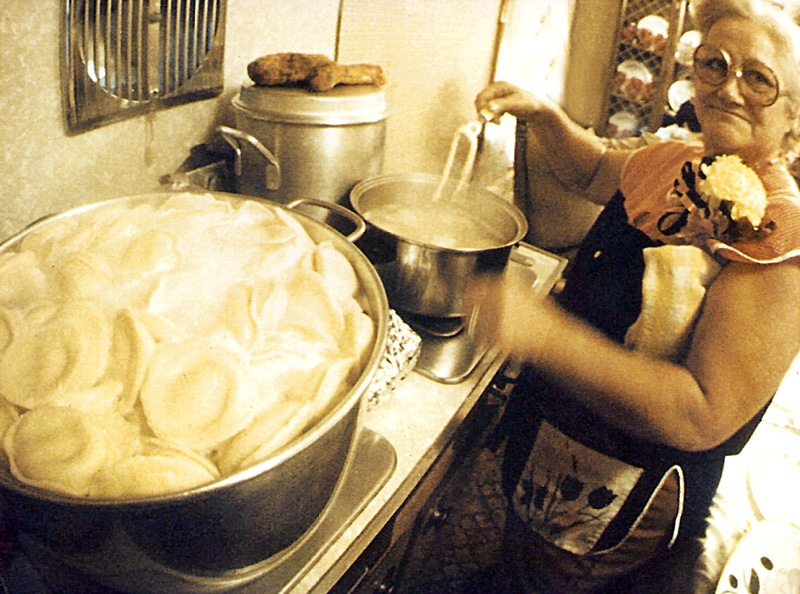 My mother in her element Traditions--or perhaps I should say rituals-- are important in our family, and in our food. After all, the food holds ties to our heritage and the food eventually becomes us. Literally and spiritually.
Happy Easter. And thanks, Mom for all those tasteful Sundays. --Jerry Finzi 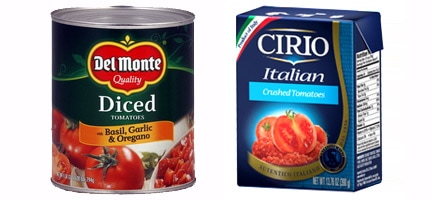  Ok, here's my basic pizza sauce. On lazy nights when I'm in a hurry, sure, I'll use a bit of jar sauce (I like Bertolli Tomato & Basil, real basic), Whatever you do, don't use any of the jarred sauces called "pizza sauce". Any that I've tried have been absolutely terrible. Trust me, there's nothing like making your own pizza sauce. To start with, there are two brands of crushed or diced tomatoes that you can use as a starting point. Del Monte Diced Tomatoes with Basil, Oregano and Garlic is a decent one. It has finely diced tomatoes of decent quality and taste. There isn't much sweetness so I tend to add a bit of sugar to cut the acidity. Cirio Crushed Tomatoes is a recent favorite for when I'm looking for a more Italian taste... it has a higher sugar content, so I don't add sugar when I use Cirio. The box is a bit awkward to open... be careful. But lately, my all time favorite to use for pizza sauce (and sauce recipes) is Tuttorosso Natural Crushed Tomatoes with Basil (a six pack of 28 ounce cans on Amazon, $19) . The "crushed" is so extreme that it makes the sauce in the can thick. I will always add a half cup of water or so to thin it out a bit when making pizza sauce. The flavor that this brand gives to the sauce is amazing. Ingredients 1 - 16 ounce can/box of crushed or diced tomatoes 2 tablespoons of dried basil pinch of salt 1 tablespoon sugar (unless using Cirio brand) 2 tablespoons extra virgin olive oil optional, 1/2 teaspoon of chopped/ground red pepper flakes (if you like heat) optional, 3 cloves garlic, finely sliced (or a tablespoon of Bellino Minced Garlic) optional, 1 small diced onion, sauteed in olive oil first Place all the ingredients in a saucepan and heat for 5-10 minutes, then use an immersion blender to smooth our the texture. If when using the Cirio crushed tomatoes the sauce looks a bit thick, add a bit of water (2-3 tablespoons) and blend again. When I use the Tuttorosso, there is no need for the immersion blender but I always add about 1/2 cup water. If you like a chunkier sauce, use the Del Monte diced tomatoes in your recipe but don't blend it. For a fresher flavor, combine all the ingredients and don't heat it. Simply blend to a smooth liquid and use this directly on your pizza. Heating the sauce combines the flavors cohesively while using a cold sauce on pizza gives a brighter, fresher flavor. Try it both ways and see what you think. 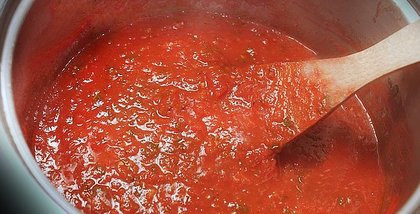 In summer, you can simply use tomatoes off the vine to make a sauce. Drop the whole tomatoes (San Marzano plum or any paste tomato varieties types are great) into a pot of boiling water for a few seconds, then transfer immediately into an ice water bath. This loosens the skin. Remove from the ice water then using your hands, slip the skins off. Crush them in your hands then use in the recipe preparation above.
I use a small ladle to spread the sauce on my pizza, just remember... don't use too much sauce. (Store any unused sauce in an airtight container for up to 2 weeks). There are some pizzas (like a basic pizza Margherita) that are much better with a splash of sauce here and there with some of the dough showing through. And experiment: while most put the sauce on the dough first, other types of pizzas call for the cheese underneath the sauce. Your choice. Buon appetito! --Jerry Finzi If you enjoyed this post, please SHARE it with your friends. Grazie mille! |

Archives
July 2023
Categories
All
|