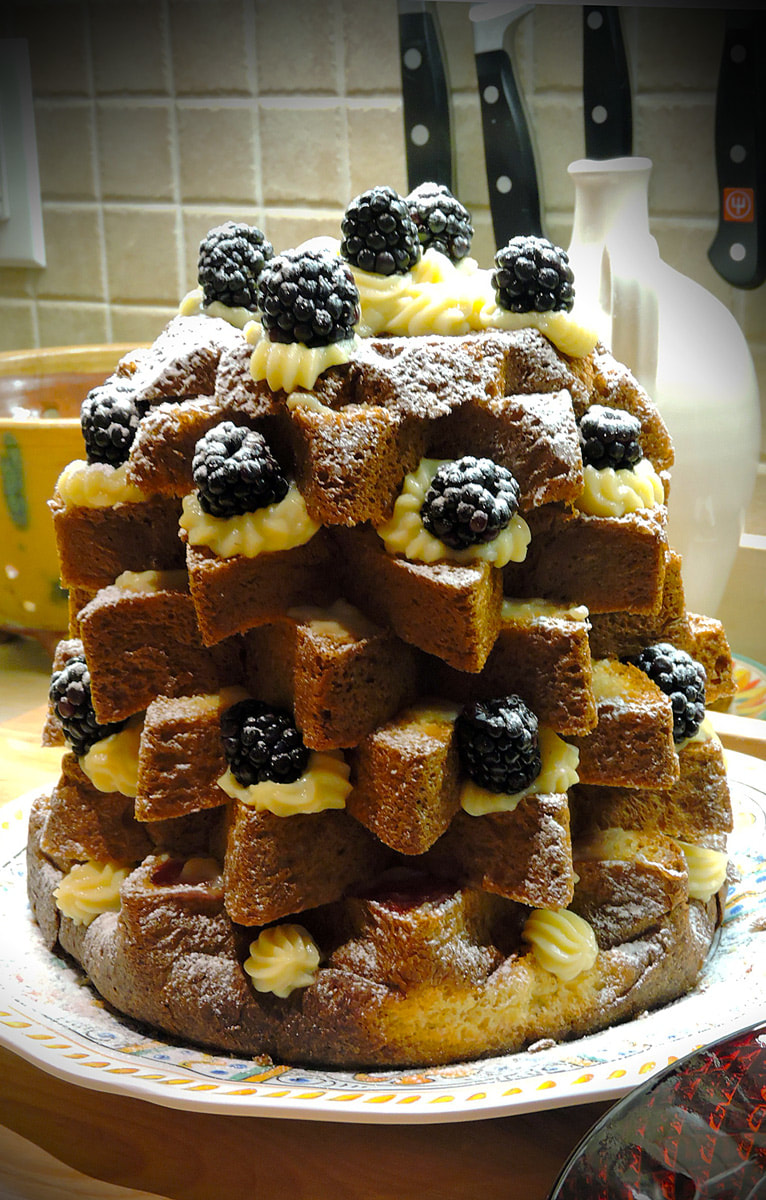
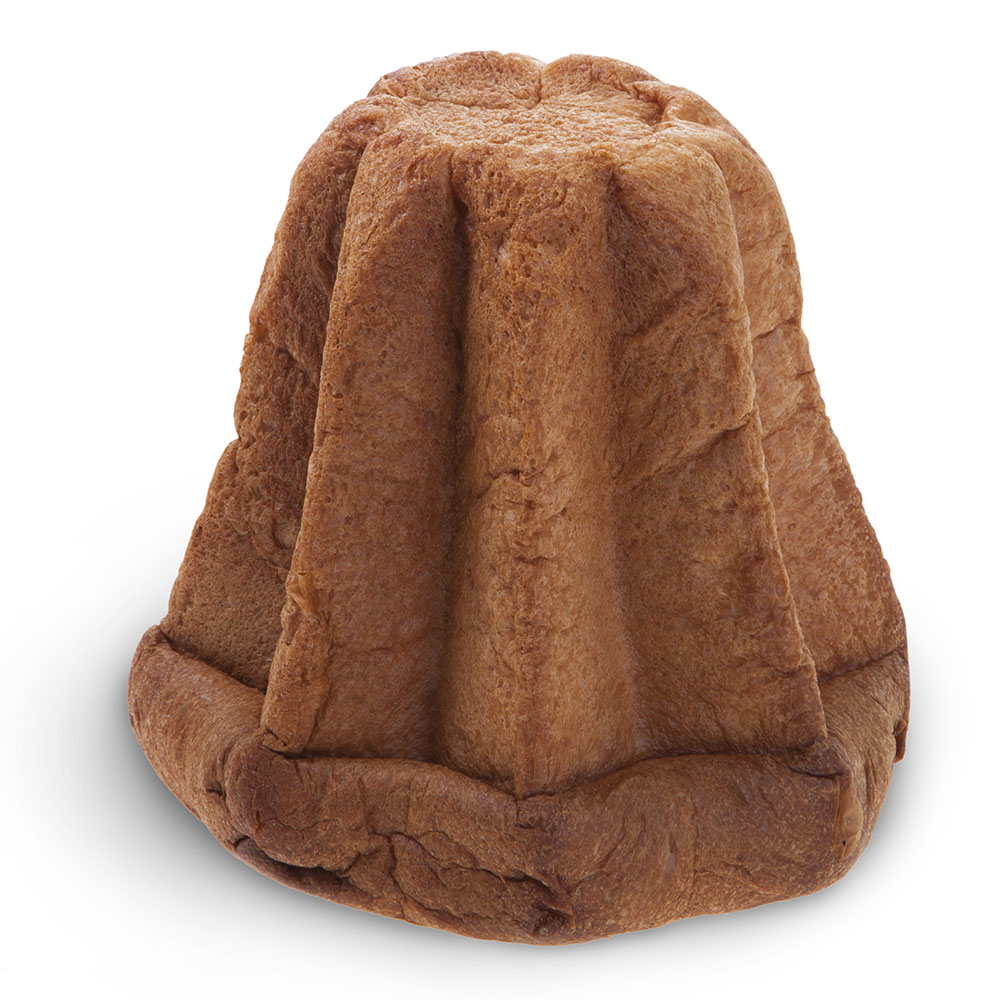
 An naked Pandoro awaiting its regal clothes An naked Pandoro awaiting its regal clothes During the Christmas Holidays--even in the States--panettone and pandoro are both in plentiful supply, even in large supermarket chains. In fact, I bought several imported pandoro and panettone (they store and freeze well) two days after Christmas for under $5 each! Pandoro literally means golden bread, and lends itself to making a tree shape because of its fluted sides. To make a tree shape, simply cut 3/4 - 1" thick slices, ensuring that each slice is cut as flat as possible to prevent your "tree" from leaning when re-assembling later. A very sharp chef's knife is better than a serrated bread knife which would create too many crumbs. You will be filling each layer and re-assembling by alternating the position of each layer to position its points in between the points of the layers below them. Keep track of the orientation of the layers and re-assemble to keep your "tree" from leaning--flipping them upside and to the side after cutting each helps keep them in order. To make ours, I brushed each layer with a coating of heated and softened seedless red raspberry jam, then willed each layer with some vanilla custard, the same recipe I use when I make pasticiotti. You can also fill them with zabaglione, butter cream, or a store-bought vanilla, or other flavored pudding mix. I held back a bit of the custard and placed it into a piping bag with a fluted tip, then piped rosettes around the tiers of the assembled panettone tree, placing a blackberry on each. You can use fresh blueberries, strawberries, raspberries or pitted cherries. Top the cake with more piped custard and berries, or place a star-shaped Christmas cookie standing up. Powdered sugar adds a dusting of "snow" to make it look really festive. Traditionally, you make tall sliced wedges for each serving and lay them on their side in a dessert plate. Vanilla Custard Recipe
While French style egg custards can be difficult to master, this is a very easy custard due to the fact that the cornstarch is the thickening agent. This recipe can be used for many pastry treats that utilize a custard as a bed for berries. Ingredients 3 tablespoons cornstarch 1/2 cup sugar 1 - 1/2 cup whole milk or Half & Half 2 egg yolks 1 tablespoon butter 1 teaspoon butter Directions In a medium saucepan, whisk together the cornstarch and sugar. Whisk in the milk and egg yolks. Place the saucepan on medium heat, stirring with either whisk or spatula until the custard starts to thicken. Add the vanilla extract and butter and stir until creamy, thick and smooth. Transfer to a bowl to cool, covering the surface with plastic wrap to prevent a skin from forming. Spread melted seedless on each layer of your pandoro and then spread on a layer of custard. Do this for each payer as you re-assemble your "tree". Pipe rosettes as described above and place your berries. Dust with powdered sugar. Buon Natale! --Jerry Finzi 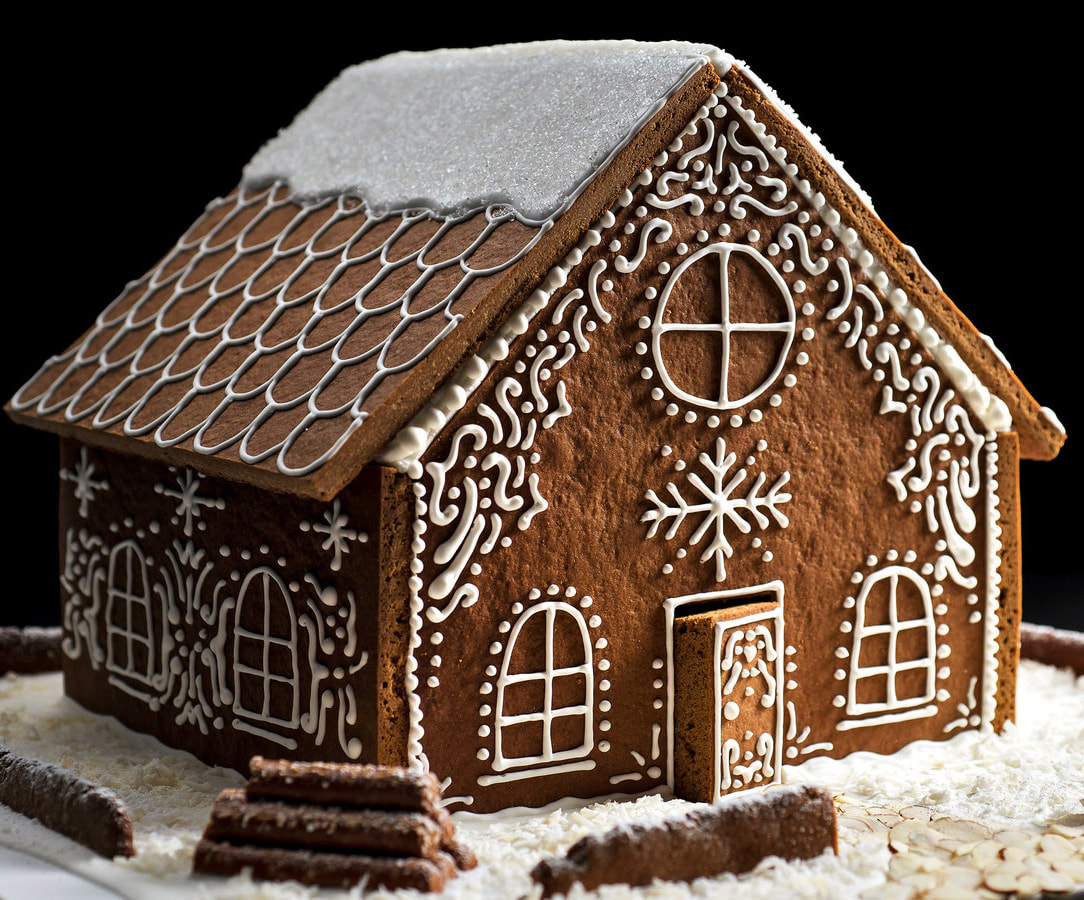 Making gingerbread and gingerbread houses have deep roots in history. Honey cakes can be traced to ancient Rome and culinary historians verify that ginger has been seasoning foodstuffs and drinks since antiquity. It is believed that the gingerbread as it appears today was first baked in Europe at the end of the 11th century, when returning crusaders brought back the custom of spicy bread from the Middle East. Ginger was not only tasty, but also had properties that helped preserve the bread something essential in the ancient world. According to a medieval legend, there was originally a fourth Magi who was to bring yet another gift to the infant Jesus--ginger. Sometime during his journey he fell ill and never got to Bethlehem, but a local Rabbi nursed him back to health. The Rabbi taught him that the name for Bethlehem in Hebrew actually meant House of Bread, and further told him of how he tasked his young students to make houses of bread to eat in preparation of their hopes for the coming of their Messiah. The Magus gave his chest full of ginger roots to the Rabbi and suggested adding ground-up ginger to the bread for flavor and preservation. The gingerbread house was born!  Gingerbread, as we know it today, descends from Medieval European culinary traditions. The spicy delight was also shaped into different forms by monks in Germany in the 13th century but quickly spread to other European countries. Medieval bakers used carved boards to create elaborate designs but in other places such as Calabria, Italy artisans hand shaped the spicy dough into elaborate designs, still popular today during holidays such as Easter and Christmas. Click HERE to read more about the art of Shaped Mostaccioli, the Calbrian Gingerbread.
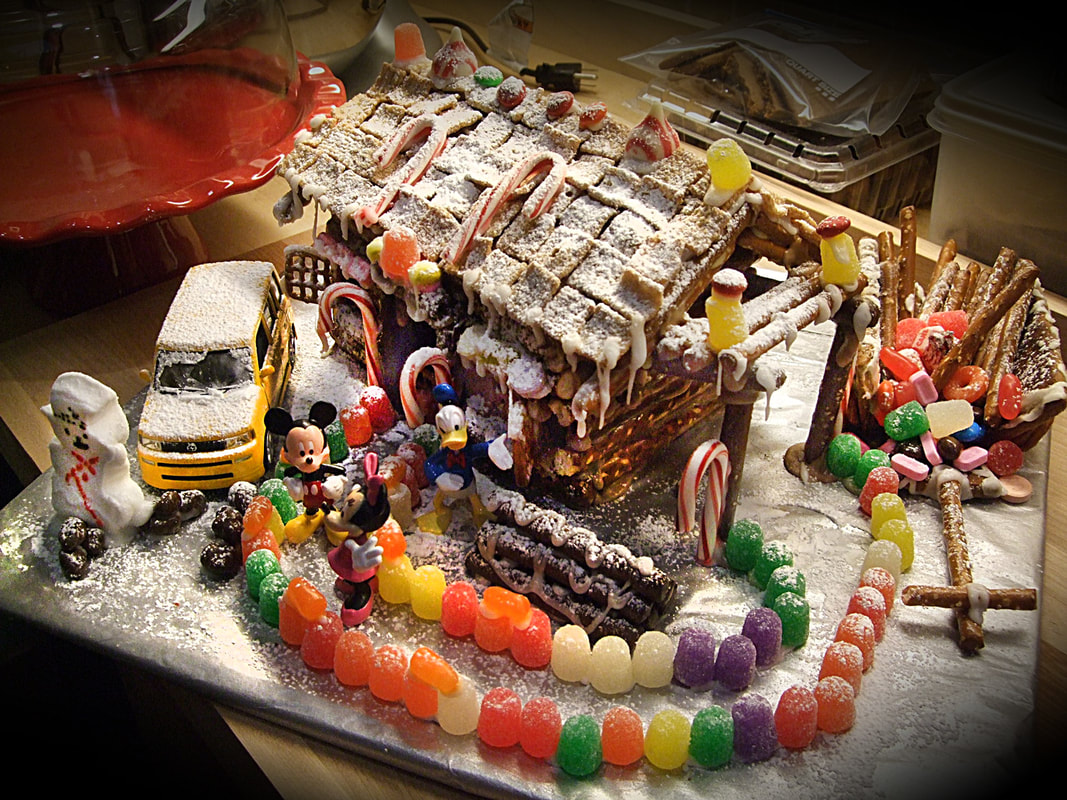
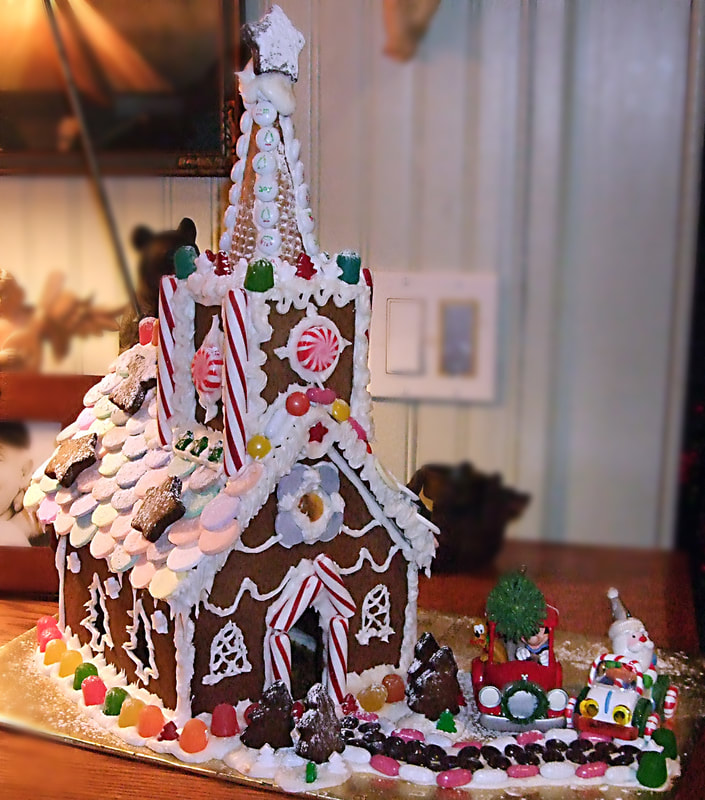
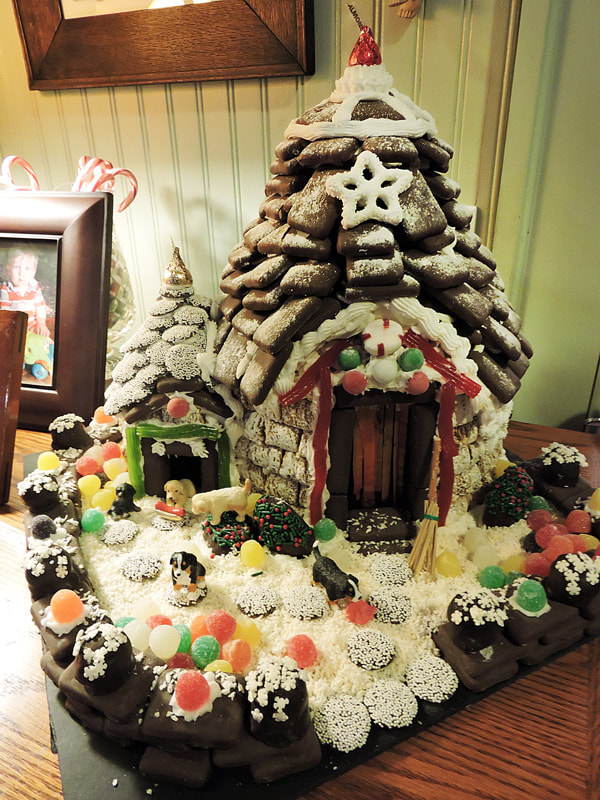
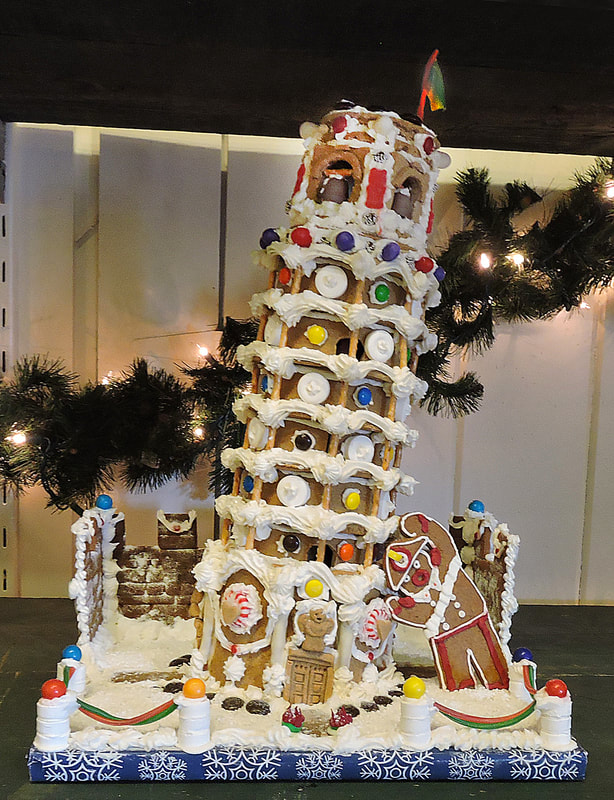
As you can see in the photos above, our gingerbread projects were modest at first, mostly a chance to begin the tradition for our son Lucas when he was a little boy. But then our passion for constructing gingerbread grew more complex and we started entering gingerbread house competions...
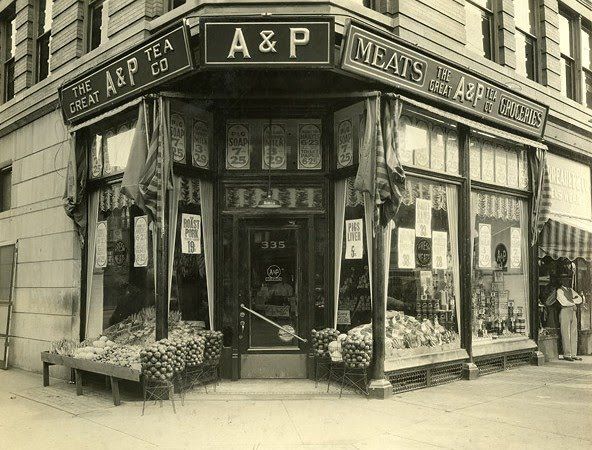
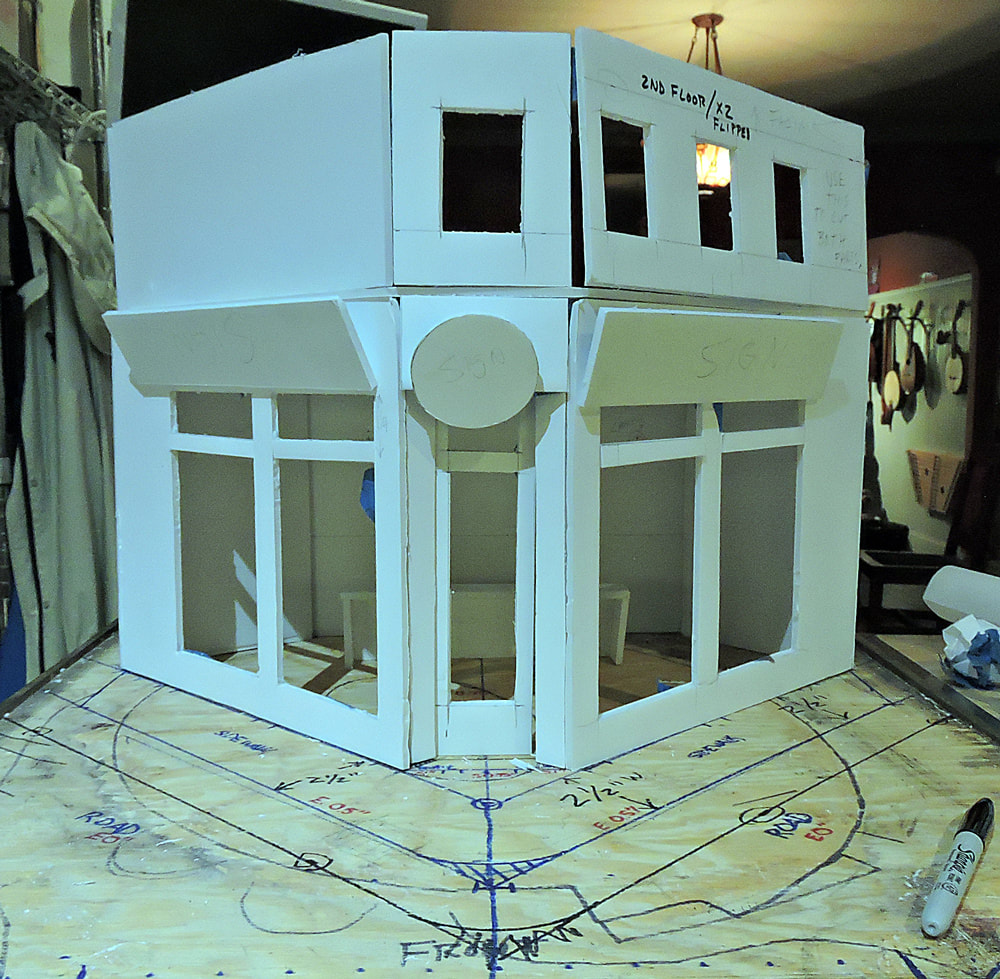
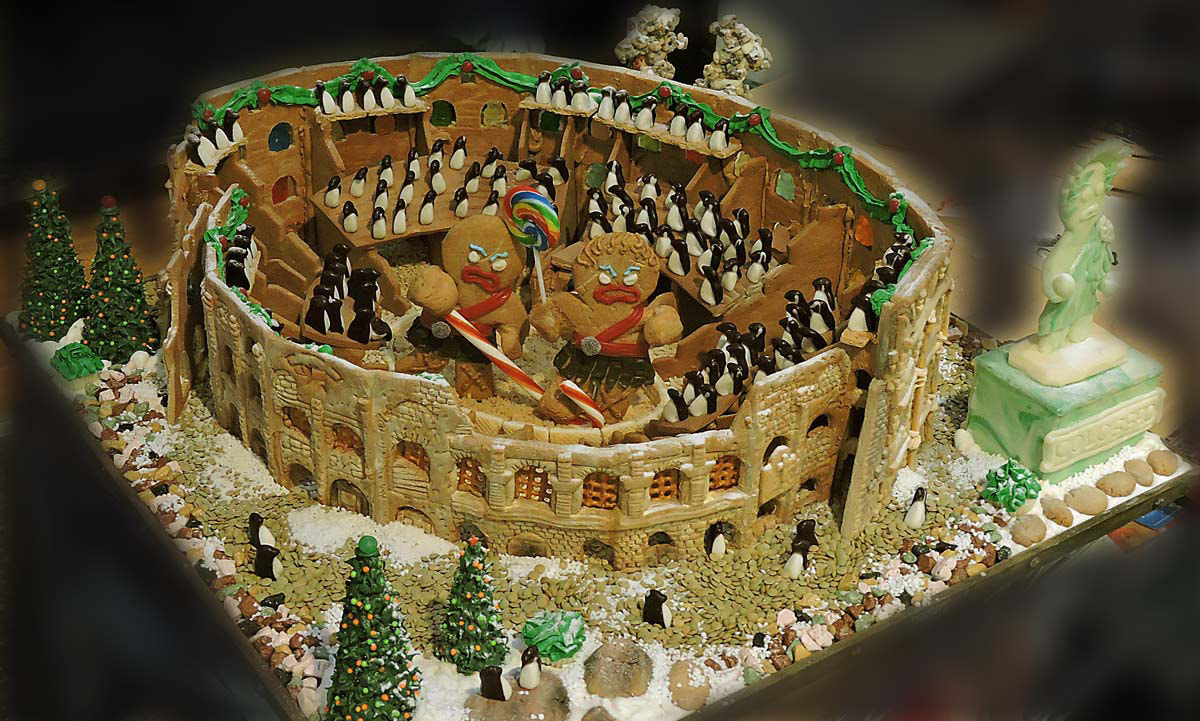 Roman Colosseum with Battling "Gingy" Gladiators - winning second place in our county competition Our 2018 Gingerbread Project: Lucas' Concept to Recreate an historic A&P Grocery Store For this year's project, I really wanted to do an Amalfi Coast hillside village complete with rugged mountain and multiple houses clinging to the cliffs, I was out-voted and we decided to build my son Lucas' concept for a 1930s vintage A&P grocery store--a timely choice since the A&P supermarket chain, the oldest in America, had recently closed all of its stores. Besides, to win, Lisa and Lucas both thought we should do a more "all-American" theme.
The trouble with completing our project was that time was not on our side. For example, to create our gingerbread Colosseum it took about 6 weeks, from planning through baking all the components to finished construction. I don't know how time slipped away from us, but we only had about 10 days to plan and complete our A&P store, which would be difficult to impossible due to all the new techniques we were going to employ for the first time: melted candy windows, poured clear gelatin window "glass", creating miniature products and produce, fondant checkerboard tile floor and fondant asphalt paving, edible printed signage and timed electrical lighting! Well, somehow we did it! We delivered our project within 15 minutes of the delivery deadline! In the end, we won First Place in the Authentic Reproduction of a Significant Building category. I think we won based on to Lucas' concept and especially his skill in creating the brick textures and miniature details (fruitcake, fruit, watermelons, pumpkins, baguettes, a cheese board and much more) and his graphic design for all the signage! Oh, and of course, as usual, my wife Lisa helped with the preparation of the gingerbread dough and fondant. We Three make a great gingerbread team, don't you think? Buon Natale! --Jerry Finzi 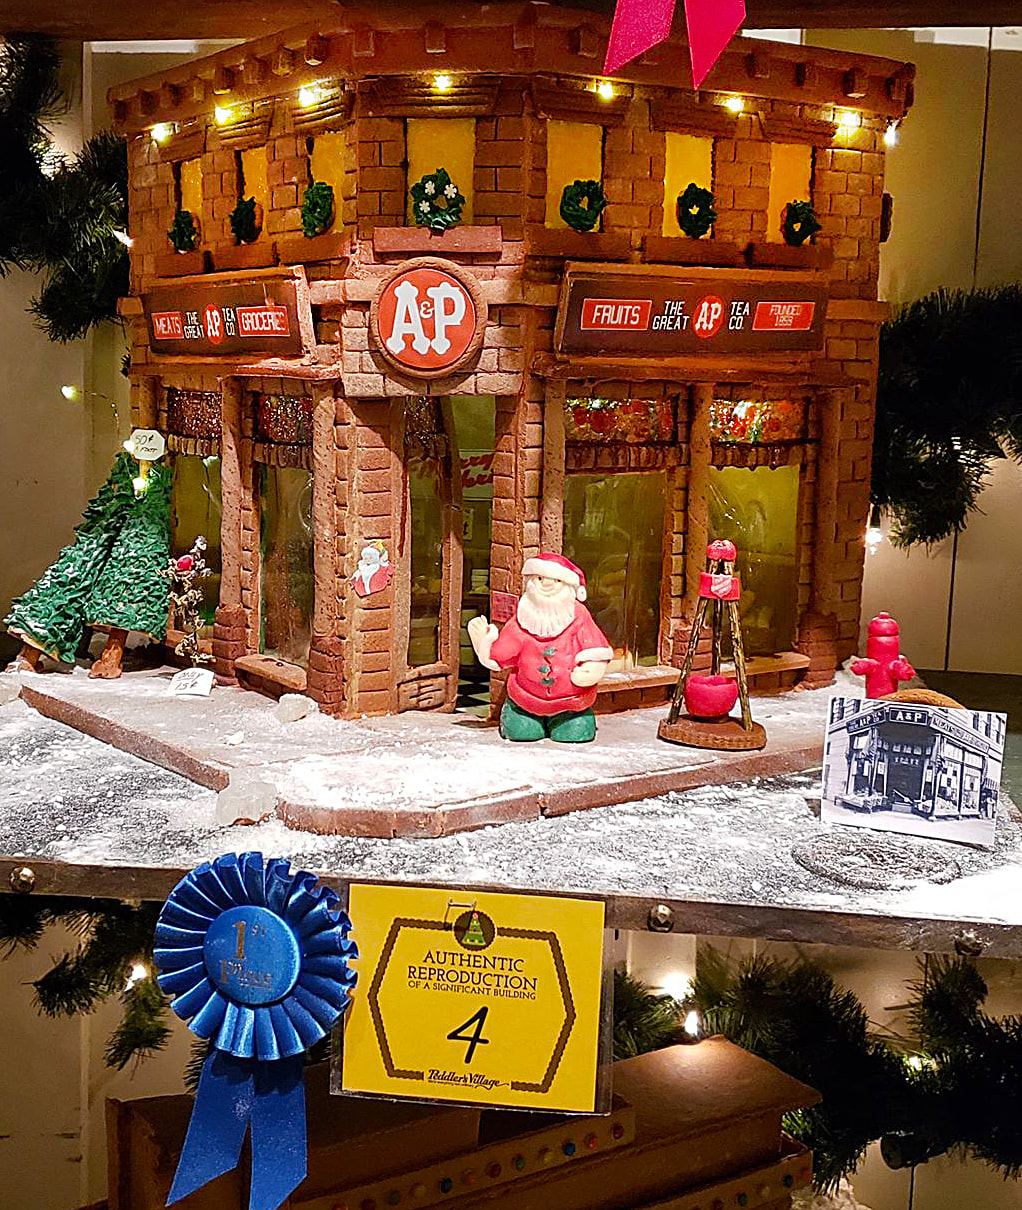 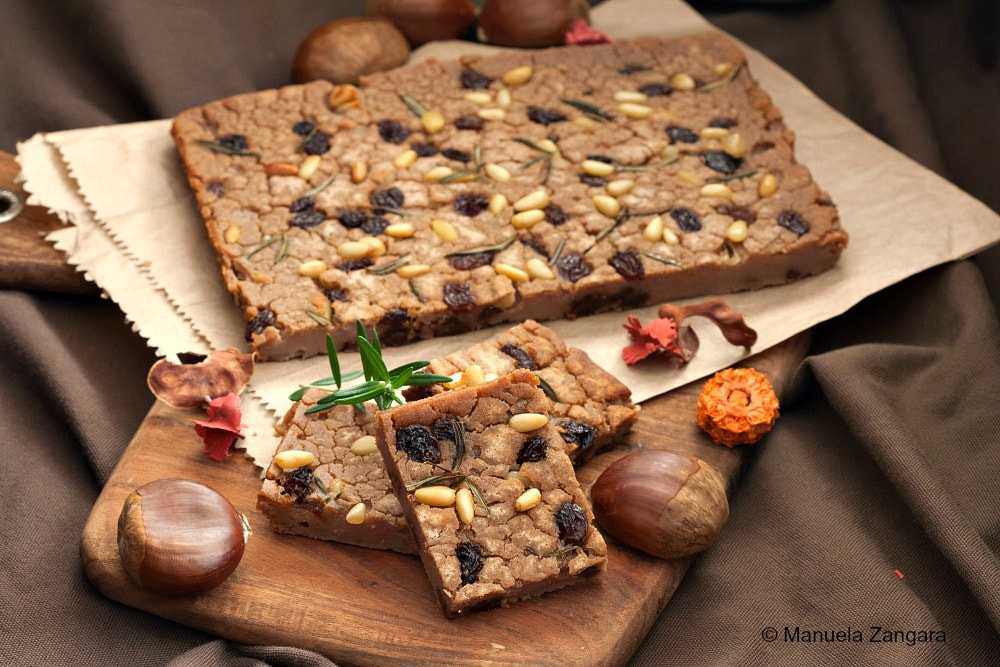
When autumn comes to Tuscany, you will be able to enjoy Castagnaccio, a torta rustica made with chestnut flour and olive oil that has ancient origins. In the 1500s it was well known in Tuscany as cucina povera, a dish prepared by poor, peasant farmers and shepherds. Chestnuts were plentiful in the hills of the Apennines and easy to harvest, not only for its nutritious flesh but also for chestnut flour. Chestnuts (castagne) are rich in protein, calcium and vitamin A.
This torta can also be called baldino, ghirighio, toppone or pattona, depending on where you are in Italy. Local variations may include other ingredients, such as rosemary, orange peel and fennel seeds. There is even one romantic legend that says when its perfumed with rosemary, Castagnaccio is a powerful love potion--making and serving it the object of your affections will make them fall in love with you, and ask for your hand in marriage. Perhaps this is more than just a dish served during Natale, but also appropriate for Valentine's Day! In its earliest conception, it was an easy way to make a portable food (like an energy bar) that stored well for long periods, helping sustain poor contadini during long, harsh winters. According to Ortensio Landi (1553) in his “Commentario delle più notabili et mostruose cose d’Italia e di altri luoghi“ ("Commentary on the most notable and monstrous things of Italy and of other places"), he traced its origins to a man called Pilade from Lucca. By the nineteenth century however, the addition of pignoli and dried fruits morphed this spiced cake into a dessert deserving of the Christmas season and its popularity spread to Liguria, Piedmont and Emilia Romagna and even on the nearby French island of Corsica. Today you will find castagnaccio just about everywhere in Italy during Natale festivities. Keeping with Tuscan tastes, typically, no sugar is added because of the inherent sweetness in the chestnuts themselves and the addition of dried fruit and raisins. Castagnaccio is often served with ricotta, honey or sweet wines such as Vin Santo. 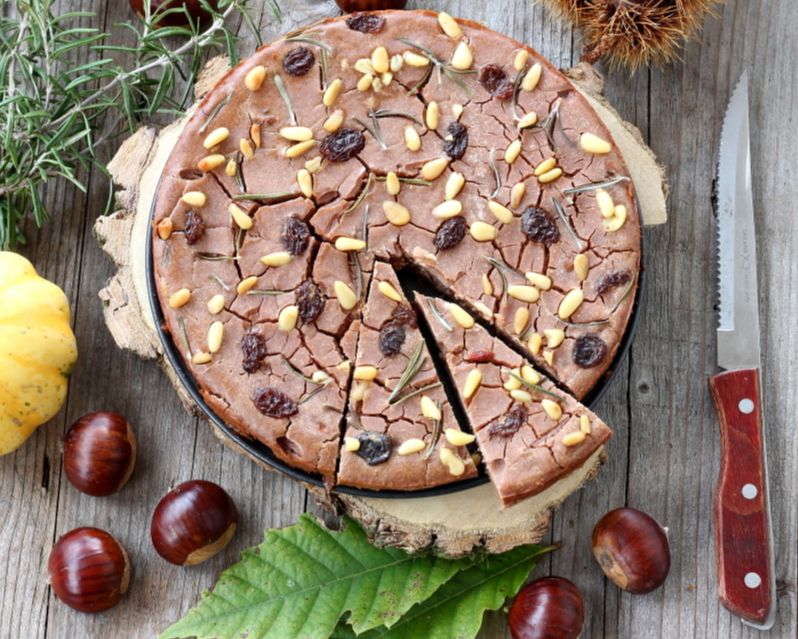
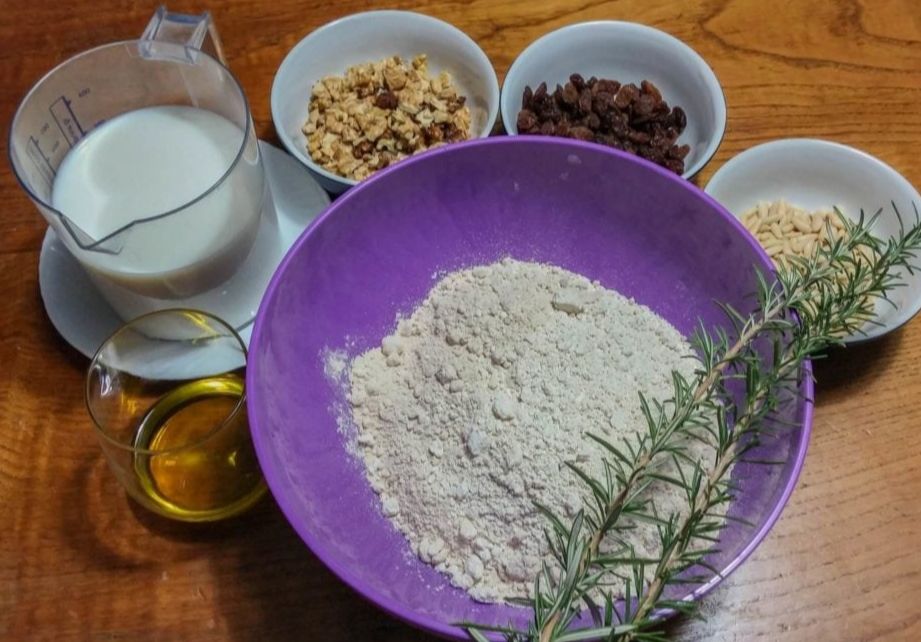
Ingredients
Optional: You can soak the raisins in rum, Amaretto or orange liquor instead of water for a more adult version.
Directions
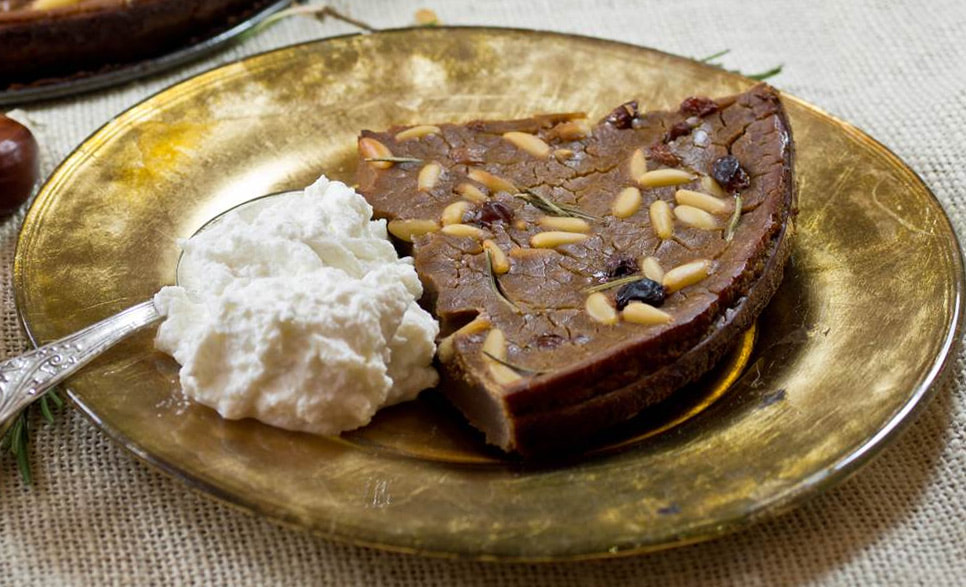
Serve with a glass of Vin Santo, and a dollop of fresh ricotta on the side, and drizzle both with a Tuscan honey of your choice.
Buon appetito! --Jerry Finzi
For further reading:
Chestnuts: The Italian Love Affair with Castagne Foto del Giorno: Chestnut Vendor Harvest Festivals in Italy: From Grapes to Wine, and More
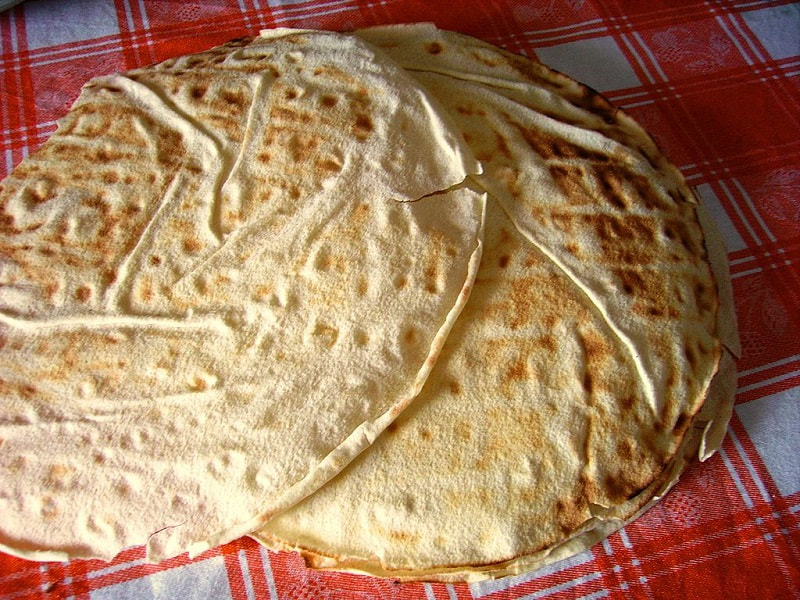
Ancient Sardinians had a saying: Chie hat pane, mai no morit (who has bread, will never die). This is true for most of the world. Pane Carasau is one of the ancient breads they were talking about. You can imagine the ancients making this bread because of its long storage capabilities and portability.
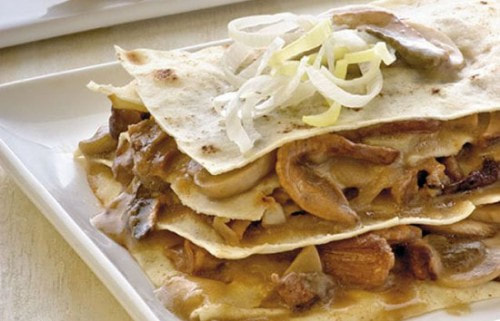
It is a a very thin flat bread--some might call a cracker--that was traditionally made for shepherds by the housewives to carry with them for long months on high pastures with their flocks. They can be eaten with sausage and cheese, or dipped in milk to re-hydrate for colazione and drizzled with honey or jam. Pane Frattau is a soup made with shards of Pane Carasau, meat, eggs, cheese and tomato. Modern Sardinian chefs are also using pane carasau in their recipes, for instance, carasau lasagna. The tedious method by which is is made creates a thin, crispy bread that will last literally for months, even if it happens to crack into shards along their travels. There are some who refer to this flatbread as carte della musica (music sheets) because of its thinness. The dough itself is fairly simple: durum wheat, yeast, water and salt. It's rolled into extremely thin rounds and baked in a wood oven until the bread puffs up like a balloon, then quickly (with dexterity, not to get steam-burned) cut into two halves, making it even thinner. They are then toasted again in the oven and dried completely. Nowadays, in Italy you might even come across packaged Pane Carasau in supermarkets.
Ingredients
Directions
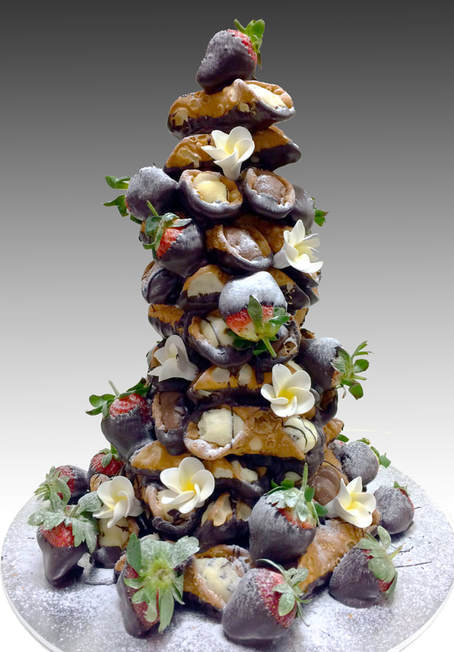 I've never been a big fan of cannoli, but I have to admit, THIS Cannoli tower takes the cake! Great idea for a wedding instead of a typical wedding cake.
--Jerry Finzi |

Archives
July 2023
Categories
All
|