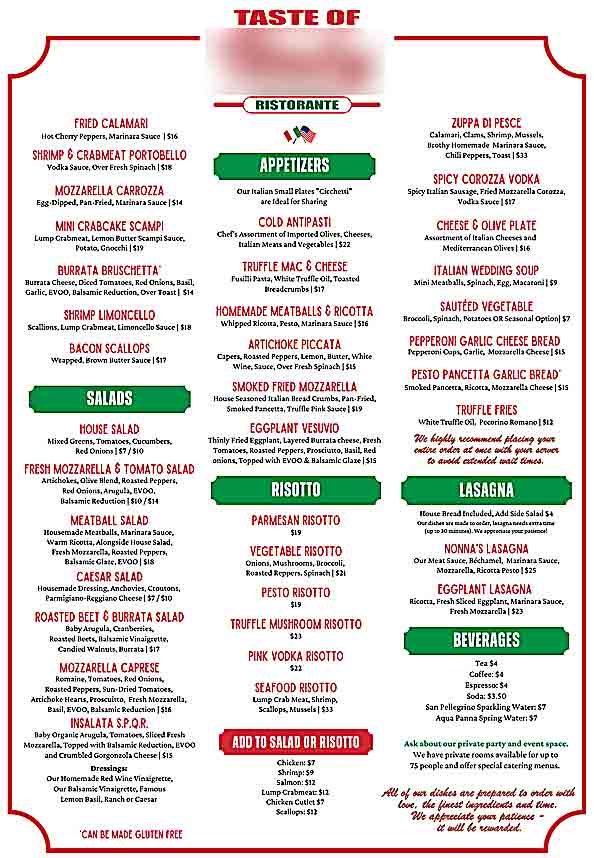
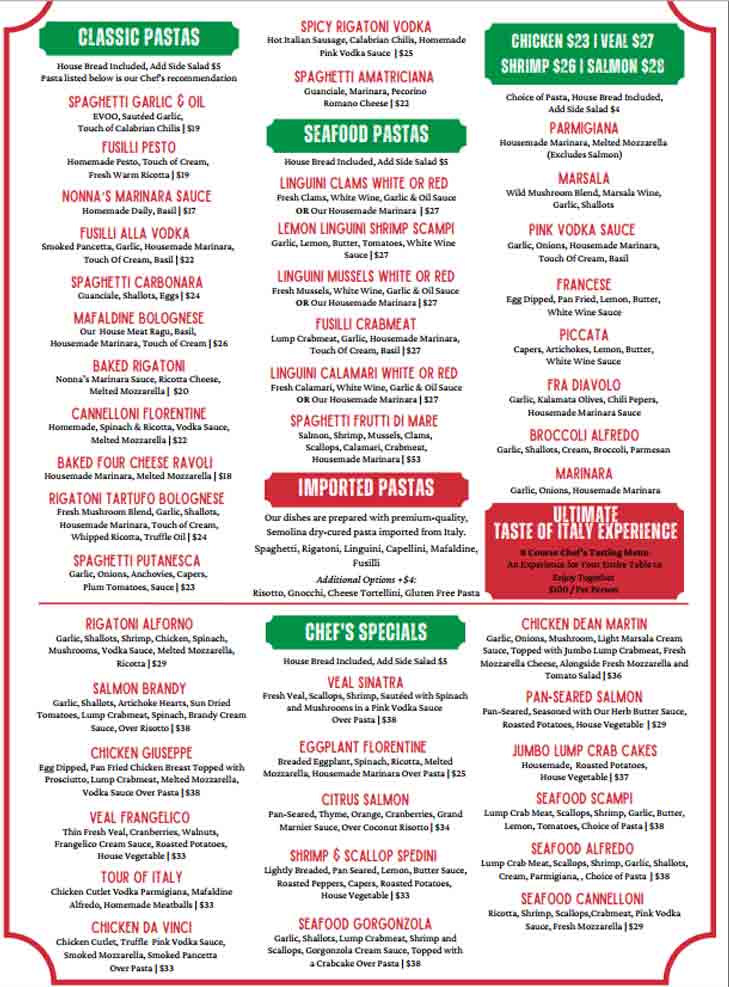
 This was supposed to be Pesto Risotto, and why put a spoon on my plate? This is it. I'm at my wits end. Is eating out at so called "Italian" restaurants worth the high prices, poorly prepared, unauthentic and inconsistent menu choices? This past Good Friday evening, my wife, son, his wonderful girlfriend and I went to a "Italian" restaurant called Taste of _____ in a nearby town. (Fill in the blank. It's one of the most overused names for Italian restaurants and pizzerias in the U.S.) The place has been getting mostly great reviews on social media from locals (Italian-Americans are a minority around here), so my wife made reservations and then... At first, we were confronted with a strong fishy smell as we entered the place (i.e, not fresh). The menu: a very typical Italian-American, overpriced (for what we received) menu with pizza place graphics. There were dishes named after Sinatra and Dean Martin and oddly one named Da Vinci. There was a volcano pile of stuff called Vesuvio and a "meatball salad"--meatballs "alongside" a salad.(Most reviews claimed the meatballs were terrible, so we didn't dare). The antipasti mix had tightly rolled, cheap capicola and a tasteless prosciutto with green and black olives straight out of a plastic 5 gallon restaurant jug. We also ordered a "fried mozzarella" that turned out to be a grilled cheese with mozzarella. The menu was missing any Neapolitan pizza, fresh pasta dishes, bistecca, boar stew or even fried/stuffed olives, chickpea fritters or arancini. Some pasta dishes were not finished in the pan, with sauces placed on top. Many were heavily finished with olive oil. The bread in the basket was not great and there was a large slice of butter swimming in a bitter, low grade olive oil mix for dipping (I suppose). There were no Primi or Secondi dishes. Proteins were mixed in with pasta on the same plate--Italian-American style. As for presentation, the portions were HUGE with so many things thrown on top, creating visual chaos. (Looking like a regurgitated meal). The finisher in the kitchen surely had a heavy hand with many dishes swimming in olive oil. (Many photos on their Google page was evidence of this). There were dry pasta dishes with Bolognese sauce (what, no fresh egg pasta?) and other misidentified pasta shapes. There was an extreme overuse of garlic in some dishes, as my son's girlfriend had in her mushroom risotto. Native Italians use garlic only to flavor the oil at the beginning, then remove the cloves. My wife said she had to "saw" through her overcooked chicken cutlet and her gnocchi were definitely made from frozen and were gluey.
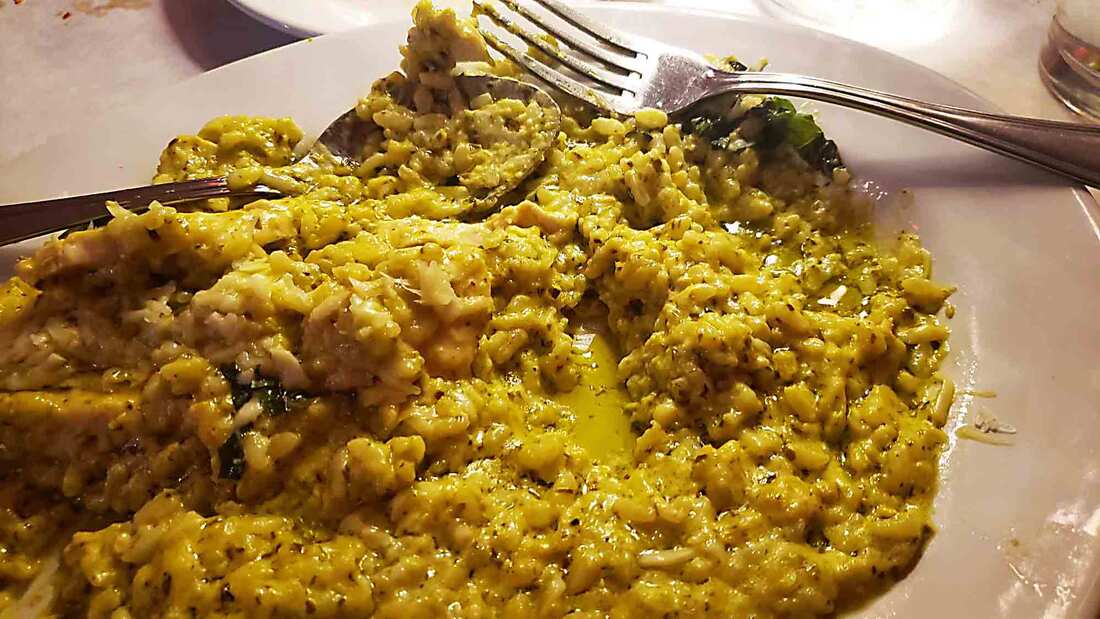
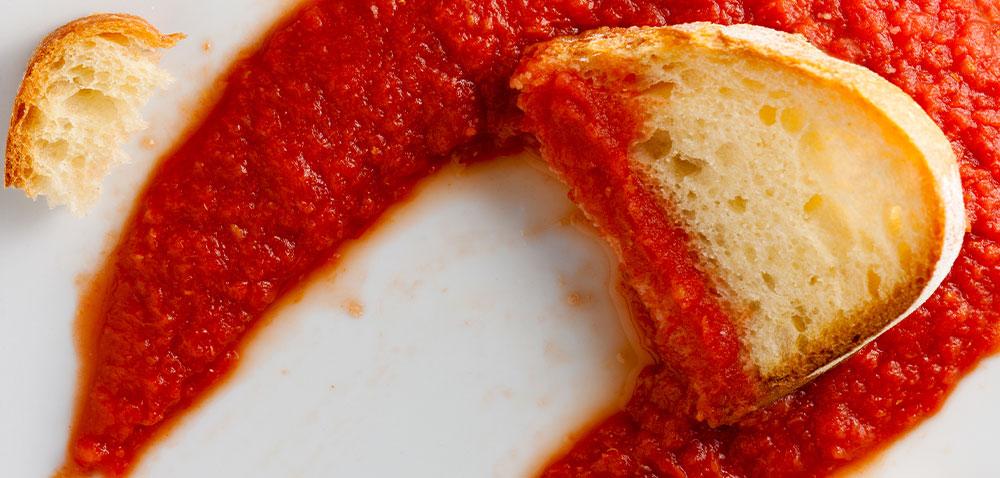
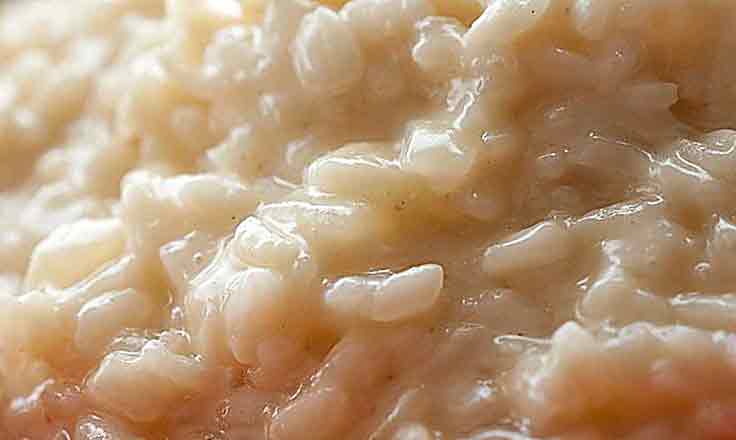
 This is how I expect a pesto risotto to be This is how I expect a pesto risotto to be At the top of this post is a photo that I took of my "pesto risotto" at the end of our meal... about 45-55 minutes after arriving at the table. You can clearly see the pools of oily fat (olive oil and broken sauce). Responding to my local review, the "owner/chef" claimed I finished 60% of the dish--I actually left 80% or more of this HUGE portion (enough to feed 3-4 people).
Also, I want you to note the huge spoon they placed on the plate, the same many American restaurants use, expecting diners to twirl spaghetti with. Five minutes into the meal my stomach was feeling queasy. There was a broken, heavy sauce (cream added?) and it looked like they poured olive oil over the risotto, pooling below. Perhaps they added too much butter and cream to finish over heat and the sauce broke. The risotto was not made with carnaroli or arborio rice. When making risotto, this type of rice itself produces its own starchy "cream" and causes l'onda (a wave). This was a gloppy mess. I still felt nauseous 2 hours after. None of us were satisfied with our meals. My son's pesto pasta had very little actual pesto with olive oil pooling underneath. Instead of a classic dollop of pesto on top, there was ricotta (not mentioned on the menu). He felt thee pesto was made using dried basil with only a blackened chiffonade of "fresh" basil sprinkled on top. I concurred. My dish sat in from of me for about 45 minutes while I picked away at it during our diner chat. Uncharacteristically, I didn't want to complain on Good Friday and while we were getting to know Lucas' girlfriend. The waitress came over once to ask how everything was, and my wife answered "fine" while I bit my tongue. After asking for the check, someone asked if I was finished, reaching for my plate just as I was pointing my phone at my dish--something that many do nowadays. Seeing me take the photo, they walked away and went right up to the owner, as my wife witnessed. During this evening, the owner stopped at nearly every table except ours... mostly filled with his "regulars". As we've noticed before in our area of Eastern Pennsylvania, most locals have no idea what a good Italian dish is. Our running family joke is about a German restaurant that is "famous" for its "incredible" pizza--flat, tasteless pizzas made and frozen before reheating! You know when the place that sells "pizza" also has Philly cheesesteak sandwiches on the menu, the pizza can't be good. Responding to my local review, the owner said he "knew these people would be trouble" as soon as we sat down, and that we just wanted a free meal. He also claimed that I pulled the plate out of the waitresses hand to take the photo, with my "agenda" to give a bad review. Never happened. The waitress (passive aggressively) did come back and asked why I took a picture and why I didn't want a "doggie bag". I then told her how dissatisfied I was and how the sauce was broke and oily. I didn't want to take the rest of the dish home. She offered to fix it, ridiculous as the bill was being paid and considering their lacking technique for preparing any classic risotto dish. She apologized and I said it was not her fault, and reminded her, "YOU aren't the chef". I never asked to comp my meal, but even after my complaint, the full charge was still on the bill when it arrived. Most places comp without even asking for it. I paid the full bill and a 20% tip and we left. We only drank water, had no desire to have desserts after our poor meals, and were billed over $150 for the privilege of eating at this phony Italian "ristorante" with busboys wearing Godfather T-shirts and Vic Damone and SInatra music pumping out of their speakers. Responding dozens of times to our local review, and literally dozens of locals defending this inauthentic place's food, the owner made himself look bad by his ridiculous and insulting accusations. There were also scores of people agreeing with my review and saying how the owner's nasty arrogance and lack of customer relations tact was hurting his own reputation. It was a typical social media flaming event. Shocking, really. All I did was post an honest review. His belligerence toward a simple, truthful diner's own experience is utterly out of place for someone wanting to make clientele happy. This owner's attitude is going to repel clients... look at other restaurant owners who offer condolence and ways to make them come back until they are served a satisfying meal. There is a New Jersey pizzeria that we order take-out from occasionally that gave me a rubbery chicken dish once. No questions asked, they offered a gift certificate as compensation. This is after all a hospitality business. Lisa is usually the one that wants to try the new places getting lots of social media buzz. I think after this, even she wants to call it quits. Our biggest complaint--even when we find a place with good food--is lack of consistency. The next time we return, we never are as satisfied as the first time. Bottom line: We've been saying this for years now... "Why waste big dollars on meals that we can cook better in our own kitchen?" Besides, we are nearing the end of our new kitchen renovation... We can't wait to have an oven again and cook on our new 36" gas cooktop with grill! Share your experiences from recent years at restaurants that others think are great. Are you disappointed too? Please leave a comment below. Ciao for now, --Jerry Finzi Without a doubt, one of the best ways to discover truly authentic Italian recipes is to subscribe to Pasta Grammar's YouTube channel. Follow them on social media too... @PastaGrammer. You see, aside from the nonnas on the Pasta Grannies YouTube channel, this raven haired Calabrese, Eva is one of the best cooks who uses traditional techniques for traditional Italian dishes. Her recipe for ciabatta is one you'll want to make every week. --Jerry Finzi  One of the primary philosophies of GVI is passing along ways to live a more Italian life (even if you're not in Italy), often shedding and evolving away from the often corrupted and devolved Italian-American traditions and methods of language, culture, and of course cooking. One of my biggest changes in recent years is to my old Italian-American method of cooking pasta--simply topping with sauce. I learned from my mother. She would boil and drain the pasta, then pour sauce over the top of each individual plate of pasta, leaving it up to us whether or not to toss with the pasta or not. The authentic, Italian method of cooking pasta is under-cooking the pasta, then finishing in the saute pan where you have prepared the sauce while the pasta is boiling. The next step is adding the under-cooked pasta to the saute pan, then adding a few ladles of starchy pasta water. Cooking further and tossing the pasta, the starch in the water allows the sauce to thicken and cling to the pasta. The pasta water both cooks the pasta and thickens the sauce, until the sauce becomes creamy and coats the pasta in a shimmering way. This method impregnates the sauce INTO the pasta and imparts enormous flavor. In Nostra Cucina, gone are the days of putting drained pasta on the plate and simply topping with sauce. Buon Appetito! --Jerry Finzi 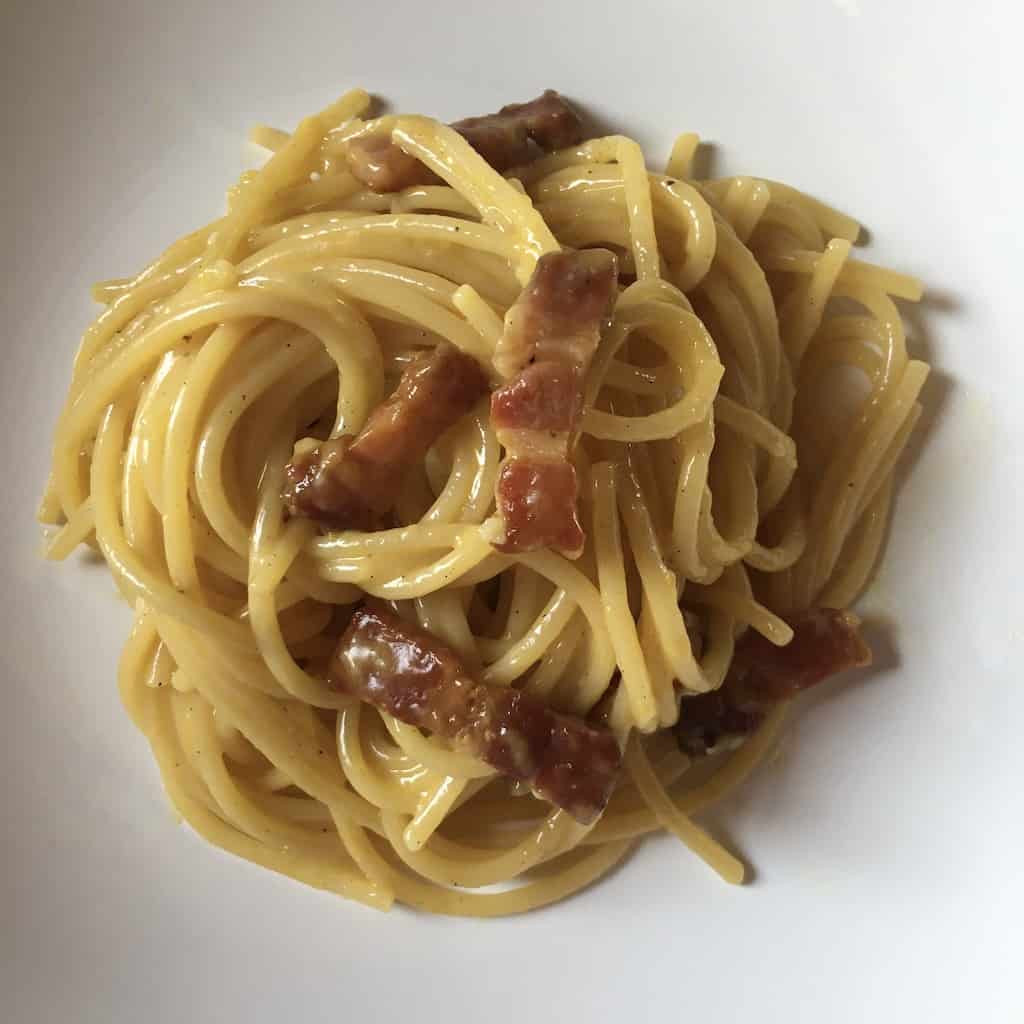 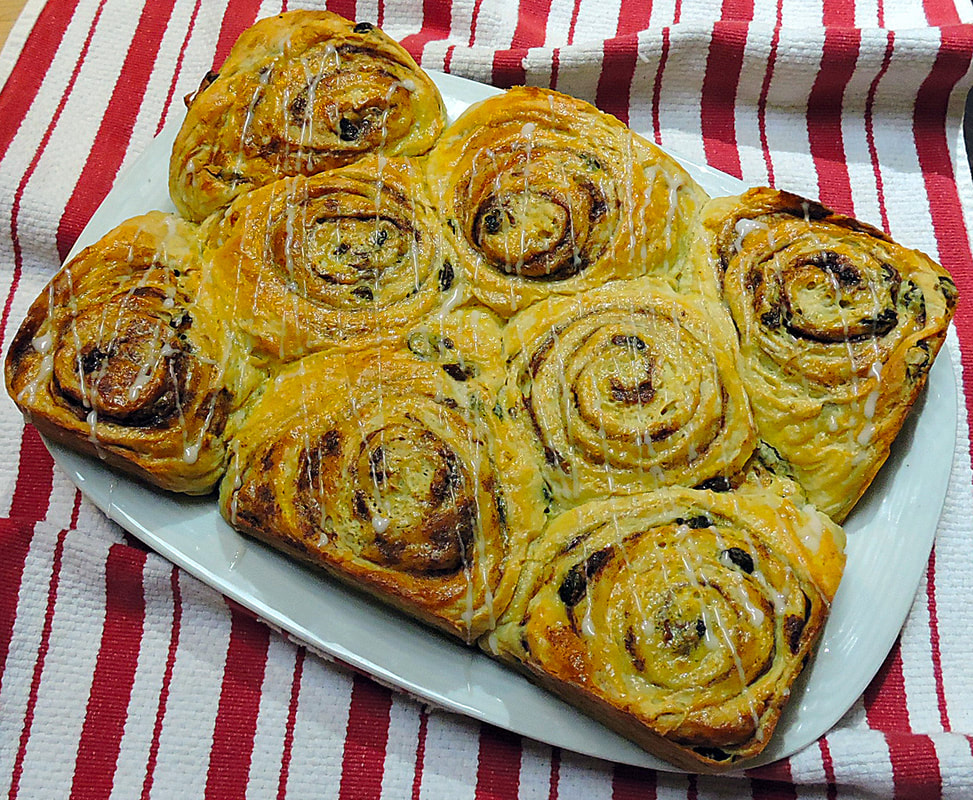  Natale a casa Finzi Natale a casa Finzi Since my son Lucas was small, we have obviously dedicated early Christmas morning to opening gifts. This early morning sharing of love for each other has often stretched past noon, depending on the number of gifts to open. Admittedly, "We Three" (as we call our little famiglia) spoil each other, with multiple gifts and overstuffed stockings hanging on the mantle--some gifts even celebrate Italian cuisine. (This year, my favorite was a 5 pound caciocavallo cheese from Puglia!). This can be a long ordeal (when Lucas was little, it might take all day), so one tradition we've tried to keep is making my recipe for cinnamon-raisin and walnut buns the day before so we can easily heat them up and ice them for our Christmas breakfast. There's nothing better than one of these buns with a hot chocolate on Christmas morning. It's also a quick, simple breakfast to make that won't delay the opening of gifts. Here is the recipe, which can make enough to enjoy throughout the entire Natale season... 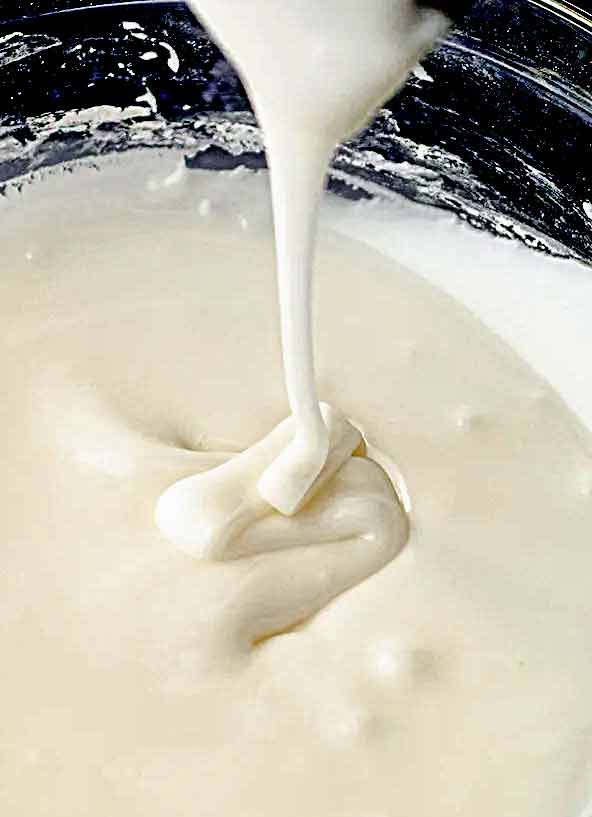 Babbo Finzi's Raisin-Cinnamon-Walnut Buns This recipe makes about 18 buns, about 5" across Ingredients Dough 4 Large Eggs 1 cup warm water (105-110 F) 1/2 cup orange juice 1/4 cup mild honey (Acacia honey is best) 2 tablespoons active dry yeast 7-1/2 - 8 cups all purpose flour 2 teaspoons fine sea salt (I use Baleine brand) 2-3 tablespoons ground cinnamon (to taste) 1-1/2 cups (3 sticks) unsalted butter, at room temperature (cut into pieces) For the Filling 1-1/2 cups light brown sugar 2 cups chopped walnuts (ground in a spice grider) 1/2 teaspoon salt 1/3 cup ground cinnamon 1/2 cup (1 stick) melted, unsalted butter 1-1/4 cups raisins (soaked in an orange liquor for 15 minutes, then drained) For the Frosting 4 cups sifted confectioner's sugar 1 teaspoon vanilla 1 teaspoon Fiori di Sicilia flavoring pinch of salt 2-3 tablespoons orange juice, or orange liquor. 1/4 cup milk (I use skim) grated zest of 1-3 oranges (depending on how many are being served) for sprinkling over the top... I forgot this Christmas) Directions for Dough 1. Place the eggs into a medium bowl and whisk until foamy. 2. Add the warm water and honey to the eggs and mix well to dissolve. Sprinkle the yeast into the egg mixture, stirring well, then let sit to "proof" until foamy (about 10-15 minutes). 3. After the yeast has proofed, add the 1/2 cup of orange juice and stir well. 4. Sift together the 7-1/2 cups of flour, 2-3 teaspoons cinnamon and 1/2 teaspoon salt into the bowl of a stand mixer. 5. Start mixing on a low speed while adding the pieces of room temperature butter until it gets to a rough crumb stage. 6. Make a well in the center and pour in the proofed egg/yeast mixture. Mix on low speed until the dough clears the sides of the bowl. 7. Place the dough onto a lightly floured work surface and knead until it becomes smooth and springs back a bit when a finger is pushed into it. This dough should become smooth and not sticky. 8. Cover with a cotton towel or plastic wrap for 10-15 minutes to relax. Make the Filling 9. In a medium bowl, combine the brown sugar, chopped walnuts, salt and cinnamon. I grind the walnuts into a crumb using a spice grinder, but if you them chunkier, leave them chopped (from a package) or use a chef's knife to chop to a size you like. Filling and Rolling the Dough 10. Prepare two half sheet pans by lining them with parchment paper. 11. Roughly shape the dough ball into a rectangular block to make rolling out into a rectangle easier. On a lightly floured surface, roll out the dough into a rectangle that is no more than 12" and no less than 1/4" thick. The rectangle should be about half as wide as it is long. Try to create 90 degree, angled corners. 12. Using a pastry brush, coat the entire surface of the dough with the melted butter, coming to within 1/4" of all sides. 13. Spread the walnut filling evenly across the dough. 14. Drain the raisins well and spread evenly across the dough. 15. Roll up the dough, starting from the side furthest from you, jellyroll fashion. As you roll toward you, lift occasionally to tighten the roll as you go. When you get to the end, pull and then pinch the last side along its length, pinching the dough so it sticks to itself. 16. Roll the pinched edge so it's underneath your roll. (This helps to hold it in place while cutting.) Using your flat hand or a bench scraper, make sure the ends are pressed in flat. 17. Using a large, serrated bread knife, start cutting 1/2 - 3/4" thick slices, placing each one on your parchment lined sheet pans. You can either allow 1-2" of space between each so they sell into nice round buns (photo below), or more tightly next to each other to create more of a pull-apart bun experience. (See the photo above). 18. Cover the pans loosely with plastic wrap and allow to rise at room temperature, away from drafts, for about 1 hour, or until doubled in bulk. This dough really puffs up! 19. About 30 minutes before baking, preheat oven to 350 F. 20. Place trays on center rack(s) and bake for 15-20 minutes, or until lightly golden brown. You can bake each pan separately, or if your oven can accommodate two pans at once, bake them at the same time, perhaps swapping racks and rotating pans once halfway through baking to ensure even baking. 21. Try not to over-bake these buns--they can dry out easily if over-baked. You want them warm and soft when served. They freeze well (on a tray in the freezer, then placed into zip-lock bags when rock-hard). They will microwave perfectly (30 seconds or so) the next day (after refrigerated), or heated in an oven from frozen for 10-15 minutes at 350 F. They can be iced right before serving. Making the Icing 22. While the buns are baking you can make the icing. Place the sifted confectioner's sugar and salt into a large bowl, and using a small whisk, combine. Whisk in the vanilla, Fiori di Sicilia and the orange juice (or orange liquor). Now, slowly start adding the milk, little by little, until the icing becomes very smooth and can make a ribbon when drizzled from the end of the whisk. You might not need all the milk, or you might need a tablespoon or two more (it depends on the humidity). This recipe can also be made swapping out the milk for water if you are lactose intolerant. You want the icing to be able to drizzle ribbons onto your buns, yet be sticky enough to cling well. Serving/Reheating 23. When finished baking, remove the pans from the oven and let cool for 5-10 minutes right in the pan. If you ice them while hot, the icing might soften and become too thin. 24. Select the buns you want to eat right away and either use your whisk or a small spoon to drizzle lines of icing across the tops. If you like lots of icing, use a small offset spatula and spread a coating of icing across the entire surface. 25. Distribute some orange zest on top. 26. For eating the next day, you can place some buns on a tray (without icing) and cover with plastic wrap. The next day you can reheat the icing for 15 seconds in your microwave, then reheat the buns in the microwave for 30 seconds (using a microwave cover) or in a 325 F oven, lightly covered with foil, for 15 minutes. 27. These buns freeze very well, without icing, by first freezing solid, uncovered, in your freezer until rock hard. Store the frozen buns individually in zip-loc bags. To defrost and reheat, place on a pan covered lightly with foil in a 350 F oven for 15 minutes, then ice afterwards. You can also defrost them using your microwave using the defrost setting, but don't forget to use a cover to prevent drying out. Our buns lasted our family of three from Christmas morning until the Epiphany on January 6th! I hope you enjoy them as much as we do... --Jerry Finzi 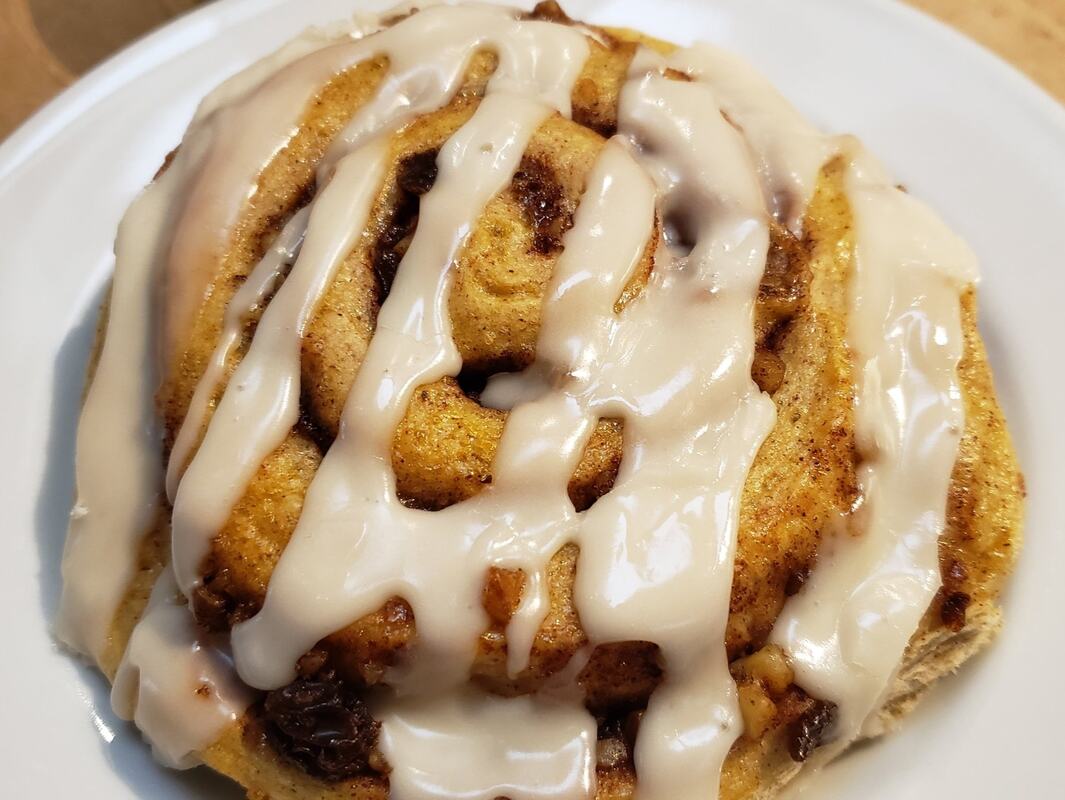 Copyright 2023 by J.Finzi/GrandVoyageItaly.com
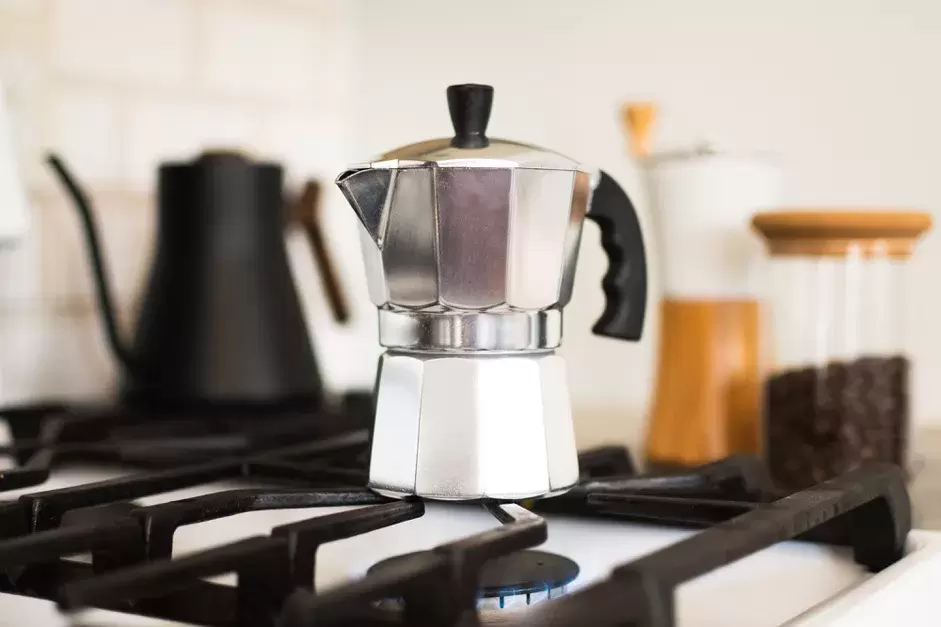 ...you throw away your counter-space hogging coffee machine, and now only make your brew in your little silver Moka pot.
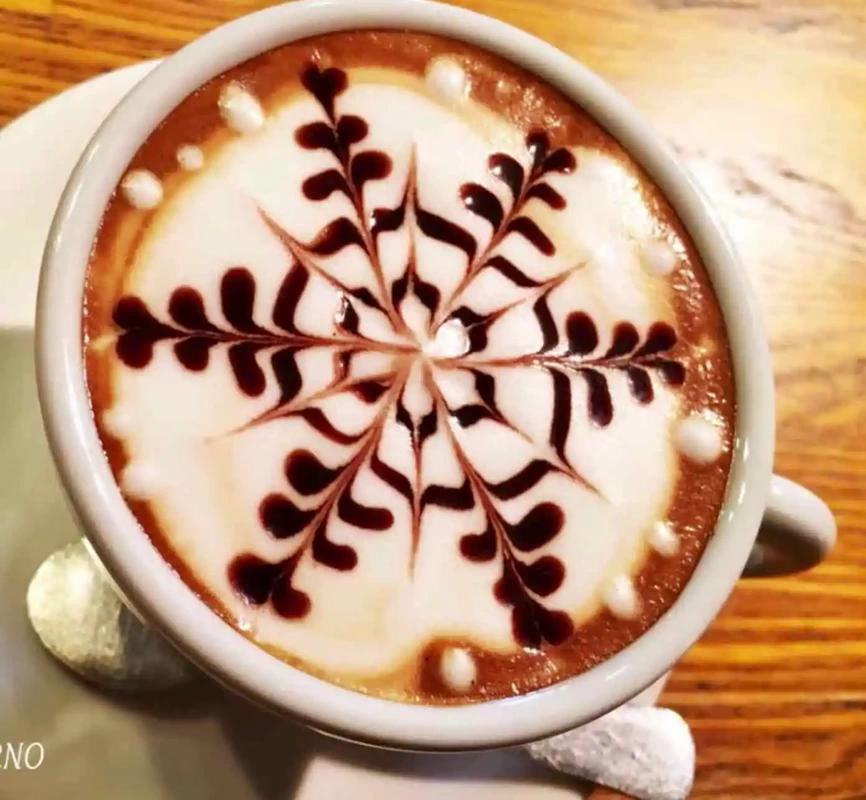
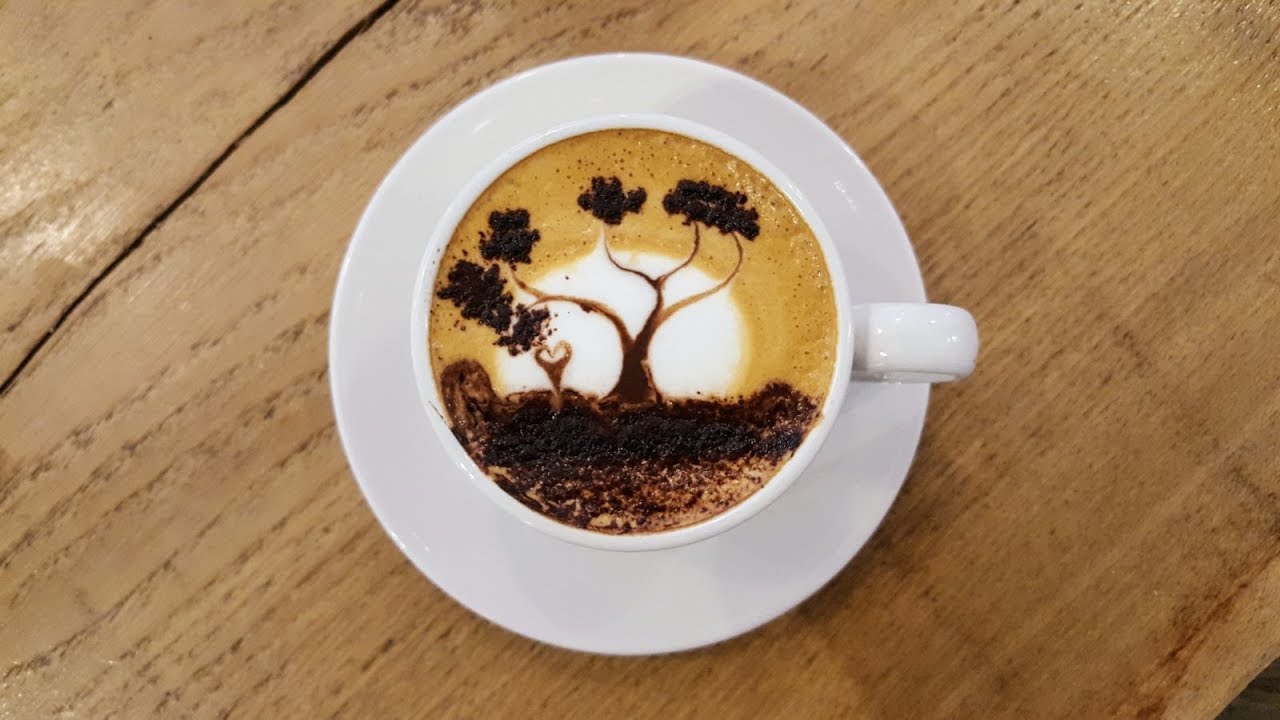
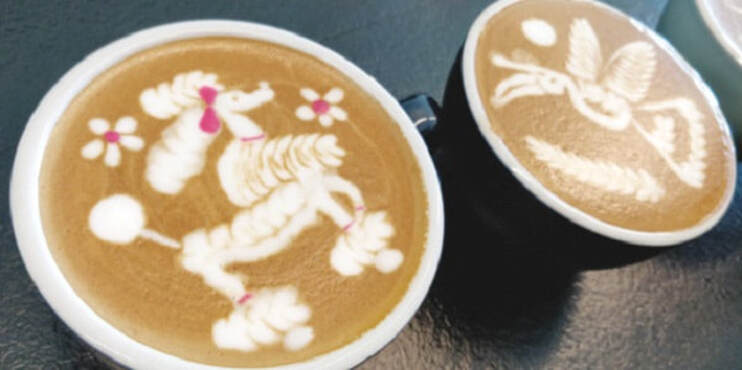  Italians have either invented, discovered or perfected many things that have spread worldwide: pasta, pizza, tomatoes, motor scooters and of course, coffee. In this case, although latte art became widespread in American coffee shops in the 1980s, it was the Italians who first created either artistic imagery or custom writing using micro-foamed milk on top of their brews. There are now latte artist-baristi all over the world, from Italy to America to Scandanavia and even in the Orient. Some of the best compete in world competitions. Here are a few examples. on AMAZON If you'd like to try your hand at this fun craft, check out these Youtube videos... Ciao! --Jerry Finzi 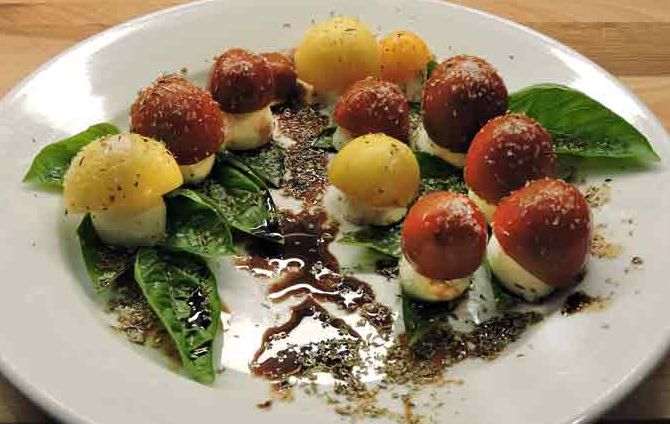 To have a little fun making caprese, take some mozzarella bocconcini and cap them off with heirloom cherry tomatoes to make little mushrooms. The tomatoes I used were Olivette Juane (yellow, egg shaped), Fuzzy Peach (a pale yellow tomato that actually has peach fuzz) and a Burgundy Roma. Slice a bit off the bottom of the bocconcini to help them stand up. Then sliced tomatoes in half (or a bit less) and cut out the middle membrane so they sit on top of the bocconcini. Carefully place them on fresh basil leaves from the garden and made a little stream of aged balsamic running through the middle. (Our bottle was brought back from Pienza,Tuscany). A sprinkle of oregano and some course sea salt sprinkled over the top of the tomatoes made them look a bit spotted. My favorite way to eat these is simply dig into the whole mushroom then mop up some of the balsamic... then pop the whole thing right in my mouth..... When tasting something exceptional, my father used to pinch his fingers together, hold them up to the corner of his mouth, and while twisting his fingers let out a little kiss--Molto bouno! Boun appetito! . --Jerry Finzi Copyright 2016, Jerry Finzi/Grand Voyage Italy - All Rights Reserved
 When I was a boy, we always had bread in our home. My Dad worked as a Deli man most of his life and would bring home beautiful Italian breads that he used to make cold cut and meatball sandwiches. In typical 1950s style, my Mom would keep loaves of white bread in what she called her "All-American house". When we had pasta with "gravy", we'd tear off some bread to use at the end of the meal to clean up the plate. Even when we had meat, like a roast beef, the bread would come out and we'd soak up "the blood" (the drippings) that oozed out of the meat in the bottom of the serving platter. If we had soup or a stew, the bread would work its way to the end of a meal to clean our plates. And if my Mom was making Sunday Gravy, we'd get out the bread, even if all we had was sliced Wonder Bread (ugh), and smear a ladleful of sauce on a slice for a pre-meal snack. 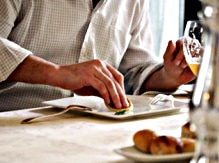 Why scarpetta (little shoe)? Wouldn't it be better to call it scopa (mop)? Little did I know what we were doing was carrying on an Italian tradition in dining--fare la scarpetta (making the slipper/shoe). Scarpetta means shoe in Italian. And to fare la scarpetta a tavola, means tearing off a piece of bread at the table to mop up the sauce or juices left on your plate, help in getting your food onto the fork or spoon. In my father's poor childhood--growing up in a Hoboken tenement with a large family--there weren't enough forks or spoons to go around, so using bread as a scarpetta was a necessity to lift bites of food out of the large communal bowl my grandmother would place in the middle of their table. Nothing goes to waste in Italy, and especially in the impoverished South where my parents came from, one would never leave anything on their plate. Food was life itself. After all, not wasting food is being furbo. And in the South, they don't shy way from having bread with pasta, like they do in the North. What is the preferred type of bread for use as a scarpetta? Curiously, it is ciabatta, which literally means slipper, but any crusty bread will do. Some say that the expression scarpetta comes from the fact that a torn piece of bread looks like a little shoe. I prefer to think that it really refers to wiping your feet... as wiping the bottom of the plate. Because of the extreme poverty suffered by many of our Southern Italian ancestors, others think scarpetta refers to being so hungry that one would eat the soles of their shoes. Sadly, there is historic evidence of desperate people doing just that, so perhaps there is some truth here.  Scarpetta can work with the right OR left hand Scarpetta can work with the right OR left hand However, the tradition of using bread to clean up plates goes back to the time of the Romans. I remember reading in my Latin study book how Romans would use bread after a meal to clean their hands--soaking up the juices and olive oil on their hands--and also cleaning the bowls and the table. They would then pop the soppy bread into their mouths. Again, furbo... nothing is wasted. Fare la scarpetta is an ancient tradition indeed. Perhaps because of its links to Southern culture and Cucina Povera, some areas of Italy consider using a scarpetta bad taste, even though its taste is actually pretty good. Most do it at home or in more casual trattoria and less in more chic ristoranti. But they all do it. And if someone tells you that they don't do it in Tuscany... nonsense. In fact, it's one of the only ways to add flavor to their saltless Tuscan bread. (That stuff is so dry on your palette without salt!) You'd be well served to consider Tuscan bread more of an eating tool, like a spoon or fork, than a bread for eating by itself. You can also do what many Italians do and consider the philosophical meaning of the phrase, fare la scarpetta: Live life fully. Never leave crumbs behind. Soak up everything that life puts in front of you. --Jerry Finzi  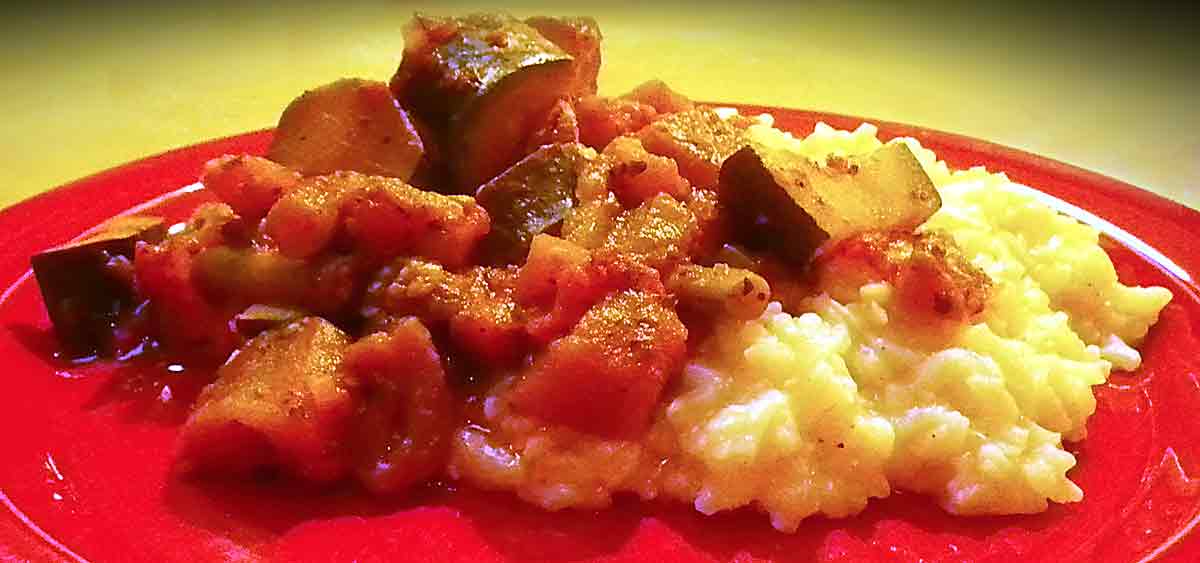 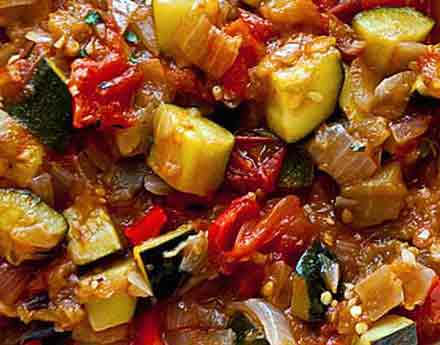 My son, Lucas loves the animated film Ratatouille, and so do Lisa and I. It's a wonderful jaunt through a vintage Parisian kitchen through the eyes of "Little Chef", a rodent who loves to cook. After seeing the film, Lucas wanted to make ratatouille, so we set out to do a rustic, delicious version and have made it many times since. But ever since re-discovering our Italian roots during our Grand Voyage of Italy, we have been concentrating more on Italian recipes. Well, this time we though we'd combine the best of both worlds--French country cuisine with the height of Italian culinary skills--in the making of a great risotto. I think we succeeded with our Ratatouille & Risotto. It's perfect for autumn or winter--a stick to your ribs supper. But this dish has two distinct personalities... the obvious simplicity of making the ratatouille--basically a vegetarian peasant stew--and the technically demanding risotto. For the Ratatouille Ratatouille is a very basic vegetable stew made in Provence and around Nice in southern France. It uses several basic ingredients: eggplant, zucchini, tomatoes, onion and pepper. There are many variations on the recipe, but the one I use is fairly rustic and traditional. Ingredients: 1 large Vidalia (sweet) onion - diced 1 bell pepper, diced 2 medium sized eggplant-skinned, cut into 3/4 -1" cubes, (the larger the eggplant, the more seeds and more bitterness) 5-6 whole garlic cloves 3-4 young, slim zucchini - skin on, sliced once lengthwise, then into 3/4" half moon slices, (smaller & younger are more sweet and less seedy) 1-16 ounce can of diced tomatoes (I use Del Monte, oregano & basil spiced, in summer use fresh heirloom paste tomatoes) 1 cup chicken (or vegetable) broth 1/4 cup port wine 1 tablespoon salt 2 tablespoons oregano 1 tablespoon rubbed sage 3 bay leaves (remove after cooking!) 40 cracks of fresh pepper (from a pepper mill, fine grind) 1/2 teaspoon hot pepper flakes Olive oil for sauteing
 For the Risotto We mainly use Arborio rice when we make risotto, but even better is if you can find Canaroli rice--it makes an even creamier risotto and is a bit more forgiving. The trick with making risotto is patience. It can take the better part of an hour or more--constantly adding broth and stirring--until the starchy exterior of the rice breaks down enough to make a creamy risotto, while still keeping a pasta-like "tooth" in the cooked rice. You don't want any crunch, there shouldn't be any mushy rice, and the texture when finished should be loose, glistening and creamy. While there are some tricks for making risotto faster, but there's no substitute for a strong arm and standing at the stove top for up to an hour... Ingredients: 2 cups arborio or carnaroli rice 2 tablespoons light olive oil 1 medium sweet onion (or half a large Vidalia)-diced finely 1 cup dry white wine (Frascati or Pinot Grigio, or one of your choice) 6 cups of chick or vegetable broth, heated in a saucepan (for ladling into the rice) 1/4 teaspoon salt 1/2 stick unsalted butter 1-1/4 cups of finely grated Parmigiano-Reggiano cheese (plus additional for topping off the dish)
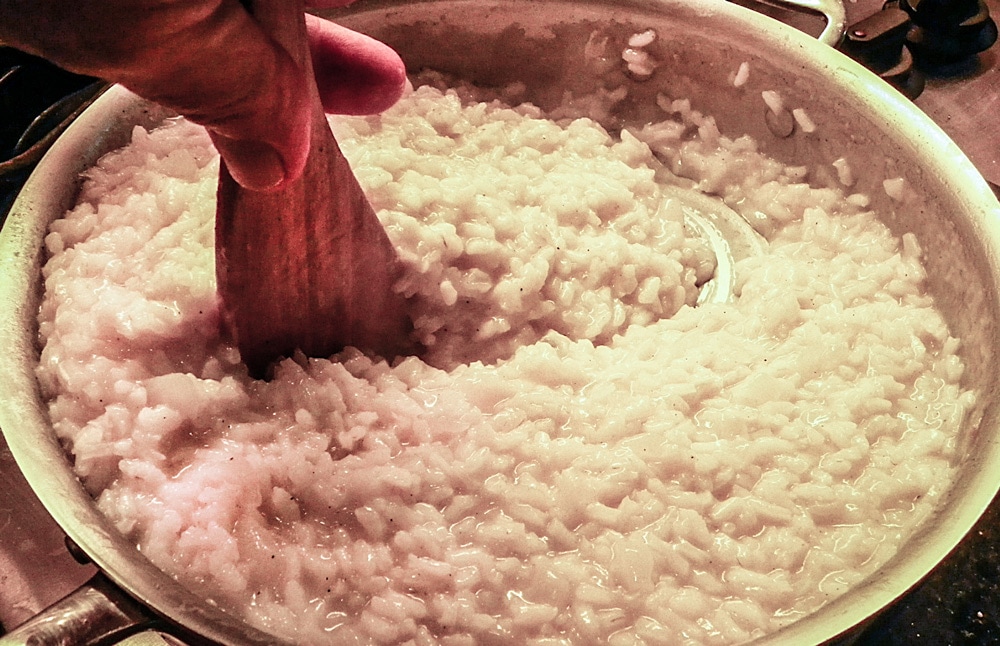 The "wave" slides in and closes itself behind your spoon as you drag it around the pan... è finito! Add the butter and cheese and serve. Toward the end, you will notice the starch in the rice being released to make a creamy consistency. Occasionally, taste the rice to make sure it is cooked through while still having a little bit of "tooth". You do not want it mushy, but you don't want crunch on individual grains. You will also know when the rice is nearing completion when you experience a sort of "wave" when you stir the rice, making a circular motion with the flat edge of your spoon around the bottom of the pan. Italian chef's call this the all'onda (wavy) effect. When your spoons passes and the rice behind it slides back in a slow motion like a silky wave, the risotto is at the right texture.
Some recipes say that this will take only 30-35 minutes, but I have found it takes me 45-65 minutes until the rice is cooked and getting creamy. Risotto should be served immediately when completed, so timing is key. But in the event you have to let your risotto sit for a bit, just leave covered, unheated... then before serving, revitalize it by heating it with a little bit more hot water on a medium low flame until the water is incorporated and it has reached the "wave" stage once again. To service, place a portion of the risotto on your plates and add some ratatouille on top, toward one side (let the creamy risotto show itself off too). You decide to have a hearty Italian Chianti or a nice French Bordeaux with the dish... after all, it does have a split-personality. I'd also like to add that the risotto recipes used in this dish is a basic risotto recipe. Once you learn how to make this, you can experience with adding all sorts of other things into the risotto... mushrooms, saffron, peas, shrimp, etc. And the ratatouille recipe is great topping a pizza, with pasta or even as a filling for a stuffed baked potato! Buon appetito! --Jerry Finzi Copyright 2016, Jerry Finzi/Grand Voyage Italy - All Rights Reserved
|

Archives
July 2023
Categories
All
|